Release 48.0 Notes 28 September 2025#
Summary#
In this release, we’ve developed the following new features and improvements:
AI Dashboard Insights functionality, which helps you better understand your dashboard data by identifying trends, patterns, and outliers across your dashboard widgets.
The Rebus Employee Portal app, which lets associates manage their shifts and track their productivity in real time on the floor through their Android devices.
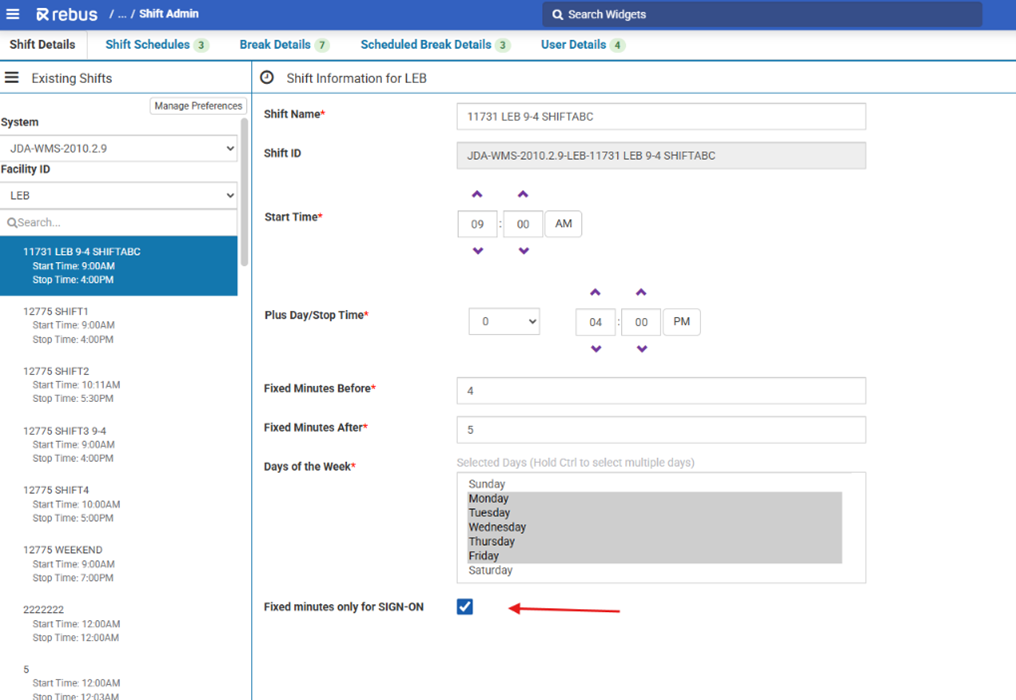
On the Shift Details screen, you can now apply fixed minutes for SIGN-ON only, instead of for all transactions. This gives you more control over how the system applies fixed minutes.
Changes to the Labor Associates screen that let you:
Manage Labor Groups,
Manage Labor Teams,
See Associate Shift Details,
Track Associates unassigned to any Group or Team.
Ability to import users via CSV from the User Admin page.
Widget Improvements#
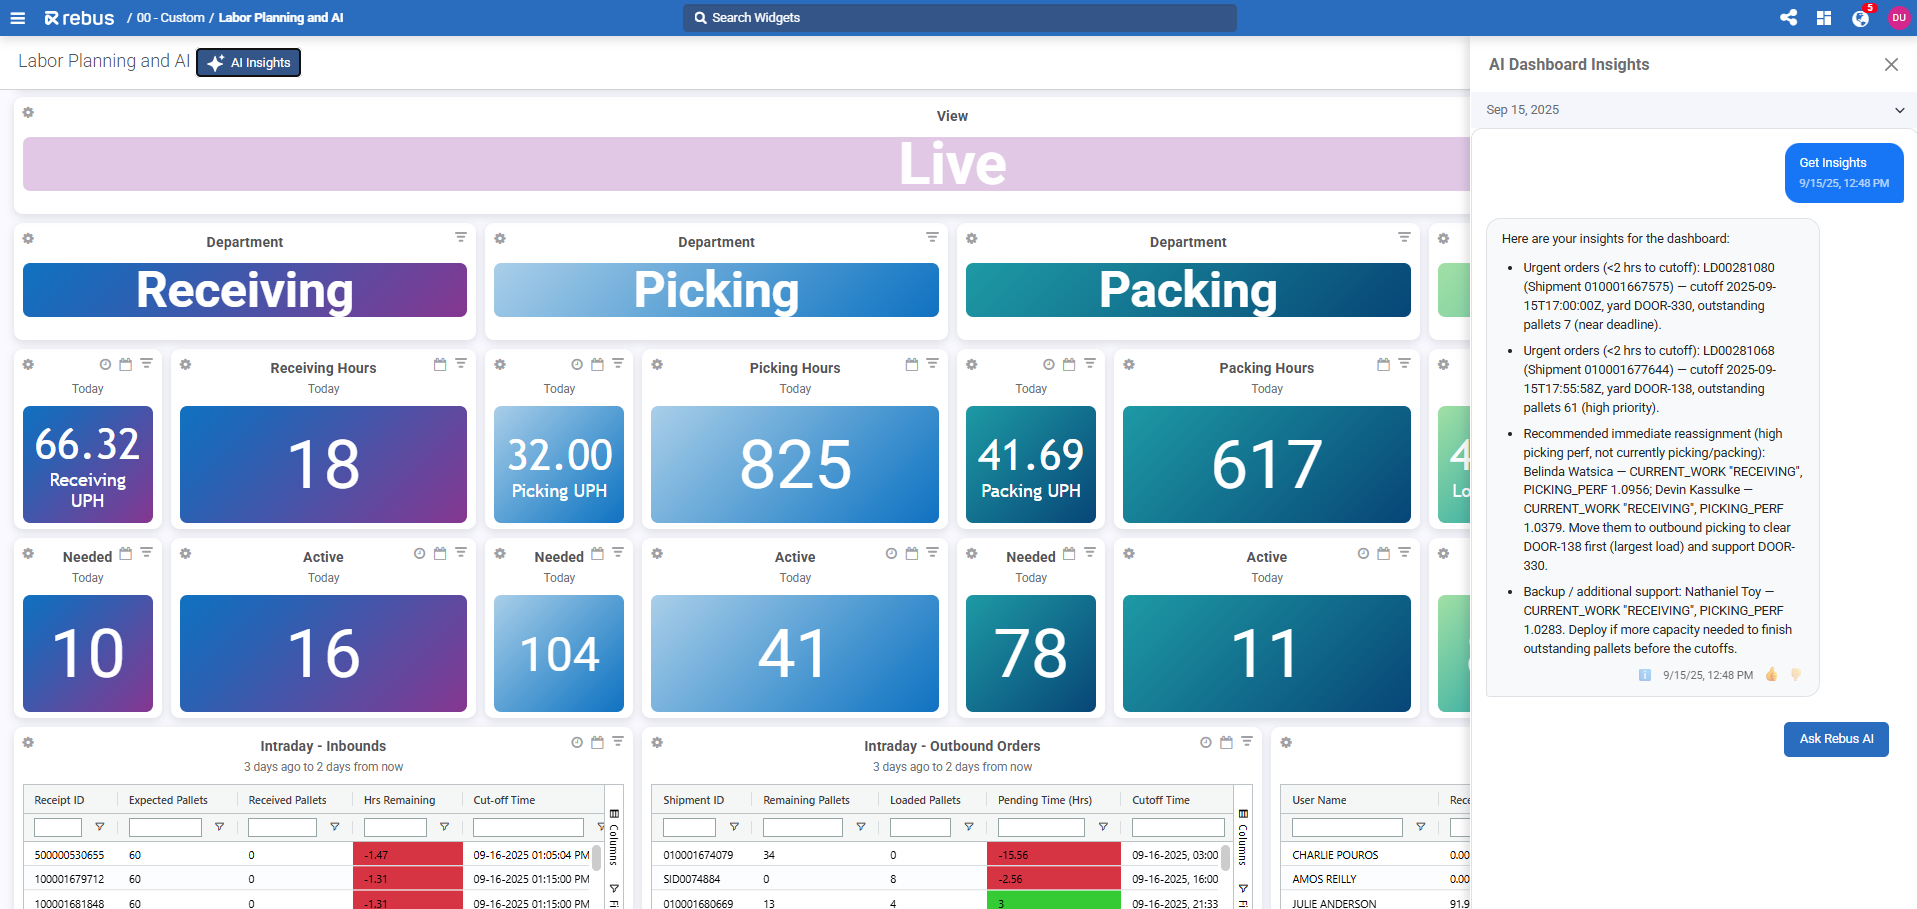
Understanding your Dashboard Data with AI Dashboard Insights#
AI Dashboard Insights helps you better understand your dashboard data by identifying trends, patterns, and outliers across your dashboard widgets, which then lets you make more informed decisions.
Watch Video demonstration of AI Dashboard Insights
To use the new AI Dashboard Insights feature:
Click on the AI Insights button on the top left of your dashboard.
The AI Dashboard Insights panel opens.
Click Ask AI.
The system will provide a widget summary that explains data trends and highlights any anomalies.
You can also keep track of previously generated AI insights by clicking the dropdown at the top of the insights panel. To get more information on the dashboard widgets that were analyzed, click the information icon at the end of your generated insight. This info includes names and descriptions of all analyzed widgets.
Rebus AI Dashboard Insights uses the widget Name and Description to help generate information. It’s important that your widget details accurately reflect the data in your widget. You should:
Be clear. Instead of having a title that reads “P-w12,” use “Pallets in Warehouse 12”.
Be precise. Instead of having a title of “Sales” and a description that reads “Monthly”, use the title of “Monthly Sales- North America” and a description that reads “Total gross revenue from all product lines in North America, grouped by month.”
Labor Improvements#
Managing Shifts through an Android Phone Mobile App#
The Rebus Employee Portal app lets associates manage their shifts and track their productivity in real time on the floor through their Android devices. Previously, they had to walk to a kiosk to use the Rebus Associate Portal in the Rebus web application.
Watch Video demonstration of Employee Portal mobile app
The app is currently only available for Android and can be found in the Google Play Store.
Setup in Rebus Step 1 of 2 : Setting up the Facility QR#
This QR code contains the information for your Facility and System. Associates must enter this information on their first sign in to the Associate portal Mobile App. Scanning this information from a barcode makes it more accessible and faster to sign in for the first time.
Go to System > Organization Admin > Facility Details.
Click on the Facility you want to create a QR code for.
Select the Mobile QR/Barcode button to set up the code.
Save and/or print this for easy scanning.
Setup in Rebus Step 2 of 2 : Setting up the First Time Pin for Associates#
Associates will also have to enter a PIN on the first login. Pins are set up in their User Profile on the Labor Associates screen. Each Associate’s Pin is unique and can also be used as the User ID.
Go to Labor > Labor Associates.
Select an existing associate you want to create a Pin for by clicking the pencil button and inputting the pin number at the bottom.
Click the 3 dots and select ‘Mobile QR/Barcode’ to save the User’s QR code.
You can also set a Pin when creating a new user. A ‘Mobile Pin’ column has been added to the to associate bulk import CSV template.
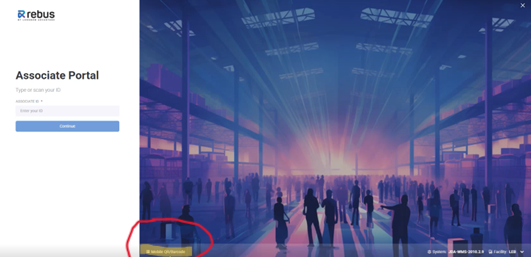
Associates Logging in for the First Time#
When you open the app, enter your credentials to sign in. You can either enter credentials manually, or by scanning a barcode provided by your facility that will automatically enter your details. You can generate a barcode from the Associate Portal screen, or from the Associates screen in Labor Associates when selecting a System and Facility.
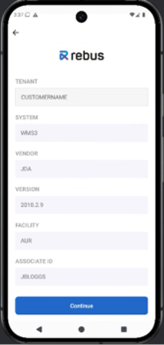
For your first sign in, you must enter the following information:
Tenant
System
Vendor
Version
Facility
Associate ID
You will also have to enter a PIN on their first login. User pins are set up in their User Profile on the Labor Associates screen.
After the first sign in, all the details except User ID are cached when you log out. The only thing you must enter or scan to sign in going forward is your User ID.

Once signed in, you can access 3 different screens:
the Home page (read-only)
the Employee Portal Screen
the Employee Profile (read-only)
The Home Page#
On the Home page, you have a summary of your performance from both today and the previous day. It is read-only.
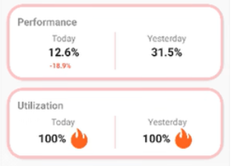
In the Performance section, you can see your performance percentage from the past 2 days. This data is pulled from the Activity Adjustment Screen. The Utilization section tells you whether you worked over the past 2 days. Utilization is 100% if you’re working, and 0% if you’re not.
The Employee Portal Screen#
Once you sign in, the mobile Employee Portal functions the same way as the Associate Portal screen in the Rebus web application. You can:
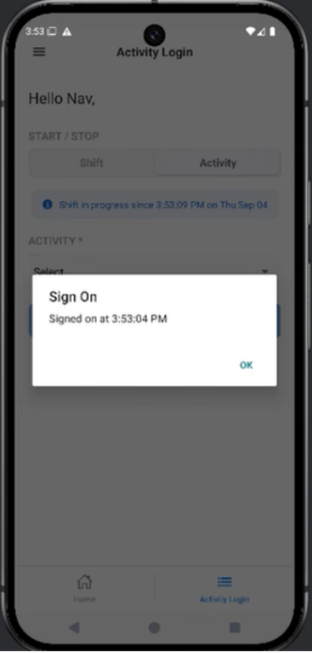
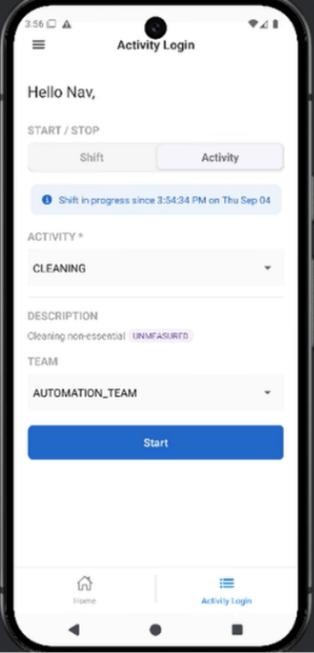
Start & stop a shift through the Shift tab
Log an activity through the Activity tab
To start or stop a shift, press either Start or Stop in the Shift tab. You will get a popup telling you what time you signed on or off. To log an activity, navigate to the Activity tab and select your desired activity from the dropdown. If applicable, select the Team you want to capture performance under. Press Stop.
The Employee Profile#
You can access the Profile page through the lefthand navigation in the mobile app. This page is read-only. Here, you can view your user information, including identifying information, your hire date, team, and group.
Allowing Extra Time for Sign-On Events Only#
On the Shift Details screen, you can now apply fixed minutes for SIGN-ON only, instead of for all transactions. This gives you more control over how the system applies fixed minutes.
Fixed minutes are the extra time before or after a shift (for example, 10 minutes early or late). With fixed minutes, if your shift starts at 9:00 and you sign on at 8:55, the system records your start time as 9:00.
With the new update, if the ‘Fixed minutes only for SIGN-ON’ box is checked, fixed minutes only applies to SIGN-ON activities. Other entries, like an activity entered at 8:55, will stay recorded at 8:55.
Easier to Log ‘Unmeasured’ Activities on Associate Portal screen#
On the Associate Portal screen, ‘non-essential’, ‘essential with Kiosk toggle on’ and ‘unmeasured’ activities will no longer have an Enter Quantity field. This makes it easier and quicker to log activities that don’t require a quantity other than 1 to be entered.
All Associate Details Managed through Single Screen#
The Labor Teams screen is now integrated into the Labor Associates screen. You can search for teams by Team Name, Member Name or ID, and team members are now sorted according to your Labor Preferences setting.
To access the Labor Teams screen, navigate to the Labor Associates page from the main menu navigation, and then click the Teams tab. Here, you can create new teams and edit and sort existing teams.
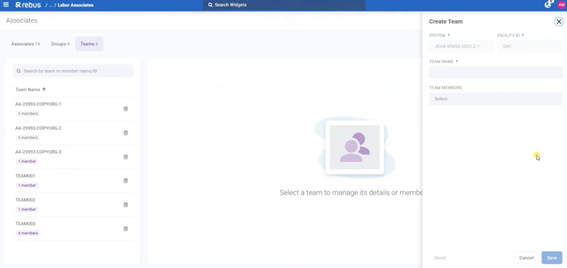
Previously, Labor Teams was its own screen and accessible through the left navigation. Now, all Associate information can be managed in one place, which makes it easier to view and make changes to Labor Associates and Teams.
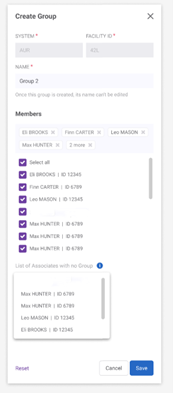
Labor Groups Managed through Associates Screen#
The Labor Groups screen, previously known as Labor User Group Admin, is now integrated into the Labor Associates screen. You can search for groups by Group Name, Member Name or ID. Associate Group Name is available as an optional field when you import or export Associates via CSV.
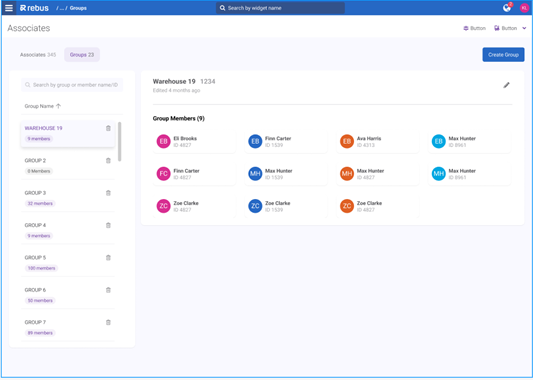
Previously, Labor Groups was an independent screen and accessible through the left navigation. Now, all Associate information can be managed in one place, which makes it easier to view and make changes to Labor Associates and Teams.
To edit a group, click the pencil icon next to the group name. You can only add or remove group members.
To create a group, select the Create Group button and fill in the necessary information in the tab.
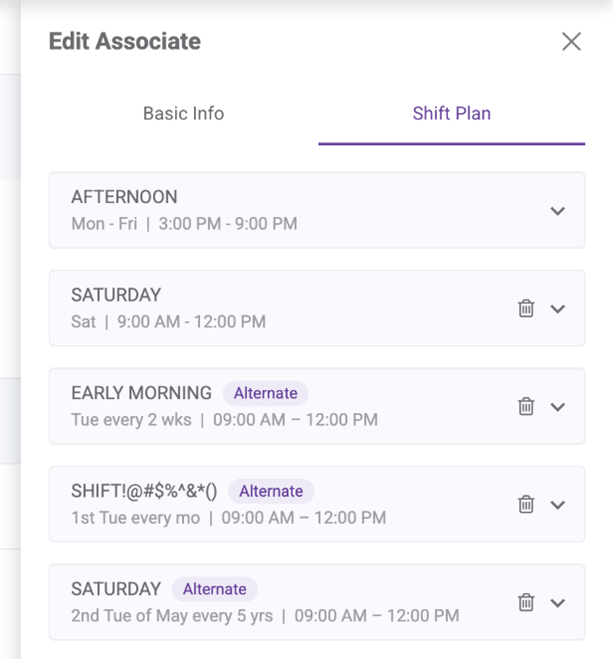
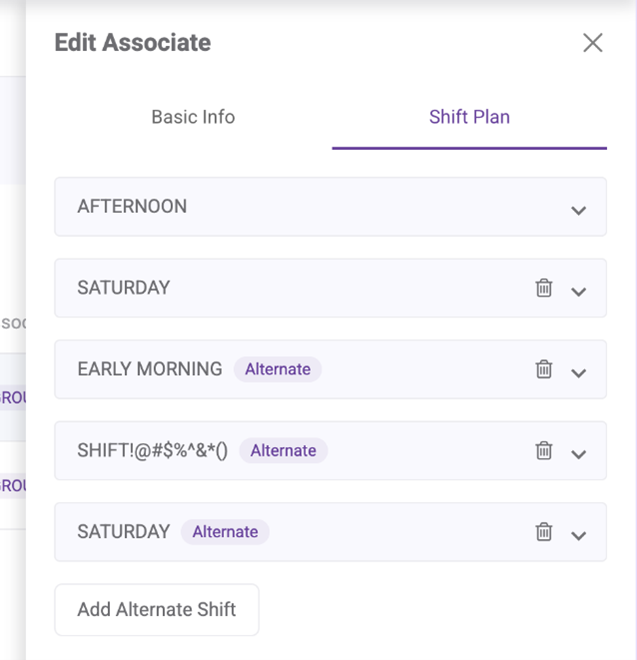
Reviewing Associate’s Shift Details Now Easier#
On the Labor Associates screen, the Shift Plan tab now displays shift summaries under each shift section. These details include the days, hours and recurrence of each shift. This makes it easier and quicker to review the shift details of an associate.
Labor Associates Page Now#
Labor Associates Page Before#
Easier to Track Associates with No Shift#
You can now filter your Labor Associates list to only view the associates who have no shift assigned. This lets you identify associates without shifts more quickly.
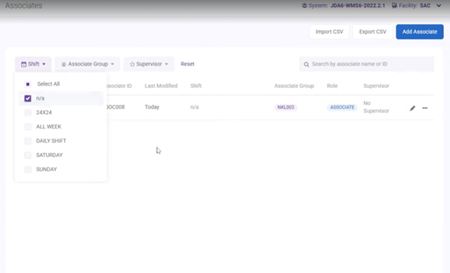
On the Labor Associates page, when you click the Shift filter, there is a new “n/a” option. When you select this filter, only Associates without shifts are displayed.
Easier to Track Associates with No Group#
On the Labor Associates page, associates with no group, shift or supervisor now appear in the Associate List. Previously, this type of associate was hidden from the list. This makes it easier to identify and assign these associates to groups.
You can filter for an associate with no group using the new n/a option in the Associate Group filter.
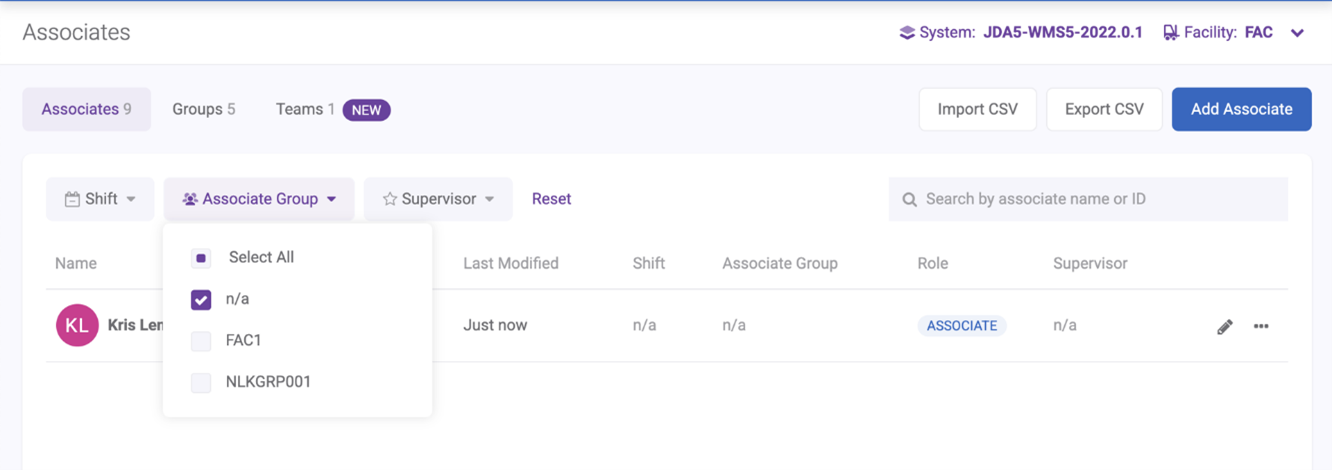
Associates with no group appear in every facility in the system since they are not tied to a group.
Note
 If a supervisor has no group or shift, you can still link associates to them. However, if the supervisor is then added to a new group and the previously linked associates are in a different facility from the supervisor, the associates will automatically unlink from this supervisor.
Admin Screen Improvements#
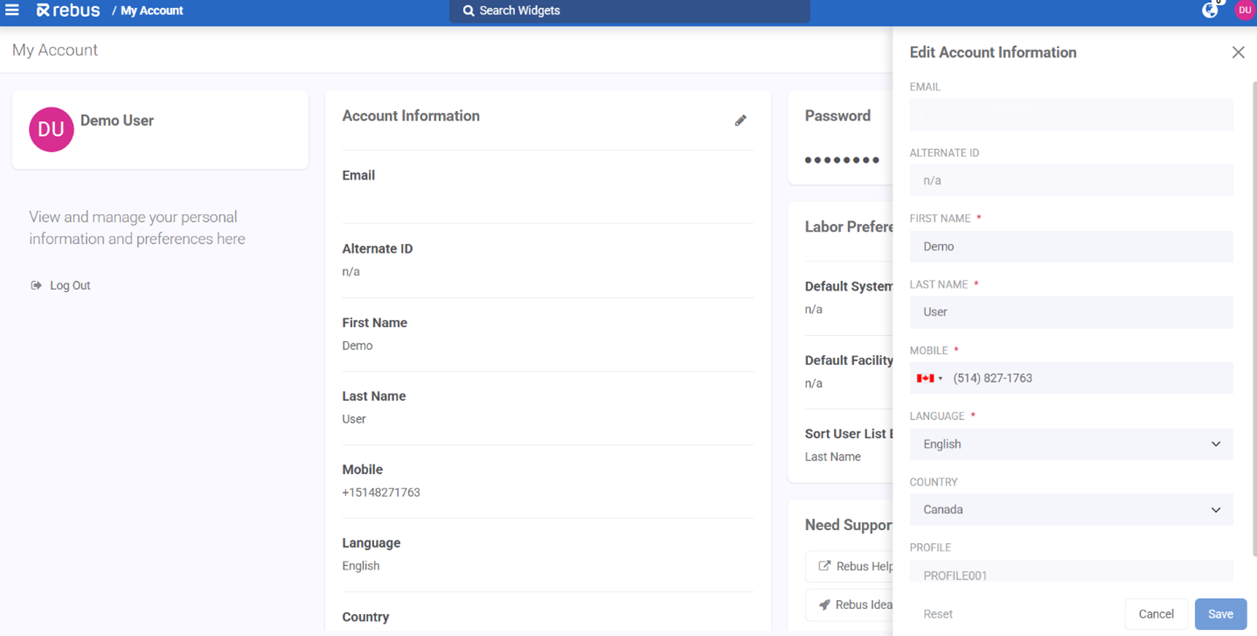
Easier to Edit User Details#
In the User Account and User Admin screens when you make changes in the Edit panel:
The Save button becomes clickable only when you’ve made changes.
The Reset button becomes clickable only when you’ve made a change or there’s an error. Clicking Reset will undo all changes.
Importing New Users via CSV#
You can now import users via CSV from the User Admin page. The new ‘Import CSV’ button lets you quickly add or update multiple users at once.
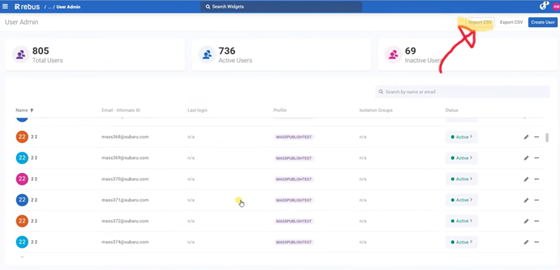
You can add new users in bulk, and you can also update pre-existing users’ information. If the CSV includes an email address that already exists in the list, it will update the user’s information.
The CSV should have the following fields, in this order:
Email Address (required)
Alternate ID (optional)
Authentication Method (required)
Profile (required)
Isolation Groups (optional)
Previously, you could only export a list of users as a CSV file and had to add or update users individually.
Bug Fixes#
Associate Portal-Invalid Error message when user provides an Associate ID that exists in other system
Labor Associates: User should not get delete icon when an alternate shift exists