Integrating Rebus#
Single Sign-On and its Benefits#
Single sign-on (SSO) lets you access multiple configured applications with a single set of credentials. When you try to login to a configured application, a request is made to the identity provider, which verifies your authentication and logs you in.
Unlike local users, SSO users don’t have to enter a username and a password to access their Rebus application. Rebus lets you configure single sign-on through OAuth with Azure.
Setting up Single Sign-On with OAuth#
Open Authorization (OAuth) is a token-based authentication and authorization standard that allows a third-party service like Rebus to use users’ account information to log them in. Rebus allows you to configure OAuth Office 365. When you login to Rebus using Office 365, Windows Azure checks that Rebus is registered with Office 365 and issues to your web browser session two tokens, which allow you to access and use Rebus.
Note
 Once you configure OAuth for a user, they won’t be able to access Rebus locally by entering a username and a password. They will only be able to access it by clicking ‘Sign with Microsoft’ on the login page.
Pre-requisites#
You must be an administrator for your company’s Microsoft 365.
You must have administrator permissions in your company’s instance of Rebus.
Step 1 of 2: Register Rebus with Microsoft 365#
After the integrating Rebus to Office 365 and conifguring single sign-on, you will be able to login to Rebus using your Office 365 credentials in Rebus.
In your web browser, open Rebus Login page and then select the Admin button. The ‘First Time Configuration’ button appears.
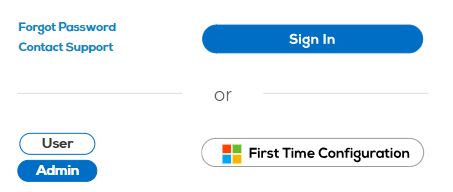
Click ‘First Time Configuration’. You are prompted to login to Office 365.
3. Login to your company’s instance of Office 365 using your administrator credentials. A permissions page for Rebus displays. The permissions that the Rebus application requests are shown below:
Read and write user and shared calendars
Create, read, update, and delete user tasks
Read and write users’ relevant people lists (preview)
Read user contacts
Send mail as a user
Read and write user mail
Send/Receive Instant Messages (preview)
Send/Receive Public Switched Telephone Network (PSTN) (preview)
Send/Receive Audio and Video (preview)
Receive conservation invites (preview)
Initiate conversations and join meetings
Read directory data
Note
 Even when Rebus is integrated with Office 365, Outlook data is NEVER stored on Rebus itself.
Approve the permissions.
Step 2 of 2 : Set up Your Rebus Users as OAuth Users#
In a new tab, log into Rebus and select Administration -> Users Administration -> User Admin. You are at the User Admin screen.
Do the following for each user whom you want to be able to login through his or her Office 365 account.
Find the user account in the Existing Users list. You can filter the list by entering the name into the ‘Search’ box.
Select the user account and make the following changes:
Set Local Authentication to ‘No’.
In the Authentication Method field, select ‘OAuth-Office 365’ .
Click ‘Save’.
Result#
You have integrated your company’s Office 365 with Rebus. The users whose authentication method is set to Oauth-Office 365 can now login using their Office 365 credentials and access Outlook functionality through Rebus.
Setting up Single Sign-On with SAML#
Single sign-on (SSO) lets you access multiple configured applications with a single set of credentials. When you try to login to a configured application, a request is made to the identity provider, which verifies your authentication and logs you in.
Unlike local users, SSO users don’t have to enter a username and a password to access their Rebus application. Rebus lets you configure single-sign on through SAML for Google, Azure, Onelogin, Okta or your own identity provider, and through OAuth with Azure.
The Security Assertion Markup Language SAML is a security standard that allows identity providers to pass authorization credentials to service providers like Rebus. By configuring single sign-on through SAML, you can access Rebus directly from your identity and access management provider portal.
Pre-requisites
You must be an administrator for your company’s IdP.
You must have administrator permissions in your company’s instance of Rebus.
- You must have your organization’s ID. To obtain it:
Open your Rebus application and go to Administration > Organization Admin > Organization details and copy the organization ID at the top of the page.
Consult one of the following procedures according to your identity provider:
Azure AD#
Step 1 of 3: Configure a Rebus App for SAML in Azure AD#
Access Azure AD as an admin and click ‘Portal’.
Go to Azure Active Directory > Enterprise Application and click ‘New Application’.
Select ‘Non-Gallery Application’, enter a name for your new app, and click ‘Add’.
Select ‘Assign a user for testing’, choose a test user, and click ‘Assign’.
Go back to the configuration menu, select ‘Single Sign-On’, and click ‘SAML’.
Open the ‘Basic SAML Configuration’ page, fill in the following fields, and click ‘Save’:
Field Name in Azure |
What to Enter… |
|---|---|
Identifier (Entity ID) |
https://analyticslb1.rebusap.com/login/SAML?eid= **rebus**
|
Reply URL (ACS URL) |
https://analyticslb1.rebusap.com/login/SAML?oid= **[your Organization ID]**
|
Open the ‘SAML Signing Certificate’ configuration page and make sure that the ‘Signature Option’ and ‘Signing Algorithm’ correspond to your organization’s.
Download the Certificate (Base64) in the ‘SAML Signing Certificate’ section and open it in a text editor.
Step 2 of 3: Configure SAML in Your Rebus Application#
In another window, open your Rebus application and go to Admin Tools > System > Organization Admin > SAML.
Fill out the form. To add a certificate, click the ‘+’ sign.
Field Name in Rebus |
What to Enter… |
|---|---|
IDP Name |
Select Azure. |
Entry Point |
Paste the Login URL provided in the Set Up section of your app on the Azure AD page. |
Issuer |
Paste the Azure Ad Identifier link provided in the Set Up section of your app on the Azure AD page. |
Signature Algorithm |
Select the SAML signature algorithm used by your organization. It should be the same as the Signing Algorithm you selected in Azure. |
Signature Level |
Select the type of signature your organization is using for SAML. |
Certificate |
Copy and paste the certificate you previously downloaded. |
Click ‘Activate’.
Step 3 of 3: Set up Your Rebus Users as SAML Users#
In Rebus:
Go to Admin Tools > Users > User Admin and select the user you want.
Toggle the ‘Local Authentication’ field to no.
The ‘Authentication Method’ field appear. Select SAML -2.0 as the authentication method.
Click ‘Save’.
In Azure AD:
Open the ‘Users and Groups’ page and click on ‘+Add user’.
Select the user of your choice and click ‘Assign’.
Result#
You have now configured single sign-on with SAML for your Rebus application. To access Rebus, login to your IdP and click on the Rebus App.
Google#
Step 1 of 3: Configure a Rebus App for SAML in Google#
Access your Google application and go to the Admin page.
Select Apps > SAML app and click the ‘+’ sign at the bottom of the page.
Click ‘Setup my own Custom App’.
Copy and paste the SSO URL and the Entity ID in a text editor, download the certificate and click ‘Next’.
Enter a name for your application and click ‘Next’.
You are at the Service Provider Details page. Fill the following fields and click ‘Next’, and then ‘Finish’:
Field Name in Google |
What to Enter… |
|---|---|
ACS URL |
https://analyticslb1.rebusap.com/login/SAML?oid= **[your Organization ID]**
|
Entity ID |
Your organization ID |
Signed Response |
Check the box if your organization’s signature level for SAML is a signed response. |
Click ‘Edit Service’ and make sure that the ‘Service Status’ is selected for everyone.
Click ‘Save’.
Step 2 of 3: Configure SAML in Your Rebus Application#
In another window, open your Rebus application and go to Admin Tools > System > Organization Admin > SAML.
Fill out the form. To add a certificate, click the ‘+’ sign.
Field Name in Rebus |
What to Enter… |
|---|---|
IDP Name |
Select Google. |
Entry Point |
Paste the SSO URL you copied from Google. |
Issuer |
Paste the Entity ID you copied form Google. |
Signature Algorithm |
Select the SAML signature algorithm used by your organization. |
Signature Level |
Select the type of signature your organization is using for SAML. |
Certificate |
Paste the X.509 Certificate. |
Click ‘Activate’.
Step 3 of 3: Set up Your Rebus Users as SAML Users#
In your Rebus application, go to Admin Tools > Users > User Admin and select the user you want.
Toggle the ‘Local Authentication’ field to ‘No’.
The ‘Authentication Method’ field appear. Select SAML -2.0 as the authentication method.
Click ‘Save’.
Result#
You have now configured single sign-on with SAML for your Rebus application. To access Rebus, login to your IdP and click on the Rebus App.
OKTA#
Step 1 of 3: Configure a Rebus App for SAML in Okta#
Access your Okta application as an admin.
Click ‘Add application’.
Select SAML 2.0 as the sign on method and click ‘Create’.
Add a name for your SAML app and click ‘Next’.
Fill in the following fields and click ‘Next’:
Field Name in Okta |
What to Enter… |
|---|---|
Single Sign-On URL |
https://analyticslb1.rebusap.com/login/SAML?oid= **[your Organization ID]**
|
Audience URI (SP Entry ID) |
Your organization ID |
Click ‘Show Advanced Settings’ and make sure that the signature type and the signature algorithm correspond to your organization’s. Click ‘Next’.
Select the type of customer you are and click ‘Finish’.
Open ‘View Setup Instructions’ and go to step 2.
Step 2 of 3: Configure SAML in Your Rebus Application#
In another window, open your Rebus application and go to Admin Tools > System > Organization Admin > SAML.
Fill out the form. To add a certificate, click the ‘+’ sign.
Field Name in Rebus |
What to Enter… |
|---|---|
IDP Name |
Select Okta. |
Entry Point |
Paste the Identity Provider Single Sign-On URL provided on the Okta page. |
Issuer |
Paste the Identity Provider Issuer link provided on the Okta page. |
Signature Algorithm |
Select the SAML signature algorithm used by your organization. It should match the signature type you selected in Okta. |
Signature Level |
Select the type of signature your organization is using for SAML. It should match the signature algorithm you selected in Okta. |
Certificate |
Paste the X.509 Certificate. |
Click ‘Activate’.
Step 3 of 3: Set up Your Rebus Users as SAML Users#
In Rebus:
Go to Admin Tools > Users > User Admin and select the user you want.
Toggle the ‘Local Authentication’ field to no.
The ‘Authentication Method’ field appear. Select SAML -2.0 as the authentication method.
Click ‘Save’.
In Okta:
Open the ‘Assignments’ tab of your newly created SAML app.
Click ‘Assign’ and select either ‘Assign to People’ or ‘Assign to group’.
Select the users or groups of users for which you want to configure SAML and
click ‘Done’.
Result#
You have now configured single sign-on with SAML for your Rebus application. To access Rebus, login to your IdP and click on the Rebus App.
OneLogin#
Step 1 of 3: Configure a Rebus App for SAML in OneLogin#
Access your OneLogin application as an admin and go to Application > Application.
Click ‘Add app’ and select ‘OneLogin SAML Test (IdP)’.
Add a name for your SAML app and click ‘Save’.
In the menu, click ‘Configuration’.
In the ‘SAML Consumer URL’ field, enter the following link appended by your organization’s ID:
https://analyticslb1.rebusap.com/login/SAML?oid= **[your Organization ID]**
Click ‘Save’ and select ‘SSO’ from the left-hand side menu.
Select the ‘SAML signature algorithm’ used by your organization.
Step 2 of 3: Configure SAML in Your Rebus Application#
In another window, open your Rebus application and go to Admin Tools > System > Organization Admin > SAML.
Fill out the form. To add a certificate, click the ‘+’ sign.
Field Name in Rebus |
What to Enter… |
|---|---|
IDP Name |
Select OneLogin. |
Entry Point |
Paste the SAML 2.0 Endpoint (HTTP) provided on the OneLogin page. |
Issuer |
Paste the Issuer URL link provided on the OneLogin page. |
Signature Algorithm |
Select the type of signature your organization is using for SAML. |
Signature Level |
Select the type of signature your organization is using for SAML. |
Certificate |
Paste the X.509 Certificate that appears when you click on View Details in Onelogin. |
Click ‘Activate’.
Step 3 of 3: Set up Your Rebus Users as SAML Users#
In Rebus:
Go to Admin Tools > Users > User Admin and select the user you want.
Toggle the ‘Local Authentication’ field to ‘No’.
The ‘Authentication Method’ field appear. Select SAML -2.0 as the authentication method.
Click ‘Save’.
In OneLogin:
Select ‘Users’ from the ‘Users’ menu.
Click on the user for which you want to configure SAML.
Select ‘Applications’ in the left-hand side menu and click on the ‘+’ sign.
Select your newly added app and click ‘Continue’.
Result#
You have now configured single sign-on with SAML for your Rebus application. To access Rebus, login to your IdP and click on the Rebus App.
Self#
Step 1 of 3: Configure a Rebus App for Your Identity Provider#
Add a SAML 2.0 application in your IdP.
Your Rebus Assertion Consumer Service (ACS) URL is the following URL appended by your organization’s ID:
https://analyticslb1.rebusap.com/login/SAML?oid= **[your Organization ID]**
Step 2 of 3: Configure SAML in Your Rebus Application#
Field Name in Rebus |
What to Enter… |
|---|---|
IDP Name |
Select Self. |
Entry Point |
This is your IdP’s single sign-on on URL, or the address of your IdP’s 2.0 Endpoint. |
Issuer |
This is your IdP’s issuer URL, or its entity ID. |
Signature Algorithm |
Select the SAML signature algorithm used by your organization. |
Signature Level |
Select the type of signature your organization is using for SAML. |
Certificate |
Copy and paste your IdP’s certificate. |
Click ‘Save’ and ‘Activate’.
Step 3 of 3: Set up Your Rebus Users as SAML Users#
In your Rebus application, go to Admin Tools > Users > User Admin and select the user you want.
Toggle the ‘Local Authentication’ field to ‘No’.
The ‘Authentication Method’ field appears. Select SAML -2.0 as the authentication method.
Click ‘Save’.
Make sure that your users are also identified as SAML users in your IdP.
Result#
You have now configured single sign-on with SAML for your Rebus application. To access Rebus, login to your IdP and click on the Rebus App.
Setting Up Service Provider (SP) Initiated SAML#
You can set up service provider (SP) initiated Security Assertion Markup Language (SAML) authentication in your Rebus environment. With SP-initiated SAML, users can be authenticated through an Identity Provider (IdP) like Okta or Azure when they login to Rebus through the Rebus login page. Through SP-initiated SAML, users access Rebus through their phones or other mobile devices.
In IdP-initiated SAML, users have to login to the IdP first, and then click on a button to access Rebus. You can have both SP and IdP-initiated SAML authentication working at the same time in your Rebus environment.
In SAML terminology, the service provider is the entity providing the service (e.g., Rebus) and the Identity Provider (IdP) is the entity providing the identities and the ability to authenticate a user.
Setting up your Rebus environment for SP-initiated SAML involves two procedures:
Setting up the SAML tab on the Org Admin screen, and
Setting up the Users who will be accessing via SP-initiated SAML.
Setting Up the Org Admin Screen for SP-initiated SAML#
Prerequisite:
Your Rebus environment is already set up for IdP-initiated SAML
Go to the Admin Tools -> System -> Organization Admin screen and then click on the SAML tab. You are at the SAML tab.
Toggle the ‘Allow SP Authentication’ flag to ‘Yes’. Four fields appear underneath the flag.
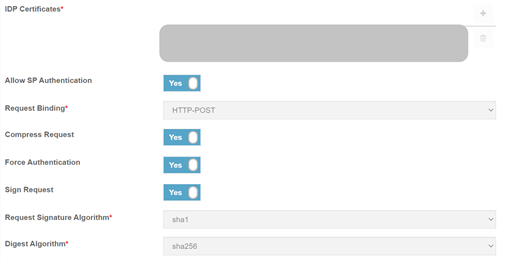
Fill in the SAML tab fields that pertain to setting up SP-initiated SAML:
Field
What you Enter…
Request Binding
Select the mechanism that will be used to transport SAML protocol messages:
HTTP POST enables SAML protocol messages to be transmitted within an HTML form by using base64-encoded content.
HTTP redirect enables SAML protocol messages to be transmitted within URL parameters.
Compress Request
Whether to compress the authentication requests to the IdP.
Force Authentication
Whether users are forced to login again if they close a browser tab or window displaying Rebus and then try to access Rebus again.
Sign Request
Whether authentication requests to the IdP are digitally signed
Request Signature Algorithm
Select the algorithm used to digitally sign authentication requests sent to the IdP.
Digest Algorithm
Select the algorithm used to generate a hash of the authentication request.
Click ‘Save’. Your Rebus environment is now set up for SP-initiated SAML authentication. Now you must set up the users who will be signing into Rebus through SP-initiated SAML.
Setting up Users for SP-initiated SAML#
To set up a user for SP-initiated SAML, do the following:
In the Menu, select Administration -> Users Administration -> User Admin. You are at the User Admin screen.
Select the user that you want to set up to access Rebus through SP-initiated SAML. The user’s details appear in the User Information screen.
Toggle the Local Authentication flag to ‘No’. The Authentication Method dropdown box appears.
In Authentication Method, select ‘saml-2.0’.
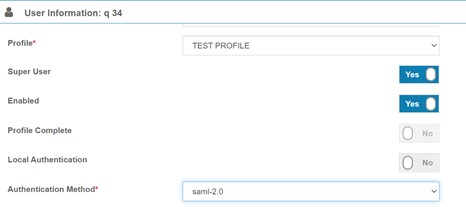
Click ‘Save’. The user is set up to access Rebus through SP-initiated SAML.
Accessing Rebus from your tablet or phone#
You can download Rebus apps for both Android and iOS devices. In the utiities bar of the Rebus web application, click  and then select either the Android or Apple icon.