Labor Admin - Setting Up#
This topic goes over how to set up the Labor Module.
What you need to know before you get started#
How the Labor Module gets its data#
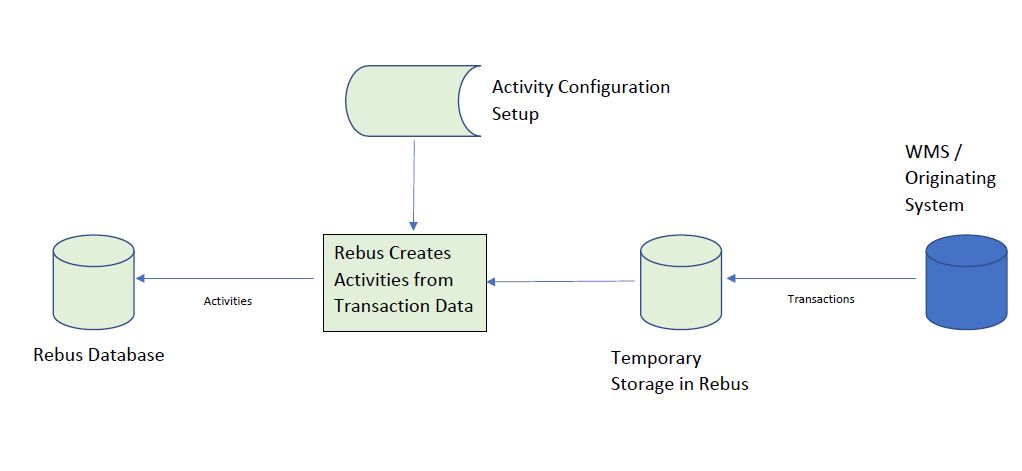
At specific intervals, Rebus pulls data from a transactions table in the WMS and stores it in Rebus. Rebus refers to the activity configuration to convert transactions into activities, which are stored in Rebus. Labor widgets refer to this data.
Activities#
To convert transactions in your WMS into activities, Rebus refers to how transaction types are mapped to valid activity types. This mapping can be set up in two ways:
Set up an activity type for a particular transaction type. In this case, each transaction of that type is converted into an activity of the activity type that’s set up for that transaction type.
Set up an activity group to dynamically create activities of a particular activity type.
Organize Activities together for Reporting Purposes#
When setting up an activity type, you have the option of applying a work category. Activities that share the same work category can have their data grouped together when displayed in widgets and reports.
For more on setting up activity groups, see Setup Procedure 5 of 7: Setting up Activity Groups.
For more on setting up activity types, see Setup Procedure 6 of 7: Setting up Activity Types for Imported Transactions.
Fatigue Allowance#
When setting up an activity type, you can add fatigue factors—a default and up to 24 additional ones—so that the right fatigue allowance is dynamically calculated and added to all activities’ total goal time for a given activity type.
The fatigue allowance of an activity is calculated as follows:
Fatigue allowance = fatigue factor*base goal time
The base goal time of an activity is calculated by multiplying the default time measurement of the activity type by the processed quantities of the unit of measure (UOM). The default time measurement and UOM are configured in Setup Procedure 6 of 7: Setting up Activity Types for Imported Transactions.
Here’s an example of how Rebus calculates the total goal time with the fatigue allowance:
Note
 The fatigue allowance will be calculated only if you turn on the feature in the activity type’s configuration screen.
Sequence |
Rebus Processing Notes |
|---|---|
1 |
The PUTAWAY activity’s base goal time is 5000 seconds. |
2 |
Fatigue Factor for the PUTAWAY activity type is added: 5% |
3 |
The PUTAWAY activity’s total goal time is: Fatigue allowance + base goal time = (Fatigue Factor * base goal time) + base goal time = 0.05*5000 + 5000 = 5250 seconds |
In the Activity Adjustment table, you can see an activity’s fatigue allowance under the Fatigue Seconds column, and how it’s added to the total goal time (i.e., the Standard Seconds column).

For more information on fatigue factors, see More about Fatigue Factors.
More about Fatigue Factors#
To capture more accurate labor performance data, you can add up to 24 fatigue factors besides a default fatigue factor.
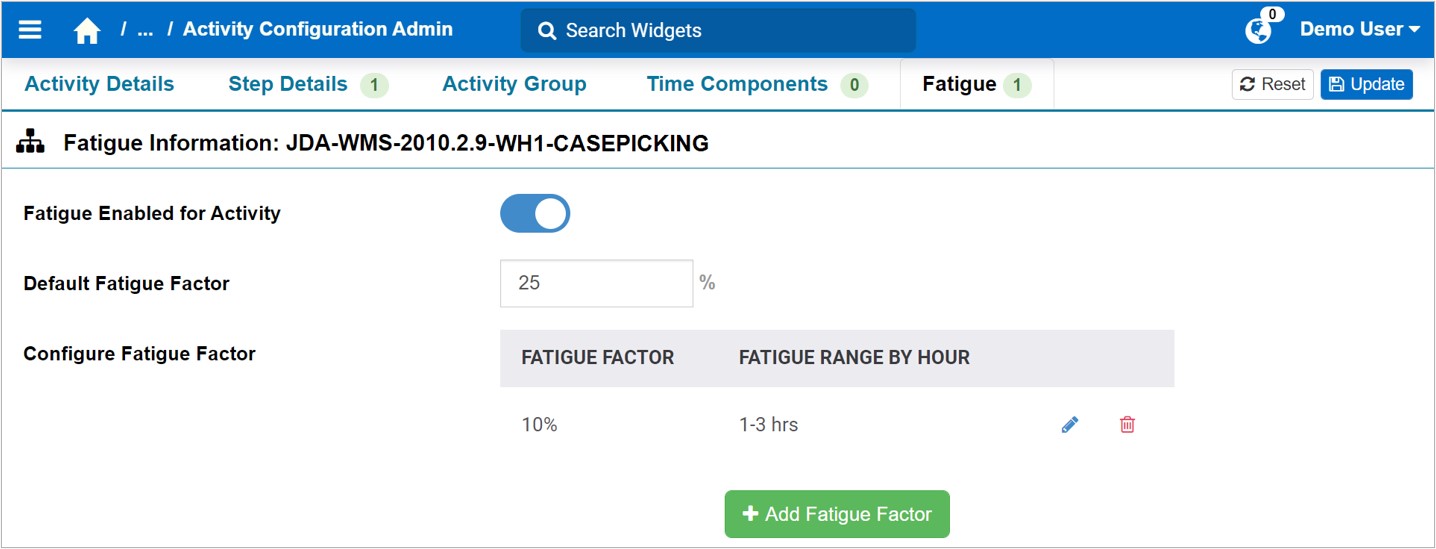
How Added Fatigue Factors Work
For each added fatigue factor, add a fatigue range (i.e., the range of hours worked). When an imported transaction is turned into an activity, Rebus applies the right fatigue factor based on the fatigue range to calculate the fatigue allowance.
Here’s an example of how Rebus applies the right fatigue factor based on the fatigue range to calculate the fatigue allowance.
Sequence |
Rebus Processing Notes |
|---|---|
1 |
The PICK activity’s base goal time is 2000 seconds. |
2 |
Default Fatigue Factor for the PICK activity type is 25%. |
3 |
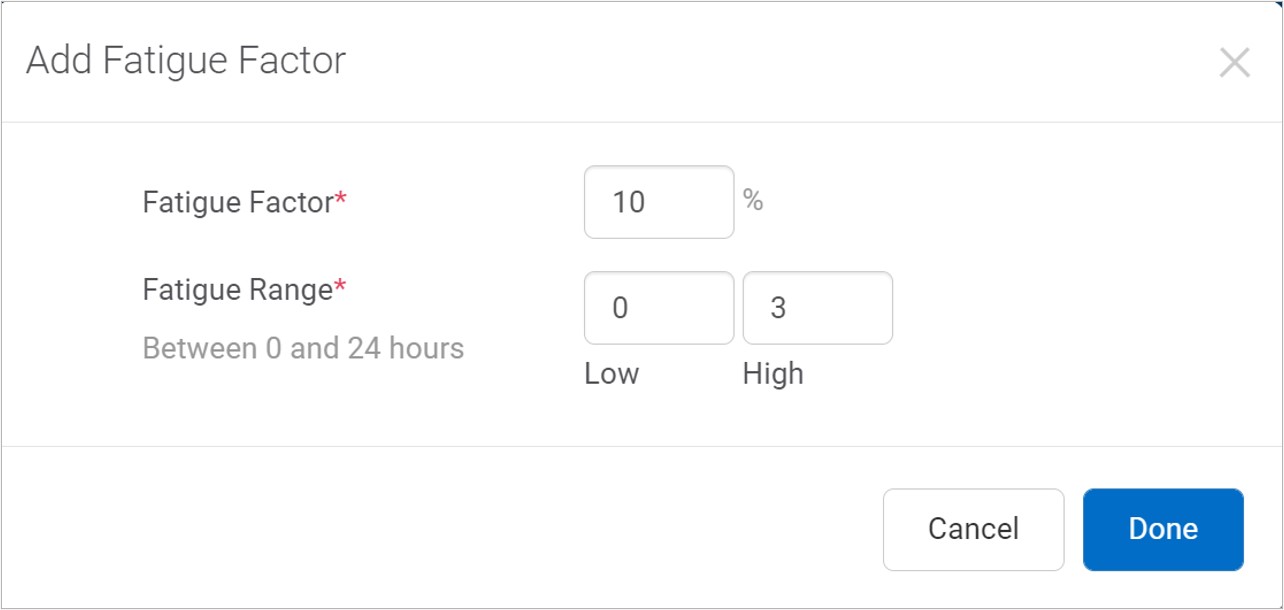
Another Fatigue Factor is added:
|
4 |
Labor Associate’s PICK transaction is imported and carries the following information:
|
5 |
Rebus calculates the fatigue range for the PICK activity: Fatigue range = PICK’s Min_Stop_Date_Local — Shift Start Time = 10:00 AM – 8:00 AM = 2 hours |
6 |
The fatigue range for the PICK activity (2 hours) falls within the 10% fatigue factor’s fatigue range (i.e., greater than 1 hour and less than 3 hours). |
7 |
Rebus applies the 10% fatigue factor to calculate the fatigue allowance and adds it to the activity’s total goal time. Otherwise, if a fatigue range for an activity does not fall within any of the added fatigue factor’s fatigue range, the Default Fatigue Factor will be applied to calculate the activity’s fatigue allowance. |
8 |
The PICK activity’s total goal time = Fatigue allowance + base goal time = (Fatigue Factor * base goal time) + base goal time = 0.10*2000 + 2000 = 2200 seconds |
Fatigue Factor Validation: Fatigue ranges of fatigue factors cannot overlap.
Note
 For essential activities created from the Activity Adjustment Admin screen, the Default Fatigue Factor is applied to calculate the fatigue allowance.
Important
For an added fatigue factor to be applied to calculate a given activity’s fatigue allowance, ensure that a shift is applied to the labor associate’s activity record. Otherwise, the Default Fatigue Factor is applied to calculate the fatigue allowance.
Alternate ID#
Rebus refers to a labor associate’s alternate user id when processing labor transactions. When a labor transaction is imported into Rebus, Rebus takes the transaction’s user ID and follows the logic below to find a matching labor associate record.
First, try to find a match with an alternate user ID. If match found with labor associate record, continue with processing, otherwise,
Try to find a match with a user ID. If match found with labor associate record, continue with processing, otherwise,
Quarantine transaction.
Validations for alternate user id: A new alternate user ID cannot be the same as an already existing alternate user ID or an existing user ID.
Alternate User IDs are set up on the Labor Associate screen.
Activity Groups#
Activity groups let you set up Rebus to do the following:
Group different transaction types under a single activity type. E.g., If your WMS has a different PACKING transaction type for each warehouse area (PACKING_AREA01, PACKING_AREA02, etc.), you can group all these differently coded PACKING transactions so that each one becomes a PACKING activity in Rebus.
Create an activity based on information taken only from a specified step of a multi-step activity. E.g., For each two-step DEPOSIT activity (STEP1 = PICKUP, STEP2 = DROPOFF), you want Rebus to create an activity for each DROPOFF step because it has the drop off location information you want to capture in a widget.
Track specific values by setting up a simple mapping scheme or specify the relationship between certain values through enhanced mapping.
Simple Mapping#
A simple mapping scheme allows you to put multiple values into one auxiliary field. Rebus selects transactions having any of the values and creates an activity for each selected transaction.
Enhanced Mapping#
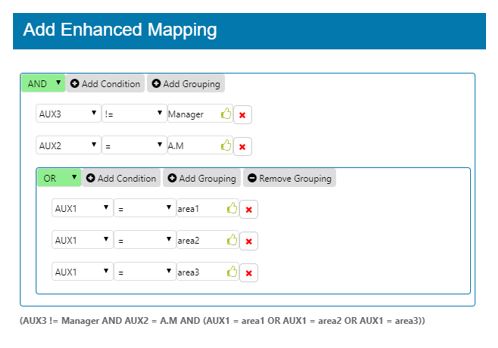
Configuring an enhanced mapping lets you put one value each into up to 25 auxiliary fields and add conditions and groupings to define the constraints and restrictions that you want to apply to the values.
A condition is an expression that is evaluated to see if it’s true. It can be used to select specific values. Each row selected by the auxiliary field is evaluated against the selected condition. The rows that evaluate “true” are selected to be compared to other groupings, if any.
Operator |
Description |
Type of value |
|---|---|---|
= |
Equal to. |
Integer |
!= |
Not Equal to. |
Integer |
< |
Less than. |
Integer |
<= |
Less than or equal to. |
Integer |
> |
Greater than. |
Integer |
>= |
Greater than or equal to. |
Integer |
In |
Equal to any of the comma separated values. |
String |
Like |
Begins with. |
String |
Not In |
Not equal to the comma separated values. |
String |
Not Like |
Doesn’t begin with. |
String |
Creating a grouping allows you to specify a different logical operator or to create an order of evaluation for conditions. Groupings are enclosed in parentheses, which means they are evaluated before conditions that are outside the parenthesis.
For more on setting up a mapping scheme, see: Setup Procedure 7 of 7: Configuring the Mapping Scheme.
Shifts#
In the Labor Module, a facility’s weekly schedule comprises shift s and the activities recorded for each labor associate. Each shift has the following attributes:
Start and Stop time,
Days of the week when the shift is scheduled,
Labor associates assigned to the shift,
Automatically scheduled breaks, and
Leeway time that’s allowed to labor associates regarding their shift start time.
Shifts can overlap, and a labor associate can be assigned to multiple shifts. To simplify time reporting; however, each labor associate should be assigned to a base shift, which is referred to by widgets that report staff time. A labor associate can be assigned to only one base shift.
When setting up shifts, keep in mind the following restrictions:
A labor associate can’t be assigned to two shifts that are scheduled for the same day of the week.
A shift can’t extend longer than 24 hours.
For more on how to set up shifts, see Setup Procedure 1 of 7: Setting up Shifts .
Types of Shifts#
There are three different types of shifts:
Shift |
Purpose |
|---|---|
Base shift |
Current base shift as it appears in User Admin. A base shift serves as defaults if a labor associate is neither part of a scheduled or an assigned shift. |
Assigned shift |
The normal shift that can be created/ assigned in shift admin. |
Scheduled shift |
A pre-configured shift that is automatically assigned to labor associates based on a schedule. |
Rebus uses the following order of priority to determine which shift appears in the ‘Shift Applied’ column:
Scheduled shift
Assigned shift
Base shift
Note
The ‘Shift Applied’ field is found in the Activity Adjustment table under Admin Tools > Labor > Activity Adjustment Admin.
Automatic Shift Scheduling#
You can schedule a shift to be applied automatically to a labor associate at a specified period. Instead of adding a labor associate to a shift, you can specify the date and time when a certain pre-configured shift will be scheduled for a labor associate. You can also make the shift for a labor associate permanent (i.e., recurrent with no end date). The scheduled shift overrides any other shift previously assigned. For information on how to add a labor associate to a scheduled shift, see Adding a Labor Associate to a Scheduled Shift.
Labor Associates and Labor Associate Groups#
You need to set up a labor associate for each staff member whose performance you want to track. You don’t need a Rebus user account to be set up as a labor associate. Each labor associate has his or her own schedule, which comprises the following:
Transactions recorded for him or her in the WMS and imported into Rebus as activities, and
Any activity adjustments manually made in Rebus to his or her schedule.
To be assigned to a shift, a labor associate must first be assigned to a labor associate group. Labor associate groups allow you to measure the performance of a set of staff at a group level. For example, you could create groups based on supervisor, job function, or whether the workers are permanent or temporary. A labor associate can be a member of only one group.
For more on how to set up a labor associate group, see Setup Procedure 2 of 7: Setting up Labor Associate Groups. For more information on how to set up labor associates, see Setup Procedure 3 of 7: Setting up Labor Associates.
Breaks#
A shift can be set up so that breaks are automatically inserted into the activities of its labor associates. There are two types: breaks (referred to here as expected breaks) and scheduled breaks.
Rebus inserts an expected break inside a concurrent activity. The activity’s duration must be longer than the break’s duration, minus any threshold. If no such activity can be found, no break is inserted, and a manual adjustment must be made to account for the break.

Breaks are shown as adjustments to activities. E.g., (-900 sec or 15 min).
For more on how to set up breaks, see Setting up Breaks.
Scheduled Breaks#
If you want to give labor associates flexibility to pick their own break time, you can set up a shift with scheduled breaks. In this alternative, labor associates can take a break within a certain timeframe, instead of having a static break start and end time.
For example, you can schedule a break of 20 minutes that a labor associate can take between 12 PM and 1 PM inclusively. Therefore, if a transaction occurs between 12 PM and 1PM, Rebus applies the scheduled break to the labor associate’s schedule. See below for an example of how the same break could work in 2 different schedules.

You can configure multiple scheduled breaks for each shift.
To apply a scheduled break to a labor associate’s schedule, the following conditions must be met:
The labor associate’s right shift must be applied to their transaction. For more information, see Types of Shifts.
The scheduled break’s start, stop time, or both overlap the activity’s start or stop times, or both.
The activity’s duration is equal to or greater than the break’s duration.
How are Errors Handled?#
To be successfully converted into an activity, a transaction must pass the following validations:
Its transaction type must be mapped to an activity type in Rebus.
The user who did it must be set up as a labor associate in Rebus.
If it’s a two-step transaction, then the following must be true:
Neither step is missing.
The user recorded for both steps match.
The quantity of the second step is equal to or greater than the quantity of the first step.
Transactions that aren’t successfully migrated to Rebus can be found on the Transaction Error Review screen. It’s essential to review this screen at least once a day to deal with any transactions that couldn’t be converted into Rebus activities. Otherwise, you may have to deal with a large backlog of unprocessed transactions that could eventually affect database performance. An error transaction is either a quarantined transaction or an incomplete transaction.
For more on how to resolve transaction errors, see Reviewing and Resolving Error Transactions.
Setting Up Labor Module#
Prerequisites#
The labor-related polls and flows through which Rebus pulls transaction data from the WMS should be turned off until this setup is done or else there will be error transactions. To make sure that these polls and flows are off, contact Rebus Customer Support.
If you want to apply the same configuration to more than one warehouse, learn more about Copying Labor Configurations.
Steps#
Go through the following procedures to set up the Labor Module.
Setup Procedure 1 of 7: Setting up Shifts#
This topic goes over how to set up a shift in the Labor Module. To learn more about shifts for a facility, see: Optional Step: Setting Up Facility Shifts.
To set up the Labor Module, you’ll have to set up shifts for each facility. For background information on shifts, see Shifts.
To learn how you can copy the shift configuration of a warehouse to another warehouse, see Copying Labor Configurations.
Setting up a Shift involves two procedures:
Prerequisites#
Know the details of the shifts that you intend to set up including:
Facility,
Start time and stop time,
How much leeway you’re going to allow in the shift to accommodate those who start early or start late,
Start and stop times of any breaks you want to be automatically scheduled.
Shifts should be set up when no one is working.
Creating Shift Records#
Go to the Admin Tools -> Labor -> Shift Admin.
In the Existing Shifts panel, populate the following dropdown fields:
Field |
What You Enter… |
|---|---|
System |
Originating system. |
Facility ID |
Facility for which you want to add a shift. |
Click ‘+Create Shift’. You are at the Shift Information form.
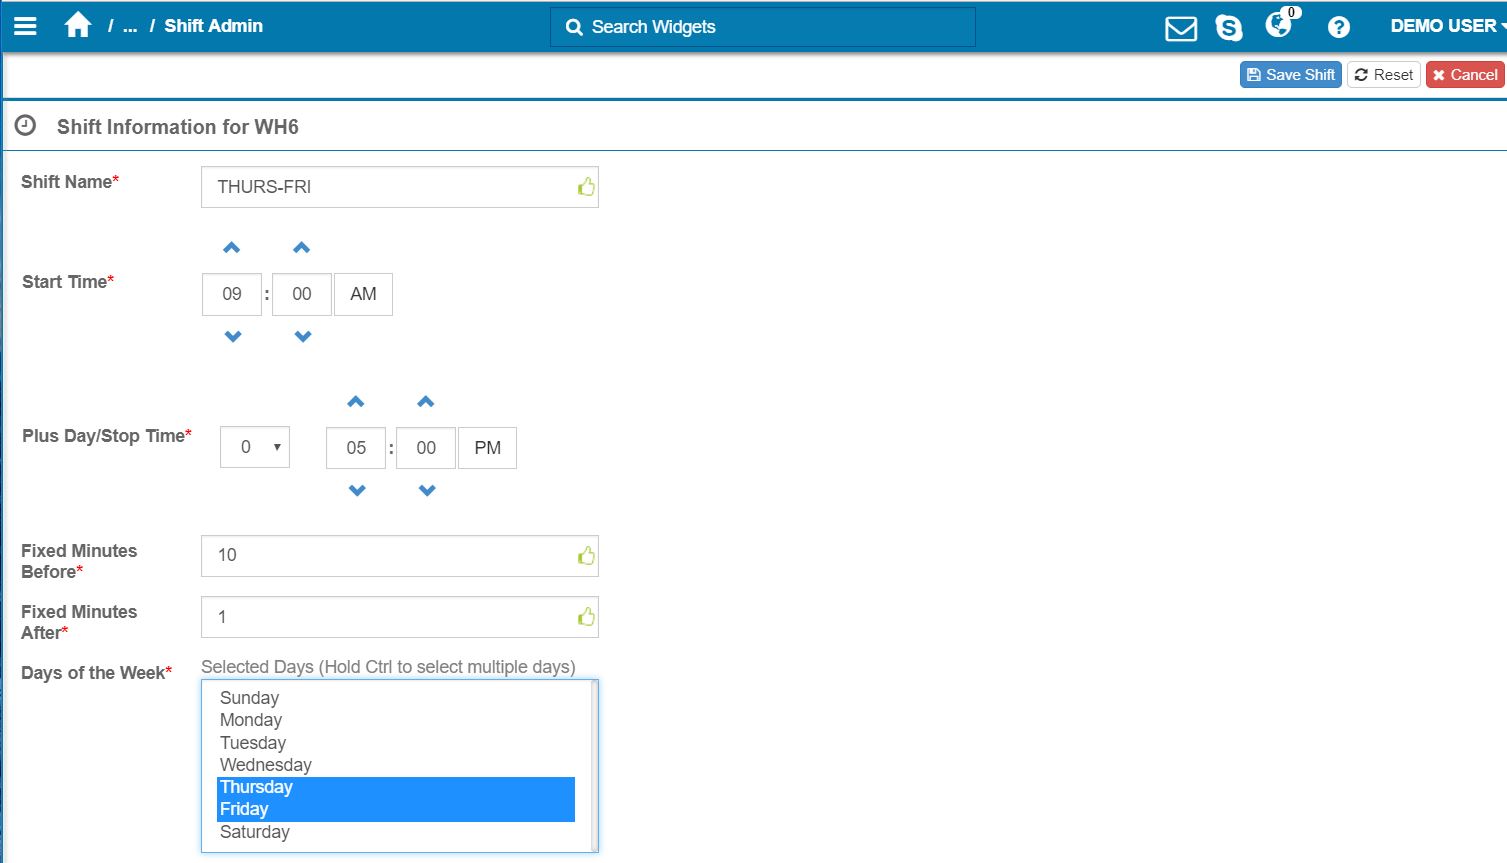
Populate the fields to create the new shift:
Field |
What You Enter… |
|---|---|
Shift Name |
Name of shift. |
Start Time |
Shift’s start time. |
Stop Time |
Shift’s stop time. |
Plus Day |
Must be used for shifts that go past midnight (12:00 AM). If you set this to ‘1’, this shift will be considered part of the previous day even if it runs past midnight. |
Fixed Minutes Before |
Labor associates who start within this many minutes before the shift start time have their start time recorded as the shift start time. |
Fixed Minutes After |
Labor associates who start within this many minutes after the shift start time have their start time recorded as the shift start time. |
Days of the Week |
The days of the week during which this shift is scheduled. |
Fixed minutes only for SIGN-ON box |
When checked, fixed minutes only applies to SIGN-ON activities. |
Click ‘Save’. You have created a new shift record. Now you can set up its breaks.
Setting up Breaks#
This topic goes over how to set up breaks for a shift. For background information on breaks, see Breaks.
To learn how you can copy the break configuration of a warehouse to another warehouse, see Copying Labor Configurations.
Constraints#
Only integers can be entered for for Scheduled Breaks’ durations.
Steps#
On the Admin Tools-> Labor-> Shift Admin select the shift to which you want to add breaks.
Click the ‘Break Details’ tab. The Existing Breaks panel on the left lists all the breaks already set up in this shift.
Click ‘+Create Break’. You are at the Break Information form.
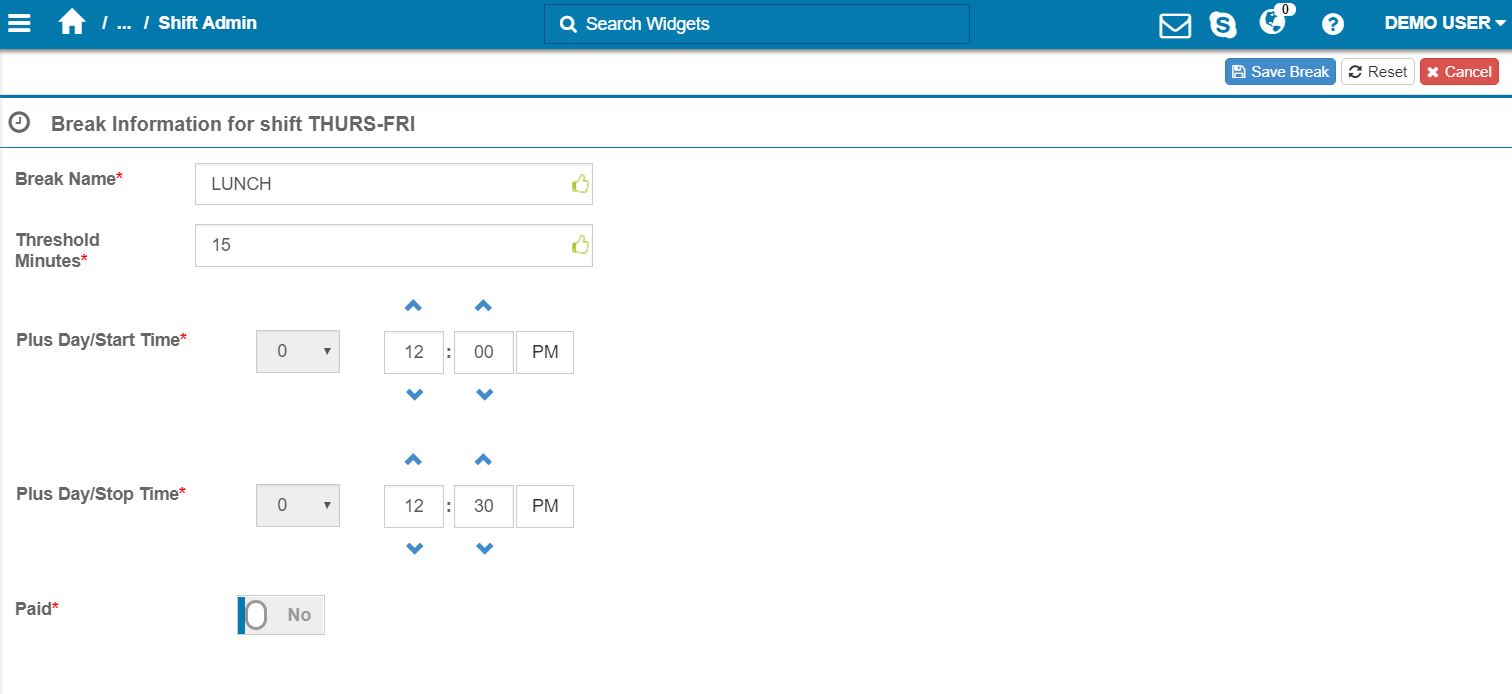
Populate the fields to create the new break for the shift:
Field |
What You Enter… |
|---|---|
Break Name |
Break Name. |
Threshold Minutes |
Leeway allowed in the break’s duration so that it can be inserted into an activity. |
Plus Day/Start Time |
Break’s start time. Set Plus Day to ‘1’ if this break is in a shift that runs later than midnight and the break’s start time is past midnight. Otherwise, set to ‘0’. |
Plus Day/Stop Time |
Break’s stop time. Set Plus Day to ‘1’ if this break is in a shift that runs later than midnight and the break’s stop time is past midnight. Otherwise, set to ‘0’. |
Paid |
Whether it’s a paid break. |
Click ‘Save Break’.
Optional: To create a scheduled break, follow these steps:
Go to the Scheduled Break Details tab.
Click ‘+ Create Scheduled Break’.
Fill in the fields.
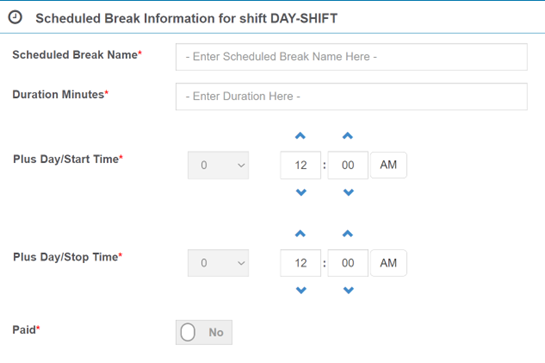
Scheduled Break fields# Field
What You Enter…
Scheduled Break Name
The name of the schedule break. Example: LUNCH BREAK.
Duration (Minutes)
The scheduled break’s duration in minutes.
Plus Day/Start Time
Scheduled break’s start time. If this break is in a shift that runs later than midnight and the break’s start time is past midnight, select 1 from the dropdown menu. Otherwise, select 0.
Plus Day/Stop Time
Scheduled break’s stop time. If this break is in a shift that runs later than midnight and the break’s stop time is past midnight, select ‘1’ from the dropdown menu. Otherwise, select ‘0’.
Paid
Whether it’s a paid break.
Click ‘Save’.
You’ve created a new break and a scheduled break.
Result#
You have created a new shift and set up its breaks and scheduled breaks. After you’ve finished setting up all the needed shifts, you can start Setup Procedure 2 of 7: Setting up Labor Associate Groups.
Setup Procedure 2 of 7: Setting up Labor Associate Groups#
This topic goes over how to set up a labor associate group in the Rebus Labor Module. When first setting up the Labor Module, set up a labor associate group for each set of associates whose performance you want to measure at a group level. A labor associate group is associated to a particular facility.
For background information on labor associates and groups, see Labor Associates and Labor Associate Groups.
To learn how you can copy the associate groups configuration of a warehouse to another warehouse, see Copying Labor Configurations.
Prerequisites#
Know the facility to which the associate group will be associated with.
Steps#
Go to the Admin tools -> Labor -> Labor Associates.
Navigate to the Groups tab. Click Create Group and the Group panel will open.
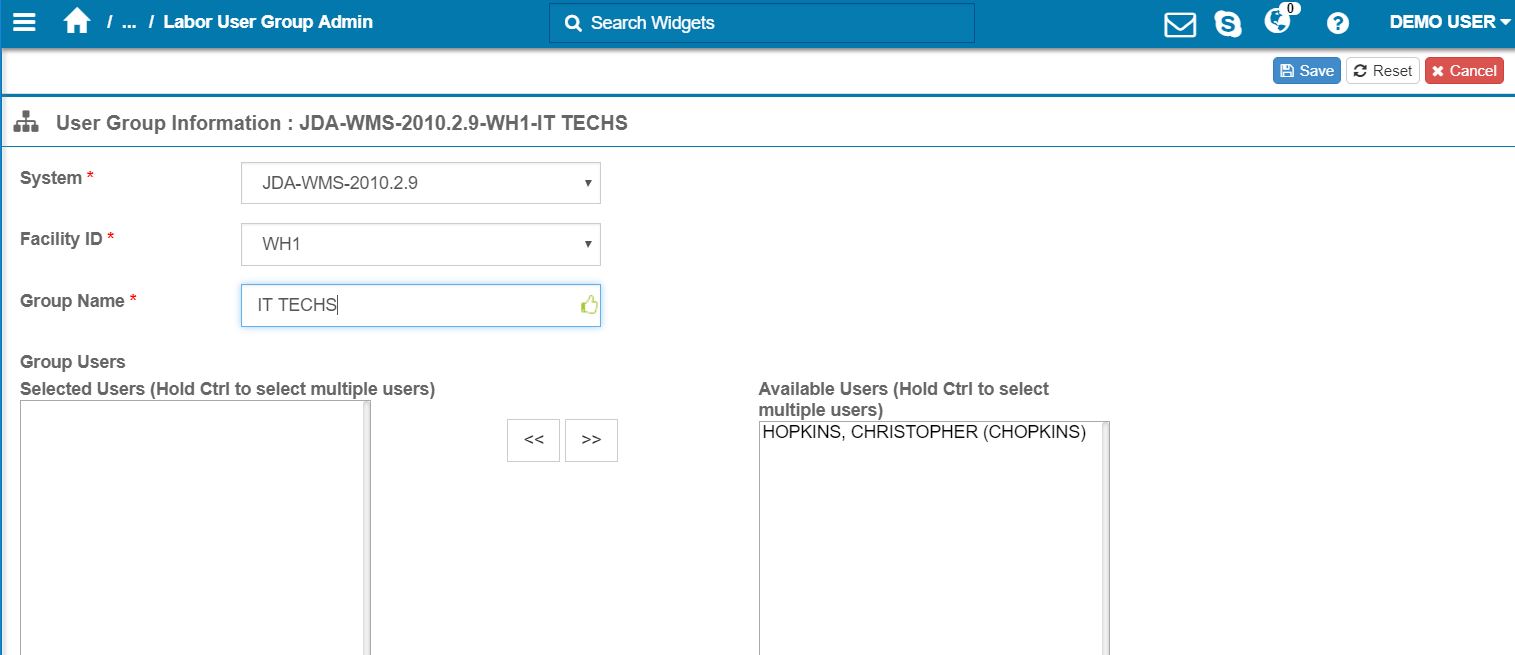
Populate the fields to create the new labor associate group:
Field |
What You Enter… |
|---|---|
System |
Originating system. |
Facility ID |
The ID of the facility that the labor associate group will be associated with |
Group Name |
Labor Associate group name. |
Optional: Add labor associates to the group if you already have labor associates created in Rebus. If not, continue to step 5. From the Members list, select the labor associates you want to add.
Click ‘Save’.
Result#
You have created a new labor associate group. After you’ve finished setting up all the needed labor associate groups, you can start Setup Procedure 3 of 7: Setting up Labor Associates.
Setup Procedure 3 of 7: Setting up Labor Associates#
This topic goes over setting up a Labor Associate in the Rebus Labor Module. When first setting up the Labor Module, set up a labor associate record for each person whose performance you want to measure.
For background information on labor associates and groups, see Labor Associates and Labor Associate Groups.
Prerequisites#
Only staff who are already set up as associates in your company’s WMS can be set up as a labor associate.
Know which labor associates are to be organized into which groups. A labor associate can be a member of only one group.
Steps#
Go to Admin Tools → Labor → Labor Associates.
Select your System and Facility. Click Add Associate – a new associate tab opens.
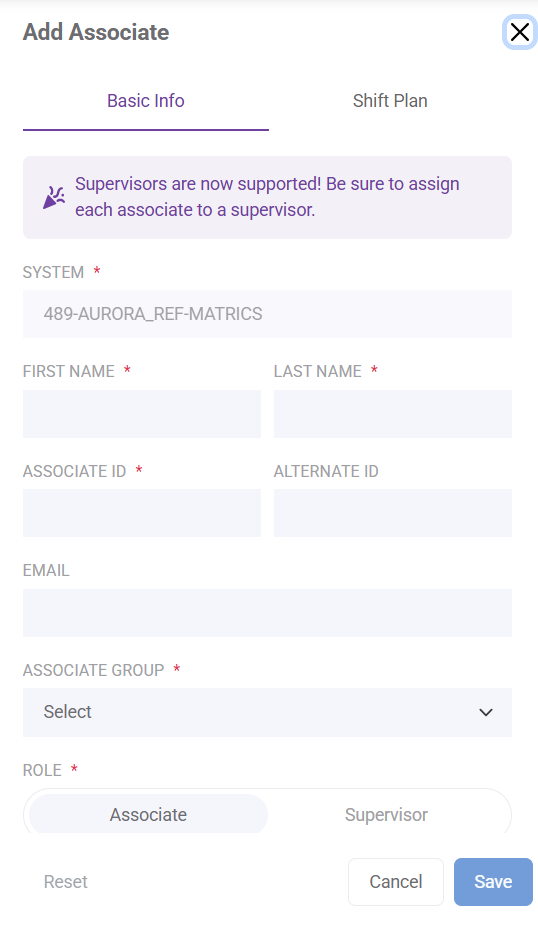
Populate the fields:
Associate Information screen# Field
What You Enter…
System
Originating system.
First Name
Associate’s first name.
Last Name
Associate’s last name.
Associate ID
Associate’s user ID in the WMS.
Alternate User ID
Associate’s alternate ID.
Email
Associate’s work email (optional).
Associate Group
Associate’s group.
Role
Associate or Supervisor; if Associate, pick a Supervisor.
Hire Date
Date hired.
Shift (under SHIFT tab)
Base shift (needed for widgets).
Click Save.
To add associates in bulk, you need to create a .CSV file that contains the details of the labor associates you want to create.
Include headers that match the column names given in the table below.
All mandatory fields must be filled in for each record. Optional fields can be left blank.
Field values can have commas and can be enclosed in double-quoted strings.
Tip
 You can maintain all existing and new labor associates in one CSV file. That way, when you import this file, new labor associate IDs result in new labor associate records, existing IDs with no changes are ignored, and existing IDs with changed information result in updated records in Rebus..
CSV file fields# Column
Mandatory
What You Enter…
Shown on screen…
userId
Y
UserID. Must not be used already by any existing labor associate in Rebus.
Labor Associates; Activity Adjustment Admin
FIRSTNAME
Y
Associate’s first name.
Labor Associates
LASTNAME
Y
Associate’s last name.
Labor Associates
laborUsergroupId
Y
Associate’s labor associate Group ID. Must be a labor associate group that’s already set up in Rebus.
Labor Associates; Labor Associate Group Admin
alternateUserId
N
Associate’s alternate ID.
Labor Associates; Activity Adjustment Admin
email
N
Associate’s work email. Must be formatted as an email address.
Labor Associates
shift
N
ID of the shift that associate works most of the time. Used for time reporting. Must be already set up in Rebus.
Labor Associates
hireDate
N
When the labor associate was hired. Use MM/DD/YYY as the date’s format.
Labor Associates; Activity Adjustment Admin
laborTeamId
N
ID of the Supervisor’s team.
Labor Associates
isSupervisor
Y
Whether or not a user is an Associate or a Supervisor.
Labor Associates
supervisor
N
Supervisor the Associate is assigned to.
Labor Associates
Import the file in Admin Tools → Labor → Labor Associates → Import.
Go to the Administration -> Labor Associates.
Click ‘Import From CSV’.
Upload the .CSV file that contains the Associates’ information.
Result#
You have created one or multiple new labor associate records. If you want to add the labor associates to additional shifts, see Setup Procedure 4 of 7: Adding Labor Associates to Shifts.
Setup Procedure 4 of 7: Adding Labor Associates to Shifts#
This topic goes over adding labor associate s to shifts.
Prerequisites#
Associates that you want to add to a shift are:
members of an associate group that’s in the same facility as the shift you want to add the associates to. For more on how to set up labor associates and labor associate groups, see Setup Procedure 3 of 7: Setting up Labor Associates and Setup Procedure 2 of 7: Setting up Labor Associate Groups.
Shifts are already set up. For more on how to set up shifts, see Setup Procedure 1 of 7: Setting up Shifts.
Know which labor associates you intend to assign to which shifts.
Steps#
Go to the Admin Tools -> Labor -> Shift Admin and run a search to find the shift to which you want to add labor associates. Select the shift.
Click the ‘Associate Details’ tab. The Existing Users panel on the left lists all the users already set up in this shift.
Click ‘+Add Associate’. The Associate Information screen appears. The Available Users box lists all the labor associates that you can add to the shift.
Note
 This list shows the labor associates who are part of a associate group that’s associated with the shift’s facility.
Select the associate whom you want to add to the shift. To add more than one at a time, hold the CTRL button while selecting associate records.
Click ‘Save Associate(s)’. The selected labor associates are added to the shift.
Result#
You have added labor associates to their shifts. After you’ve finished setting up all the needed shifts, you can start Setup Procedure 5 of 7: Setting up Activity Groups.
Resolving Conflicts when Adding Associates to Shifts#
When adding an associate to a shift and there’s a conflict (A labor associate can’t be assigned to two shifts that are scheduled for the same day of the week.), you can choose to remove the user from the other shift and continue with your current selection. This lets you solve a conflicting shift validation error in one action. Rebus shows you the list of conflicting users along with the conflicting shifts. You can proceed in two ways:
Option |
Result |
|---|---|
Continue with the selection. |
Conflicting users are deleted from the other shift and added to the new one. |
Do not continue with the selection. |
You are taken back to the add associate page to modify the selection. |
Setup Procedure 5 of 7: Setting up Activity Groups#
Note
 You only need to do this setup if you want to have Rebus dynamically create activities of a particular activity type. If you just need to map each transaction type from your original system to a corresponding activity type in Rebus, you can skip this and go to Setup Procedure 6 of 7: Setting up Activity Types for Imported Transactions.
Note
 activity group is something different from work category.
This topic goes over how to set up an activity group, which lets you have Rebus dynamically create activities for specified transaction types or steps of multi-step transactions in the WMS. For background information on activities and activity groups, see Activities.
To learn how you can copy the activity group configuration of a warehouse to another warehouse, see: Copying Labor Configurations.
Prerequisites#
Know which transaction types or step of multi-step transactions you intend to assign to an activity type.
Know which type of mapping you want to use for this group.
Activities should be configured when no one is working.
Steps#
Go to the Admin Tools -> Labor -> Activity Group Configuration.
Click ‘+New’. You are at the Activity Group Information form.
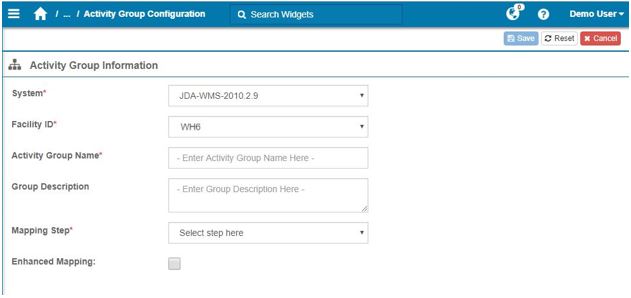
Populate the fields to create the new Activity Group:
Note
 Don’t click Enhanced Mapping if this is an activity group that’s already set up for simple mapping. To upgrade the mapping scheme from simple to enhanced, contact Rebus Customer Support.
Field |
What You Enter… |
|---|---|
System |
Originating system. |
Facility ID |
The ID of the facility that the activity group will be associated with. |
Activity Group Name |
Activity group name. NOTE: Name can be made up of numbers, letters, underscores, and dashes. Any other special characters could result in processing errors. |
Group Description |
Brief description of activity group. |
Mapping Step |
Indicates which step of the transaction Rebus refers to when getting the details, including start time and stop time, to populate the activity record. |
Enhanced Mapping |
Select this feature to configure an enhanced mapping scheme instead of a simple mapping scheme when configuring your activity group. |
Click ‘Save’.
Result#
You’ve created a new activity group. Activity groups are linked to activity types through the Activity Configuration screen. After you’ve finished setting up all the needed activity groups, you can start Setup Procedure 6 of 7: Setting up Activity Types for Imported Transactions.
Setup Procedure 6 of 7: Setting up Activity Types for Imported Transactions#
This topic goes over how to set up Rebus so that the transactions that you want to track are imported into Rebus from the WMS database and become activity records. Set up the types of the activity records into which WMS transaction data will be imported.
Each facility must have one activity type set up as a sign-on activity, and one other must be set up as a sign-off activity.
For background information on activities and activity groups, see Activities.
To learn how you can copy the activity configuration of a warehouse to another warehouse, see: Copying Labor Configurations.
Prerequisites#
Know which transaction types you want to be imported into Rebus and converted into activity records.
Know which of these transaction types have two steps and which have one step.
For each activity type that is to be mapped to transaction types through an activity group, know the identifying values (e.g., name, associate, area) that can be used by Rebus to identify the transactions you want to be converted into activities of a particular activity type and know which auxiliary field has to be selected for a particular value, if you selected the enhanced mapping feature. Rebus selects transactions having any of the identifying values and creates an activity for each selected transaction.
Activities should be configured when no one is working.
Steps#
Go to the Admin Tools -> Labor -> Activity Configuration Admin.
Click ‘+Create New Activity’. You are at the Activity Information form.
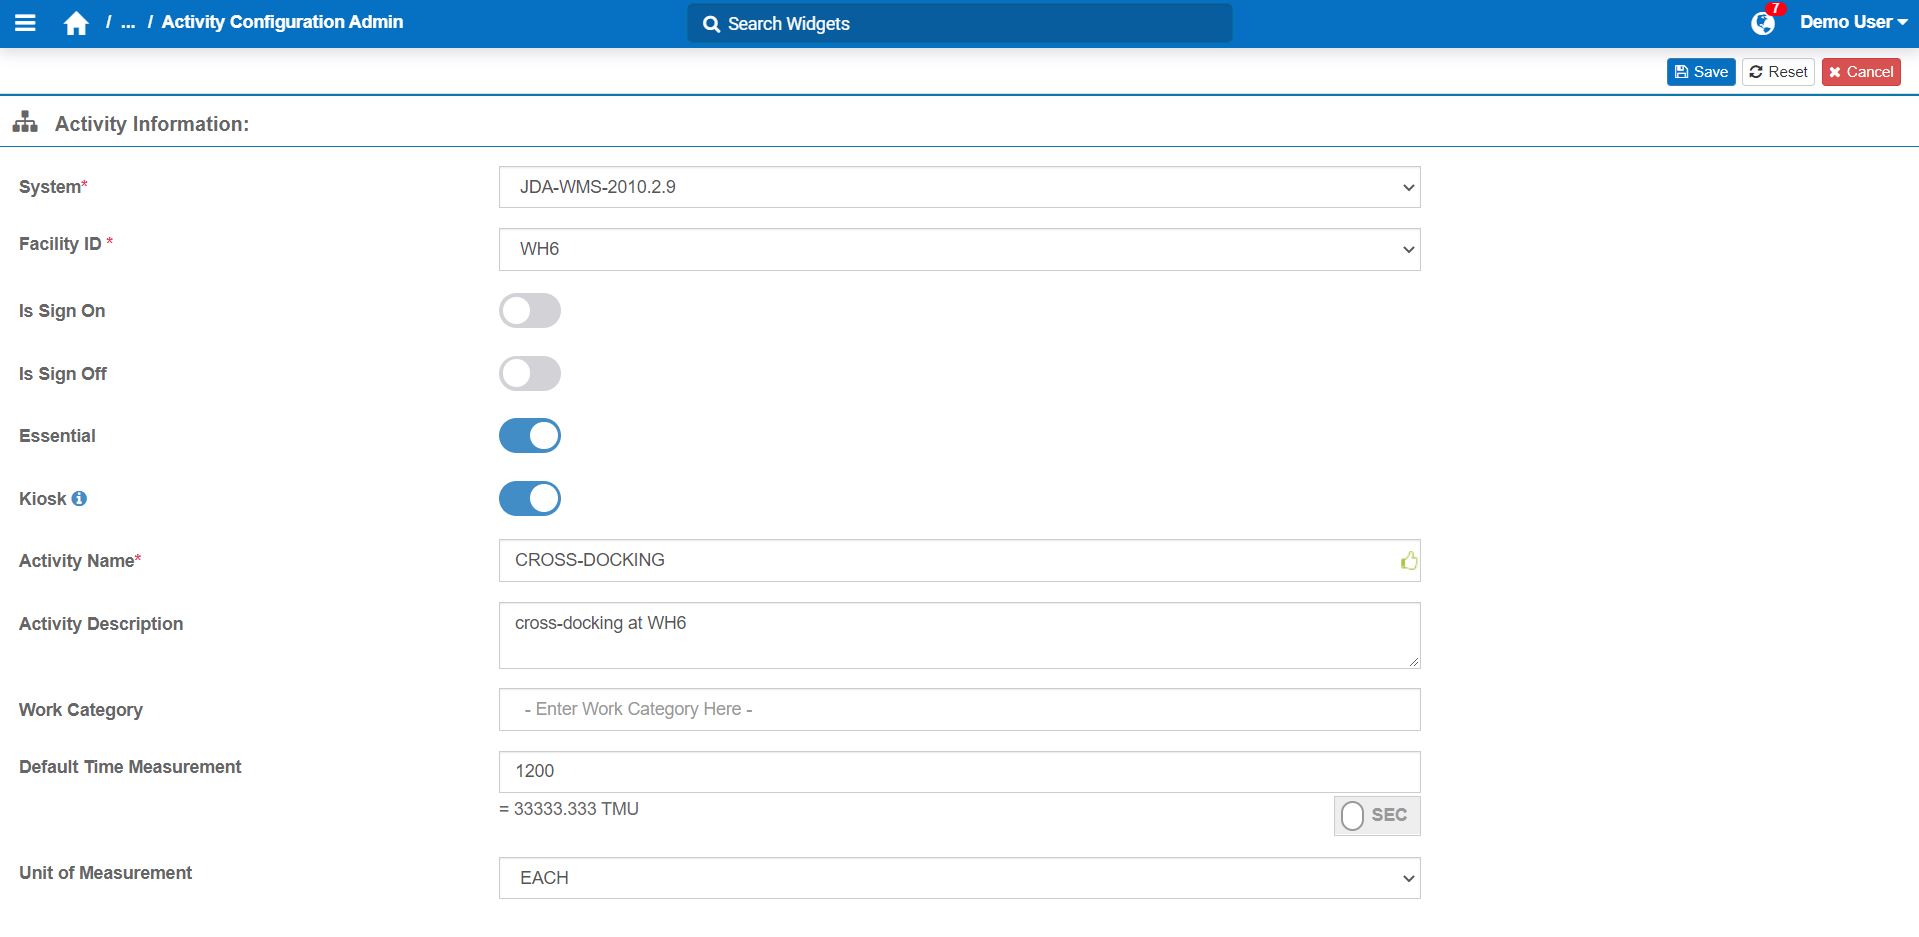
Populate the fields to create the new Activity Type:
Field |
What You Enter… |
|---|---|
System |
Originating system. |
Facility ID |
The ID of the facility that the activity will be associated with. |
Is Sign On |
Whether this type of activity is a ‘start of day’ activity. For each facility, one activity type, named ‘SIGN-ON’, must be set up as a ‘Sign-On’ activity. |
Is Sign Off |
Whether this type of activity is an ‘end of day’ activity. For each facility, one activity type, named ‘SIGN-OFF’, must be set up as a ‘Sign-Off’ activity. |
Essential |
Whether you want to measure performance for this activity type. Activities like breaks, meetings, and housekeeping would usually be considered non-essential. |
Kiosk |
Whether you want to allow labor associates to log the activity into the Activity Log In screen. |
Activity Name |
Name of activity type. If this is a Sign-On activity type, this value must be ‘SIGN-ON’. If this is a Sign-Off activity type, then this value must be ‘SIGN-OFF’. If this activity type is for one transaction type only, then this value must match the name of that transaction type in the WMS. Transactions of that type will be converted into activity records in Rebus. NOTE: Name can be made up of numbers, letters, underscores, and dashes. Any other special characters could result in processing errors. |
Activity Description |
Brief description of activity type. |
Time Measurement and Unit of Measurement |
The standard for how long the activity should take per unit of measurement (e.g., pallet, line, each). Can be entered in seconds or in TMU. The unit of measurement for non-essential activities is ‘INCIDENT’. |
Work Category |
Text entered here can be used to categorize the activity. |
Click ‘Save’. You’ve created a new activity type.
Optional: To have a fatigue allowance added to the activity’s total goal time, add a fatigue factor. To do so, follow these steps:
Select the Step Details tab and set up the steps for this activity. Set up one step if the activity type corresponds to a one-step transaction and two steps if the activity type corresponds to a two-step transaction. To create a step, do the following:
Click ‘Create New Step’ and fill out the fields in the Step Information form:
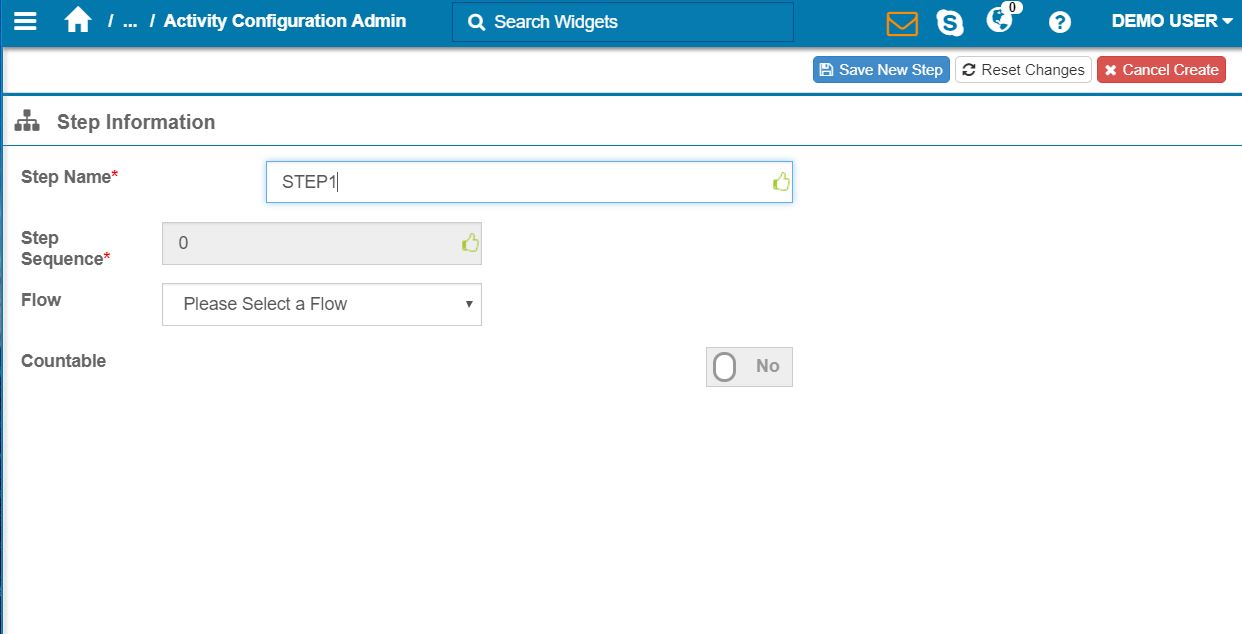
Field |
What You Enter… |
|---|---|
Step Name |
Label for the step. |
Step Sequence |
Automatically populated. The first step has a value of ‘0’ and for each subsequent step this value is incremented by one. |
Flow |
Leave this blank. |
Countable |
Whether the number of units (defined on the Step Details tab e.g., pallet, line) is to be taken from the corresponding transaction step and recorded for this step of the activity. |
–
Click ‘Save New Step’. The step is saved.
After you’ve finished setting up all the steps, decide whether you need to link the activity type to an activity group.
This Activity Type is to be mapped to Transactions Types through an Activity Group… |
Otherwise… |
|---|---|
Select the Activity Group tab and continue with the Activity Group setup below. |
You have finished setting up the Activity Type. End of Procedure. |
Result#
You’ve created a new activity type. When Rebus imports transaction data from the WMS, each transaction with a corresponding activity type is converted into an activity record.
Setup Procedure 7 of 7: Configuring the Mapping Scheme#
This topic goes over the configuration of the mapping scheme for an activity group. When creating an activity group, Rebus lets you choose between simple mapping or enhanced mapping.
For background information on activities, activity groups and mapping types, see Activities.
To learn how you can copy the mapping scheme of a warehouse to another warehouse, see: Copying Labor Configurations.
Prerequisites#
Know which type of mapping you want to use for this group.
To configure an enhanced mapping, first select the enhanced mapping option in the Activity Group Configuration screen.
Steps#
Go to the Admin Tools -> Labor -> Activity Configuration Admin.
Select the activity that you want to put in the activity group and click on the Activity Group tab.
From the drop-down menu, select the desired activity group.
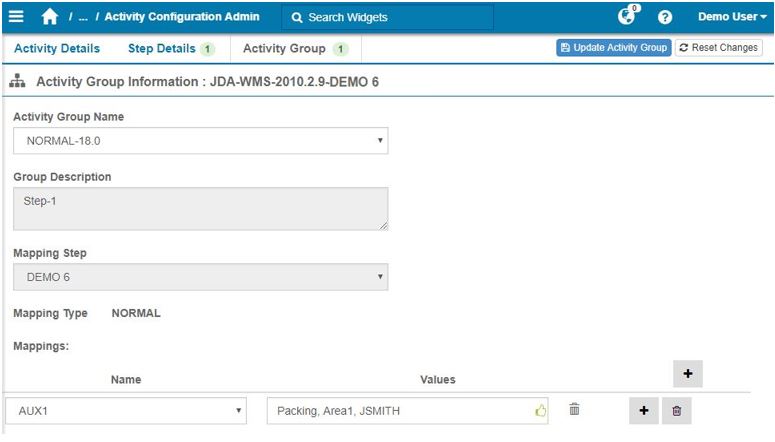
Map the activity group to the transaction types. In the Mappings table column headings, click ‘+’.
Field |
What You Enter… |
|---|---|
Name |
From the drop down, select ‘AUX1’. |
Values |
Identifying values in the transactions that you want Rebus to turn into activities of this activity type. These values can be names, user ids, areas, or other codes. The values must be delimited by commas. |
Click ‘Update Activity Group’.
Configure the desired mapping.
Enhanced Mapping# Field
What It Does
AND/OR
The logical operator that defines the relationship of conditions in a grouping.
Add Condition
Add a new field to enter an auxiliary field, a condition and a value.
Add Grouping
Add a grouping to use a different logical operator or to configure an order of execution.
- Click ‘+Save Mapping’.
For more information on conditions and groupings, see Activity Groups.
Result#
You’ve linked an activity type to an activity group by configuring a mapping scheme. Each transaction selected by the auxiliary field and respecting the mapping conditions will be tracked.
Copying Labor Configurations#
You can copy the Labor Module configurations of a warehouse to another warehouse, instead of having to configure the same settings multiple times.
Prerequisites#
The destination warehouse must have already been set up in your Rebus application.
The destination warehouse doesn’t have any Labor Module configurations.
The configurations you are copying must have already been configured in the source warehouse.
Know which components (i.e. details of the source warehouse.) you wish to copy. Child components are logically grouped under parent components. The following table indicates which parent component should be selected to access the desired child component.
Parent Component |
Child Component |
|---|---|
Activities |
Activity Steps |
Activities |
Activity Groups |
Activities |
Activity Group Normal Mapping |
Activities |
Activity Group Enhanced Mapping |
Activities |
Time Measurement Configurations |
Activities |
Fatigue Configurations |
Activities |
Time Components |
Activities |
Attribute Mappings |
Shifts |
Breaks |
Associate Groups |
Holiday |
Matrices & Travel Distance Maps |
None |
Steps#
Go to Admin Tools > System > Organization Admin.
Click ‘Facility details’ tab.
In the upper right corner, click on ‘Copy Labor Configuration’.
Select the system and facility ID of the source warehouse.
Select the components you want to copy. To access a child component, select its parent component.
Select the System and facility ID of the destination warehouse.
Click ‘+Copy Configuration’.
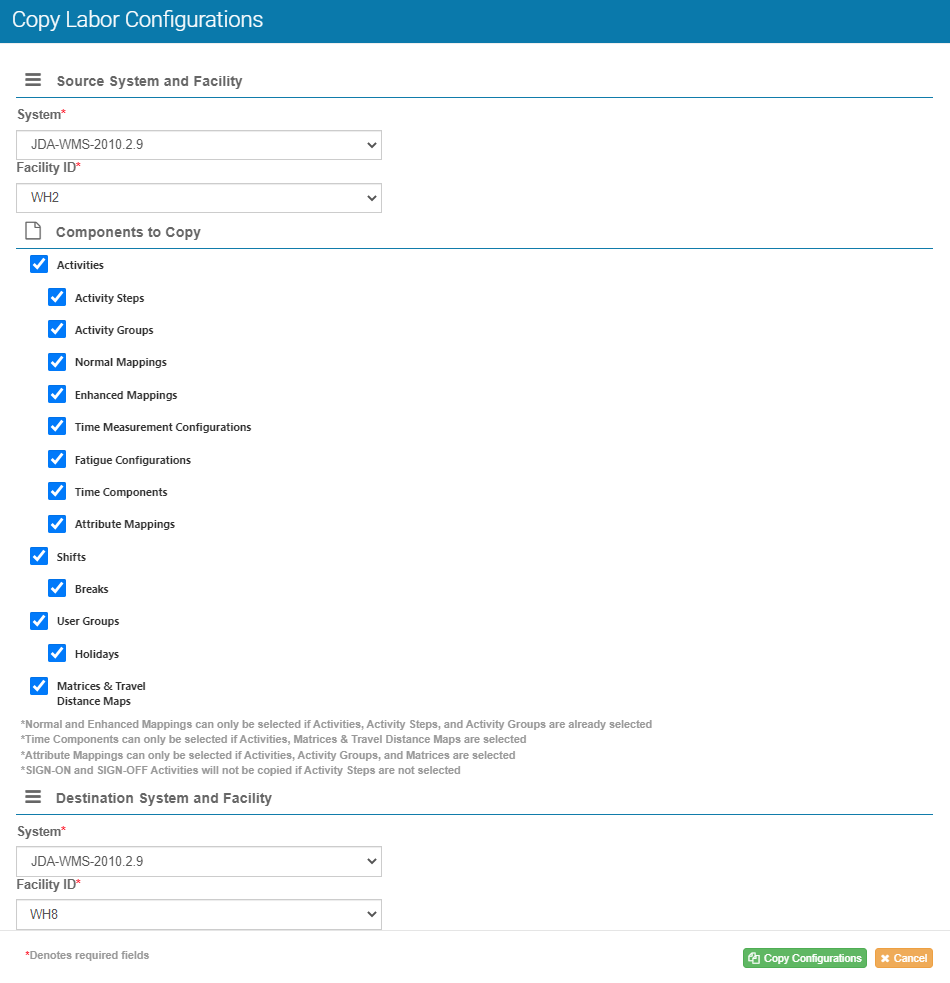
Result#
You copied the configuration of a source warehouse to a destination warehouse. The components you decided to copy are now configured in the destination warehouse settings.
Setting a Default System and Facility ID#
You can set a default system and facility ID for all menus in your labour module so that you don’t have to select them every time.
Note
 If no default choice is selected and there is only one system and one facility in the list, they will be selected by default.
Steps#
Go to Admin Tools -> Labor -> Preferences -> Default Preferences Tab.
Note
 On every Labor Module menu screen, there is a manage preferences button that takes you to the default preference tab on the preferences screen.
Select the default system and facility ID. You also have the option to select a default system and leave the facility ID blank.
Result#
The default system and facility ID will be automatically chosen on every labor module screen. This includes the following pages: Activity Adjustment Admin, Activity Configuration Admin, Activity group Details, Activity Log In, Labour Associate Admin, Labor Associate Group Admin, Existing Shifts, and Transaction Error Review.
Creating List of Pre-Defined Activity Adjustment Notes#
This procedure goes over creating adjustment note values that you can then select when adjusting activities.
Note
 You need permissions to this screen to do this task. If you need access to this screen, contact your Rebus Administrator.
- The Dynamic Field Configuration screen has three tabs:
Adjustment Notes
AUX Alias
Time Component Number Alias
Adjustment Note Tab#
Steps#
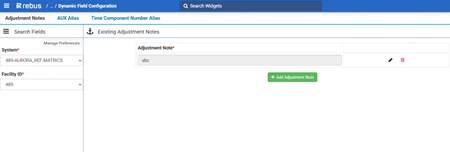
From the Rebus menu, go to Admin Tools > Labor > Dynamic Field Configuration.
Select the System and Facility ID. You’re at the Adjustment Notes tab.

Click ‘Add Adjustment Note’. A blank row appears.
In the ‘Adjustment Note’ text box, enter the adjustment note.
Click the checkmark
 to save the note. Each note has its own save checkmark. You must save a note before creating another one.
You cannot create and save notes in bulk. If you do not click each row’s Save button after creating it and before creating a new one, you will lose your changes.
You’ve created an adjustment note. It’s now available to select from the Adjustment Note dropdown list.
AUX Alias Tab#
In this tab, you can create an alias for your AUX fields. Instead of having each field named AUX1, AUX2, etc., you can more easily identify them by naming them for the information they hold. For example, AUX1 becomes Vehicle Type, AUX2 becomes Current Location, etc.
Steps#
From the Rebus menu, go to Admin Tools > Labor > Dynamic Field Configuration.
Select the System and Facility ID. You’re at the Adjustment Notes tab. Navigate to AUX Alias tab.

Select the Add AUX Alias button to add an alias.
Select your desired AUX field from the dropdown and then type out its alias.
Click the checkmark to save the alias. Each alias has its own save checkmark. You must save an alias before creating another one.

You cannot create and save aliases in bulk. If you do not click each row’s Save button after creating it and before creating a new one, you will lose your changes.
You’ve created an AUX Alias. It’s now available on the Existing AUX Alias list.

Time Component Number Alias Tab#
In this tab, you can create an alias for your Time Component Number. Instead of having each field named Time Component 1, Time Component 2, etc., you can more easily identify them by naming them for the information they map. For example, Time Component 1 becomes Horizontal Travel Time, etc.
Steps#
From the Rebus menu, go to Admin Tools > Labor > Dynamic Field Configuration.
Select the System and Facility ID. You’re at the Adjustment Notes tab. Navigate to Time Component Number Alias tab.

Select the Add Time Component Alias button to add an alias.
Select your desired Time Component field from the dropdown and then type out its alias.
Click the checkmark to save the alias. Each alias has its own save checkmark. You must save an alias before creating another one.

You cannot create and save aliases in bulk. If you do not click each row’s Save button after creating it and before creating a new one, you will lose your changes.
You’ve created a Time Component Alias. It’s now available on the Existing Time Component Alias list.

I’ve Completed the Labor Module Setup: Is there anything else I need to do?#
Contact Rebus Customer Support to have the labor-related polls and flows turned on.

