Labor Planning - Setting Up#
Before you can forecast and plan labor costs allocation, you must set up the module first. Follow each procedure below to set it up.
Setting Up Demand Types#
This procedure goes over setting up Demand Types. For background information on Demand Types, see Demand Types.
Prerequisites#
You have defined and planned all Demand Types.
Steps#
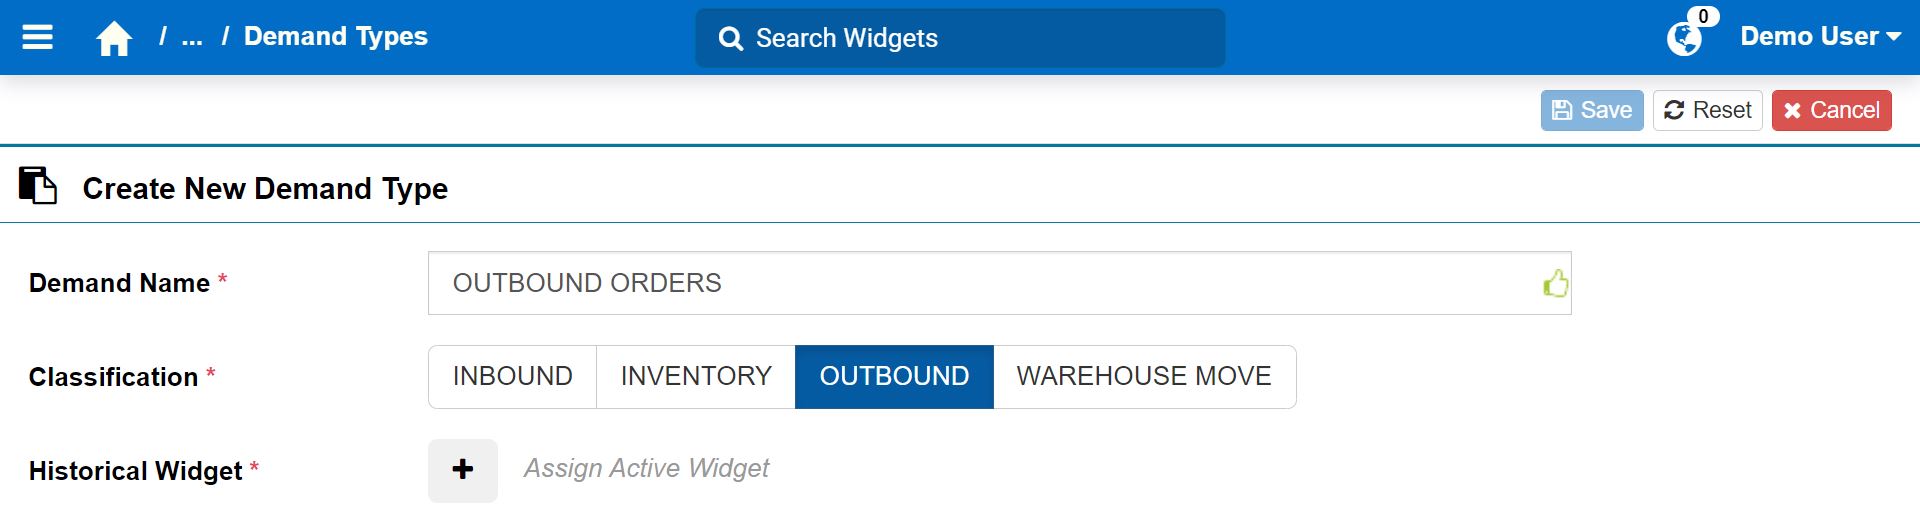
From the Rebus menu, select Admin Tools > Labor Planning > Demand Types. You’re at the Demand Types screen.
Click ‘+New Demand Type’.
Start filling in the fields needed to set up the Demand Type.
Demand Type Fields# Field
What You Enter…
Demand Name
Name of the type of demand.
Classification
The demand’s classification. It’s information that you can display when building a widget.
If you want to remove the existing classifications and add new ones, contact Rebus Customer Support.
Historical Widget
Historical Widget. To do so, click the ‘Assign Active Widget’
 button. The Assign Widget form appears.
On the left-hand side, find the widget you want to assign. You can use the search box to enter its name and to find it in its group.
Click the group and then the ‘Assign’
 button.
Click ‘Done’. You are back to the Demand Type screen, and additional fields appear.
Note
You can change the Historical Widget by clicking the ‘Edit’
 button next to it.
Fill in the rest of the fields.
Demand Type Fields Cont’d# Field
What You Enter…
Historical Control Date
Date parameter used to specify the historical date range that you will define in the Forecast Definition. You can leave it as is or select another one.
Future Widget
Future Widget.
To select a Future Widget that is different than the widget assigned as the Historical Widget, select the ‘Edit’
button next to it and select the right widget.Future Control Date
Date parameter used to specify the future date range that you will define in the Forecast Definition. You can leave it as is or select another one.
Demand Attributes
Fields that will be used for:
Mapping: used for mapping a demand to an activity.
Output: use for grouping the aggregated demand results in the forecast results.
Units: hold the demand quantity.
Note
If a Demand Type requires fulfillment with more then one Unit field, you must set up more than one Demand Type. For more information, see Setting Up Demand Types with Multiple Unit Fields.
Click ‘Save’. You have created a Demand Type.
Repeat the steps for each Demand Type you want to set up.
Setting Up Demand Types with Multiple Unit Fields#
If a Demand Type requires fulfillment with more then one Unit field, configure separate Demand Types, and select a different Unit field for each. Configuring separate Demand Types with unique Unit fields prevents Rebus from calculating future labor costs and quantities with only the first unit field in the Demand Type’s list of Unit fields. For example, in the screenshot below, the Demand Type has both PALLET and CASE selected as Unit fields, but Rebus will use only PALLET quantities to calculate the future labor costs and quantities.
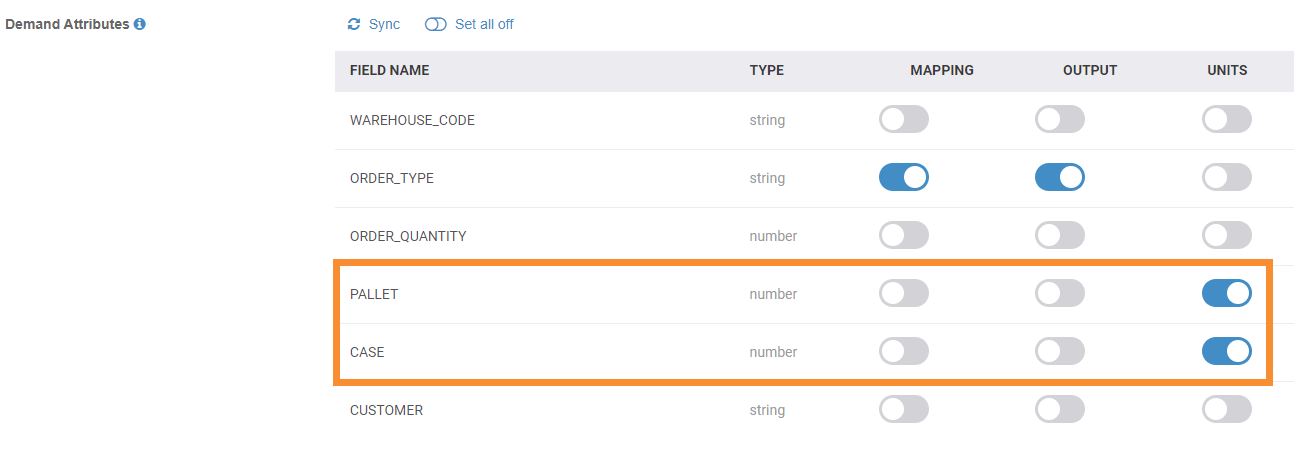
Therefore, two identical Demand Types must be created where one contains PALLET as the Unit, and the other contains CASE.
Next#
Setting Up Labor Definitions#
This procedure goes over setting up Labor Definitions. For background information on Labor Definitions, see Labor Definitions.
Prerequisites#
You have determined and planned the Labor Definition(s).
Steps#
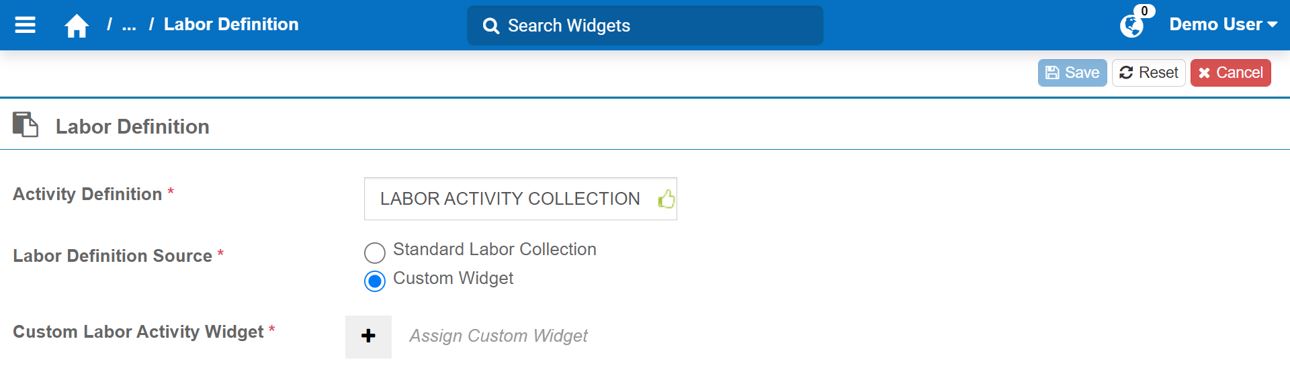
From the Rebus menu, select Admin Tools > Labor Planning > Labor Definition. You’re at the Labor Definition screen.
Click ‘+New Labor Definition’.
Start filling in the fields needed to set up the Labor Definition.
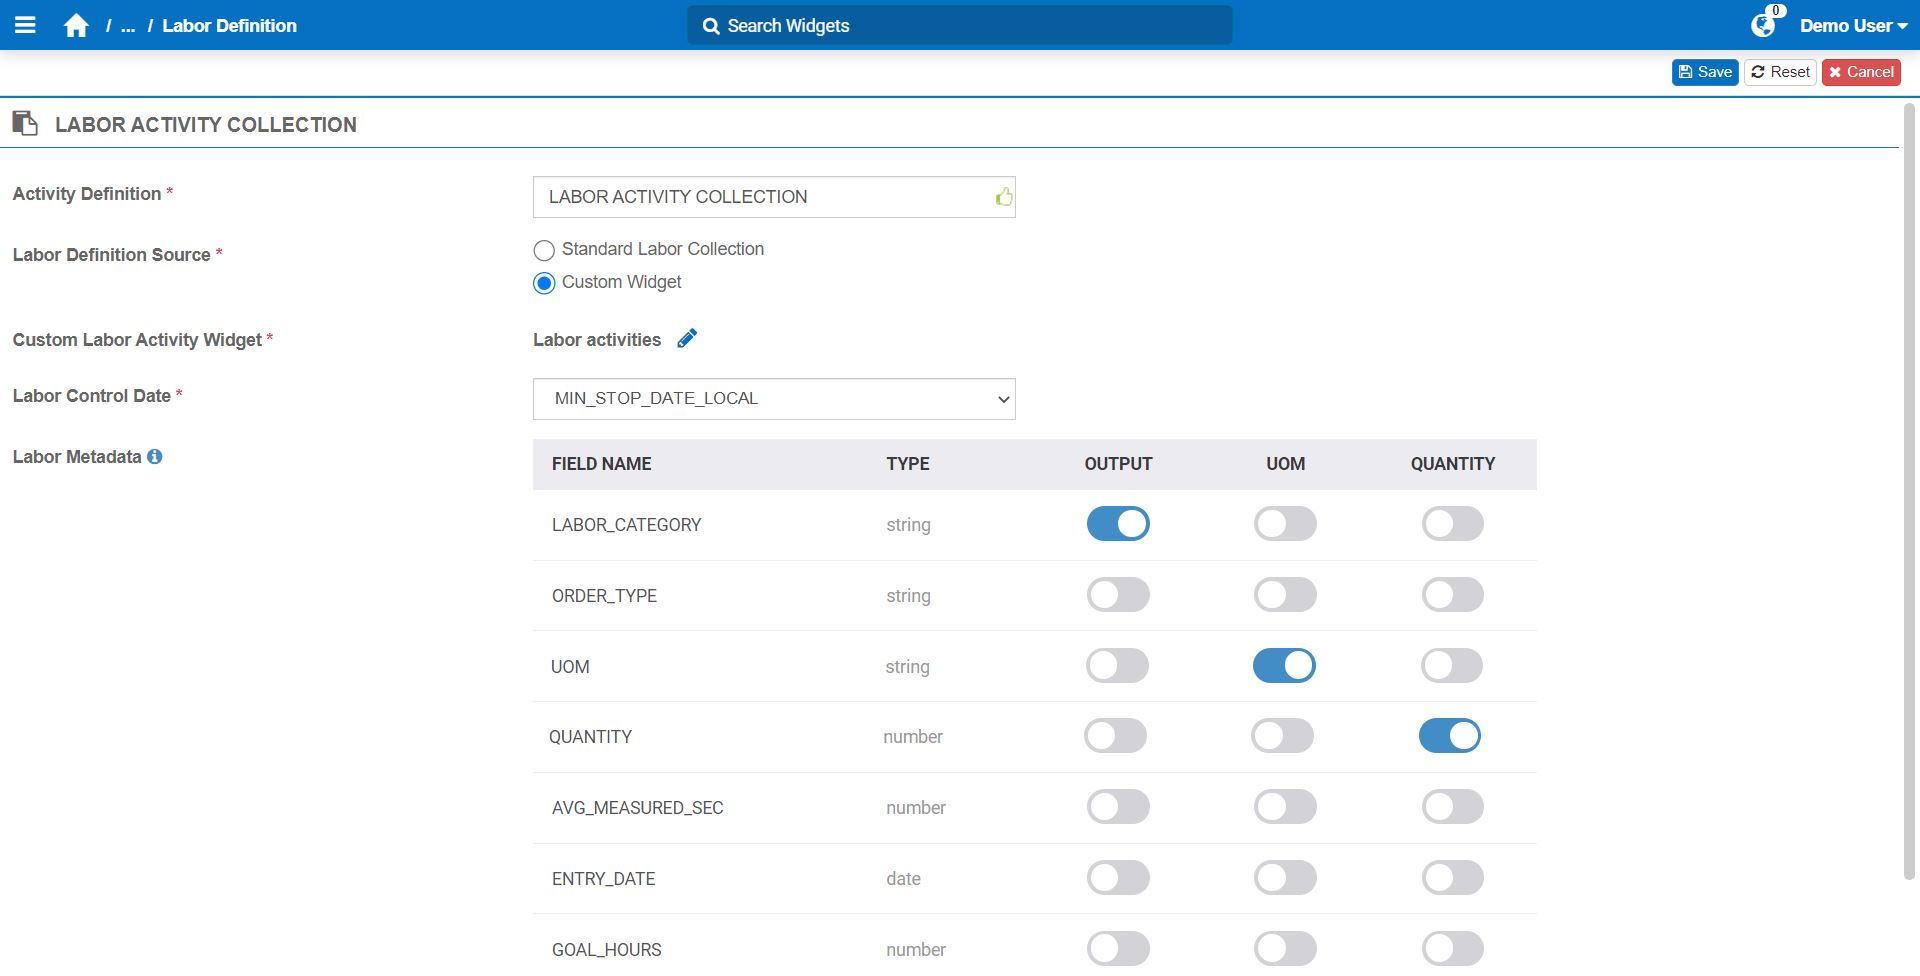
Labor Definition Fields# Field
What You Enter…
Activity Definition
Name of the Labor Definition.
Labor Definition Source
One of the following sources from which the labor data will be retrieved:
Standard Labor Collection: Select this option if you’re using the Labor Module. The ‘Labor Metadata’ section appears.
Custom Widget: Select this option if you’re not using Rebus’s Labor Module. The ‘Custom Activity Widget’ appears.
Custom Activity Widget
Custom widget. To do so, click the ‘Assign Active Widget’
button. The Assign Widget form appears.On the left-hand side, find the widget you want to assign. You can use the search to enter its name and to find it in its group.
Click the group and then the ‘Assign’
button.Click ‘Done’. You are back to the Labor Definition screen, and the Labor Metadata section appears.
Fill in the rest of the fields.
Labor Definition Fields Cont’d# Field
What You Enter…
Labor Control Date
Date parameter that Rebus will use to calculate the right offset. You can leave it as is or select another one.
Labor Metadata
Fields that are going to be used for:
Output: used for grouping the labor costs in the forecast results.
UOM: stores the UOM of the activity.
Quantity: stores the quantity value of the UOM.
Click ‘Save’. You have created a Labor Definition.
Repeat the steps if you need to set up more than one Labor Definition.
Next#
Setting Up Plan Definitions#
This procedure goes over setting up Plan Definitions. For background information on Plan Definitions, see:
Here’s an overview of the procedure:
Step |
Why Do This? |
|---|---|
A Plan Definition must exist in the application to set it up. |
|
A Plan Definition must hold all demands and all possible activities for which to forecast the labor costs. Plan Mappings combine Demand Types and Labor Definitions and define the mapping method. |
|
Mapping attributes help you get the most precise forecast results; they are a set of conditions that must be true for Rebus to calculate the historical labor costs associated to demand volume. |
Prerequisites#
You have:
Planned the Plan Definition.
Considered all direct activities needed to complete each demand.
Step 1: Adding a Plan Definition#
From the Rebus menu, select Admin Tools > Labor Planning > Plan Definition. You’re at the Plan Definition screen.
Click ‘+New Plan Definition’.
Fill in the fields needed to add the plan definition.
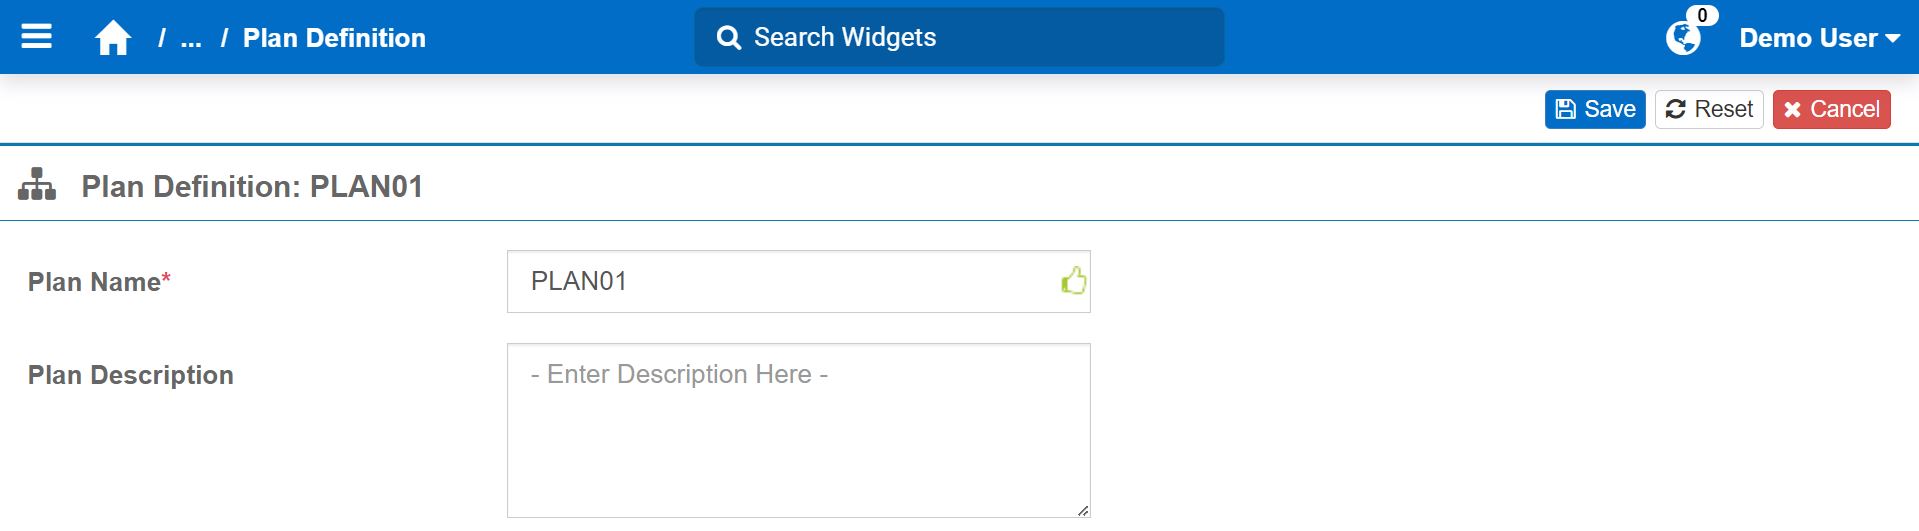
Plan Definition Fields# Field
What You Enter…
Plan Name
Plan’s name.
Plan Description
Description for the Plan Definition.
Click ‘Save’. You’ve added a Plan Definition.
Step 2: Configuring Plan Mappings#
From the Plan Definition screen, go to the ‘Plan Mappings’ tab.
Click ‘+New Mapping’.
Fill in the fields needed to configure the Plan Mapping.
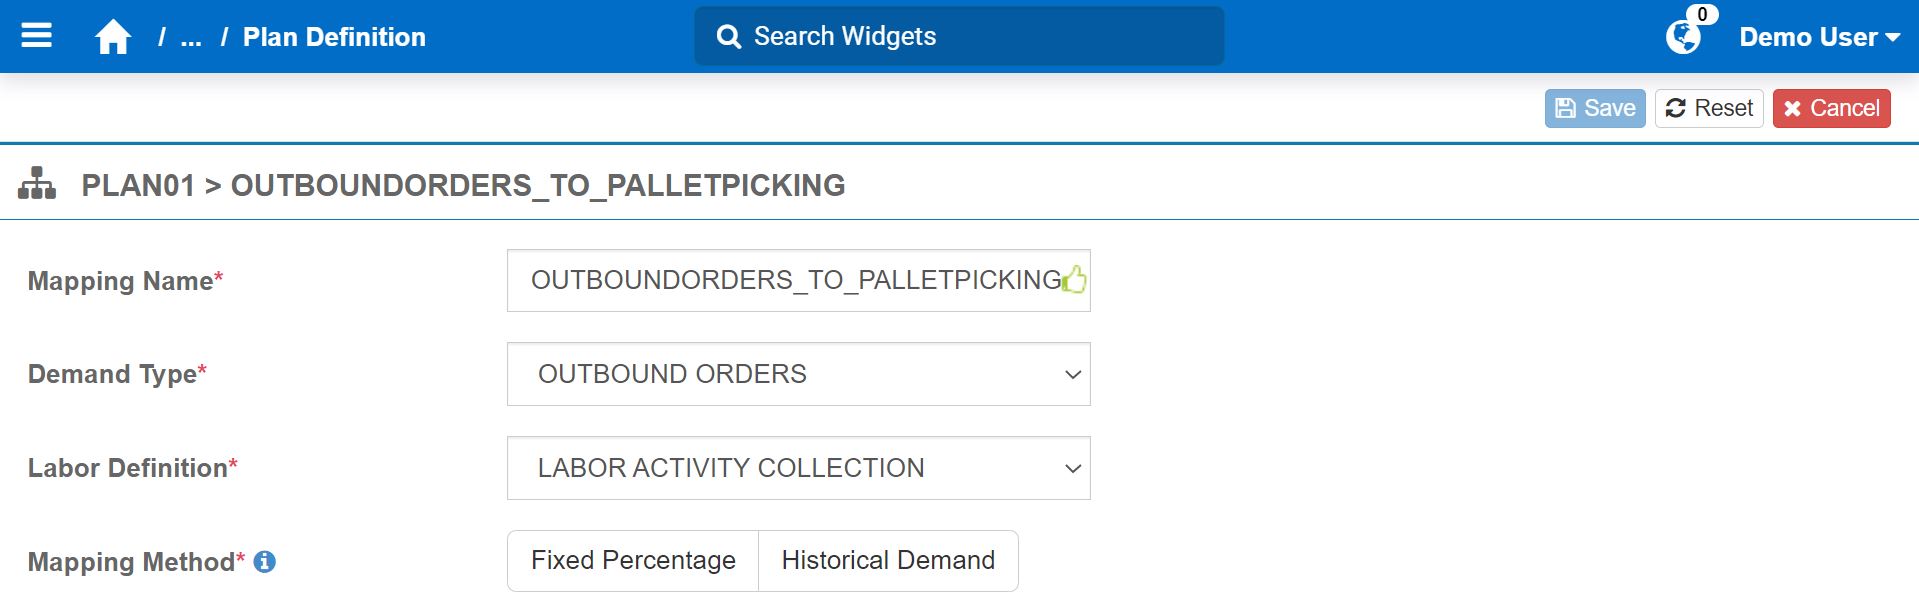
Plan Mapping Fields# Field
What You Enter…
Mapping Name
Name that can represent the association between a demand and an activity. In the above example, we want to associate the demand ‘outbound orders’ to the pallet picking activity. Therefore, the name represents this association.
Demand Type
Demand Type.
Labor Definition
Labor Definition.
Mapping method
Fixed Percentage or Historical Demand.
Follow the steps according to the selected mapping method:
Fill in the fields needed to configure the Plan Mapping with the Fixed Percentage.
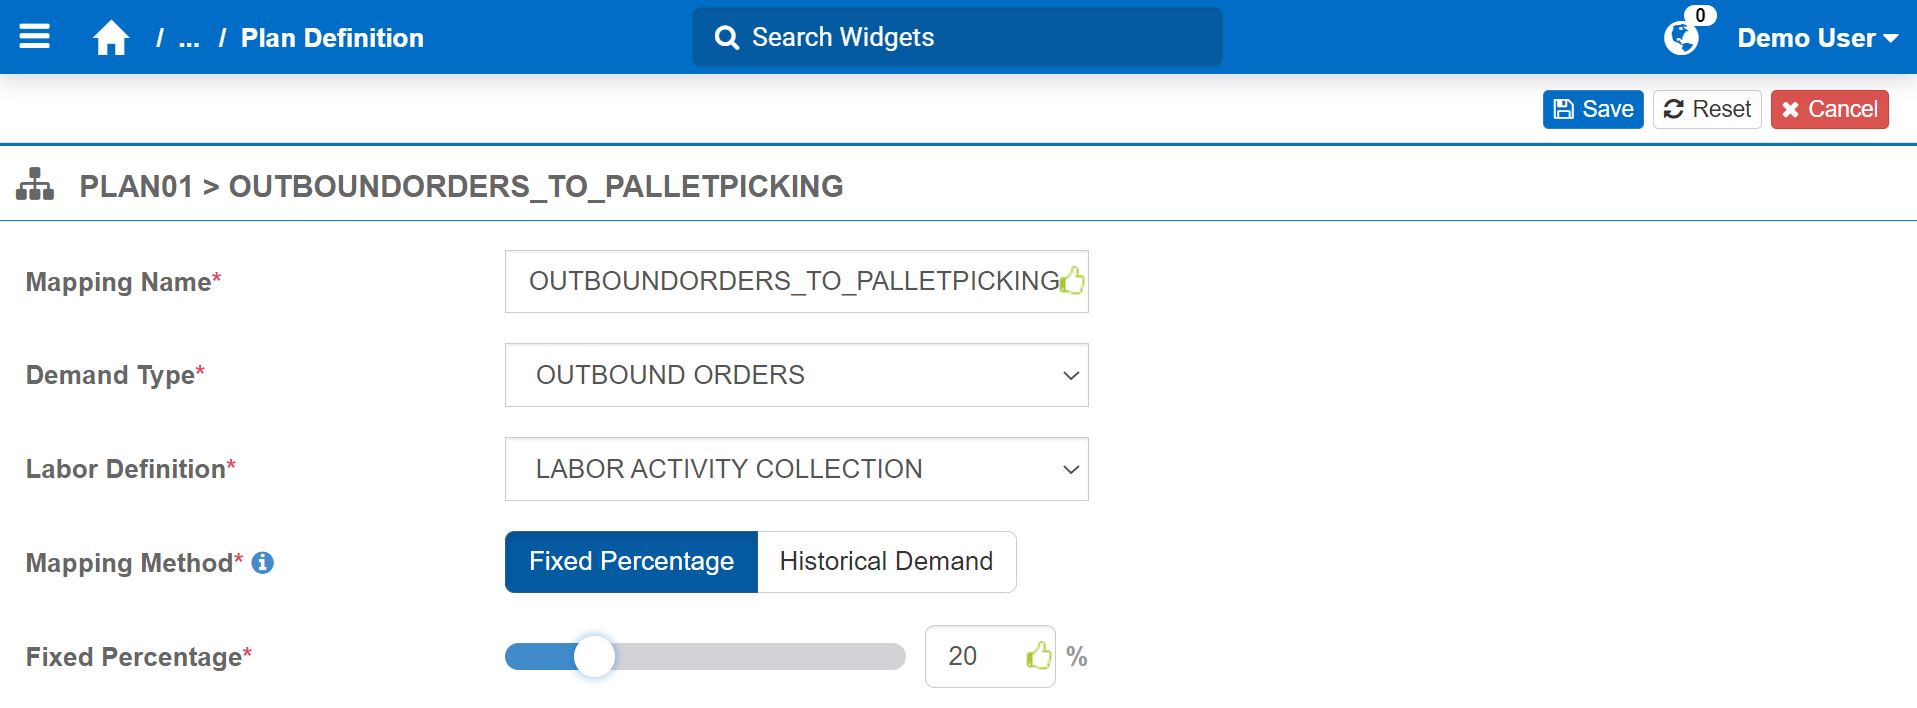
Fixed Percentage Fields# Field
What You Enter…
Fixed Percentage
The percentage of the future demand quantities for which the activities’ future labor costs will be calculated.
In the above example, 20% of future outbound order quantities will go through the quality assurance (QA) activity. The Mapping Name OUTBOUNDORDERS_TO_QA indicates a focus on using the data relevant to only the QA activity to calculate its future labor costs. You set up the conditions that identify the data relevant to the QA activity later (i.e., Step 3: Configuring Plan Mapping Attributes).
Fill in the fields needed to configure the Plan Mapping with the Historical Demand.
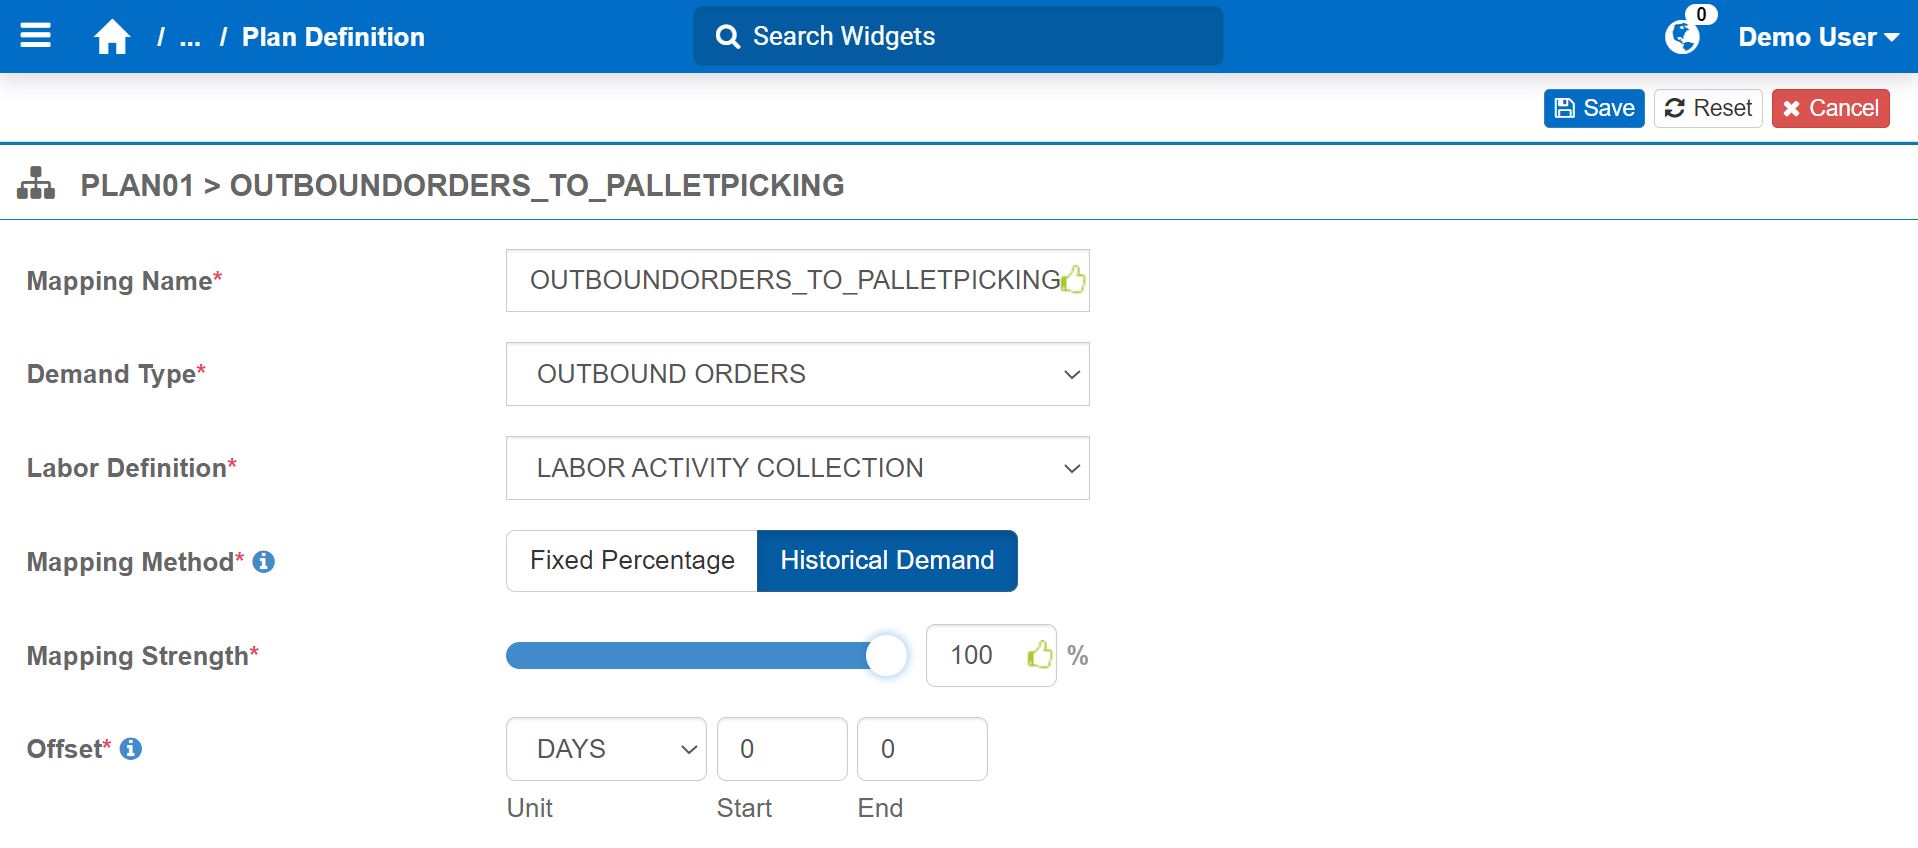
Historical Demand Fields# Field
What You Enter…
Mapping Strength
The percentage value to adjust the calculation of future labor costs, based on the specific requirements of a particular type of demand. The value must be a percentage between 0% and 300% inclusive.
Offset
The offset. Enter the following:
Unit: hours, days, weeks, or months.
Start and End: the number of units before/after the start of the historical demand date range.
Depending on the type of demand, ‘0’ represents either the demand’s starting or ending point. In this current example, pallet picking occurs on the day of the outbound order’s trailer dispatch (i.e., the demand’s ending date). Therefore, ‘0’ is the activity’s Start and End.
Click ‘Save’. You’ve configured a Plan Mapping.
Repeat all the steps for each Plan Mapping you want to configure.
Step 3: Configuring Plan Mapping Attributes#
Go to the Plan Mapping Attributes tab.
Configure the conditions to specify the activity and the fields that map it to the demand. You can create multiple conditions and put them together using ‘OR’ and ‘AND’ logical operators.
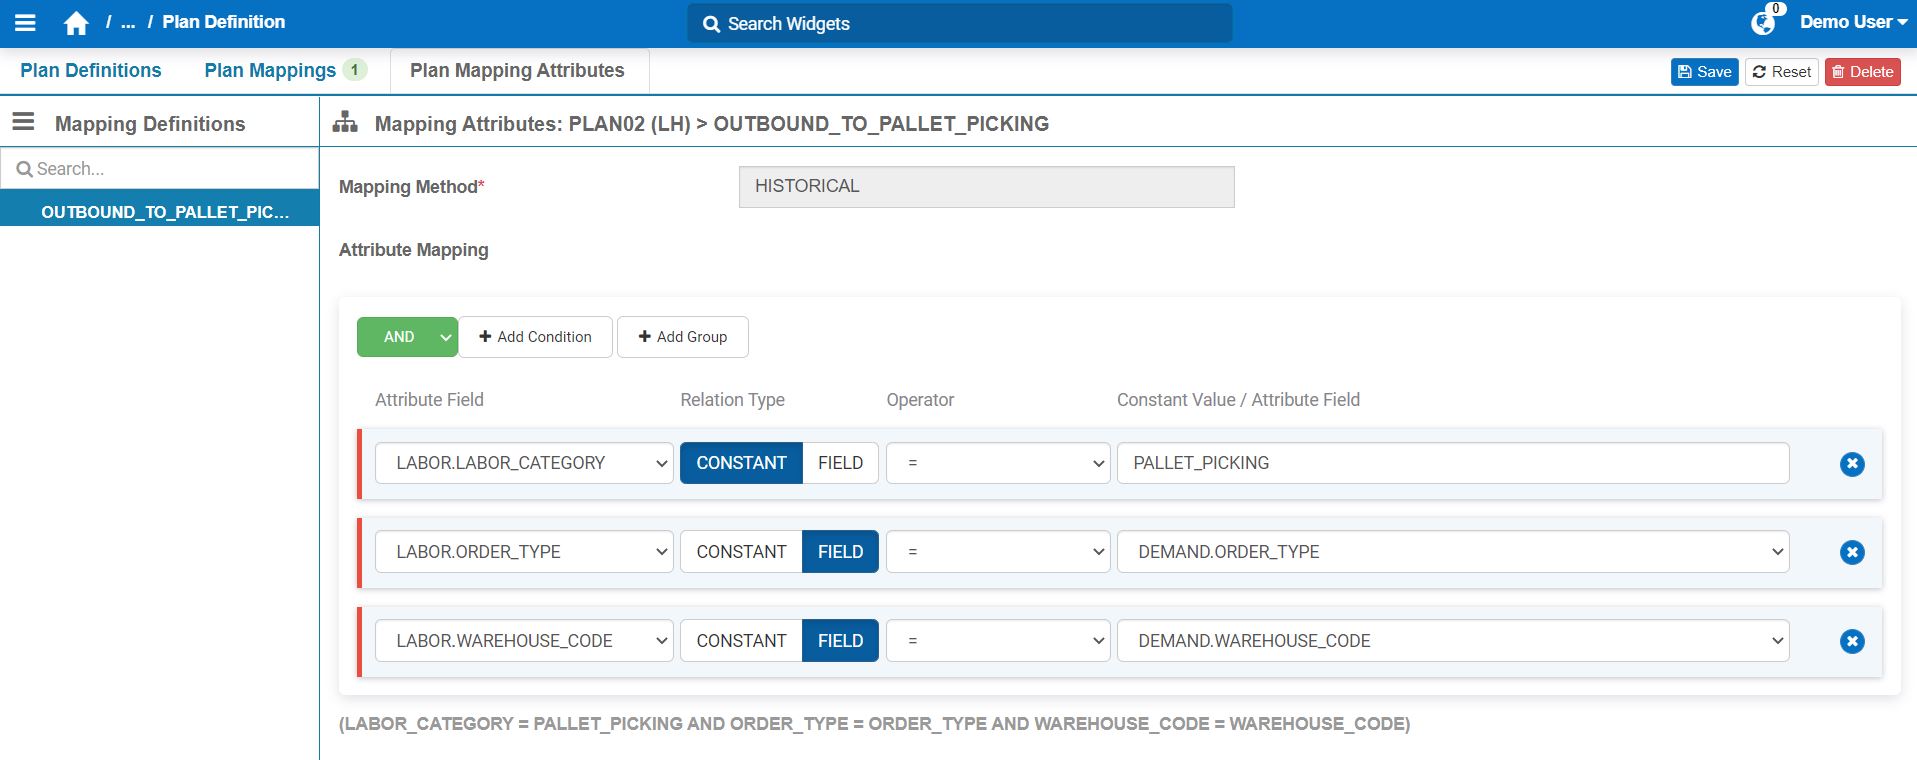
Click ‘Save’. You have configured the Plan Mapping Attributes for its Plan Mapping.
Next#
Setting Up Forecast Definitions#
This procedure goes over setting up Forecast Definitions. This the last step for setting up the Labor Planning Module before forecasting labor costs. For background information on Forecast Definitions, see Forecast Definitions.
Tip
To create a Forecast Definition similar to an existing one, you can clone it and make the necessary changes.
Constraints#
Once a Forecast Definition is activated, you can’t add, edit, nor delete Widget Builder stages of the widgets used for forecasting labor costs (i.e., the Demand Type’s Historical Widget, and the Labor Definition’s custom widget).
Note
You can deactivate a Forecast Definition any time.
Prerequisites#
You have:
Planned your Forecast Definition(s).
Defined how many Forecast Definitions to set up.
Steps#
From the Rebus menu, select Admin Tools > Labor Planning > Forecast Definition. You’re at the Forecast Definition screen.
Fill in the fields needed to set up the Forecast Definition.
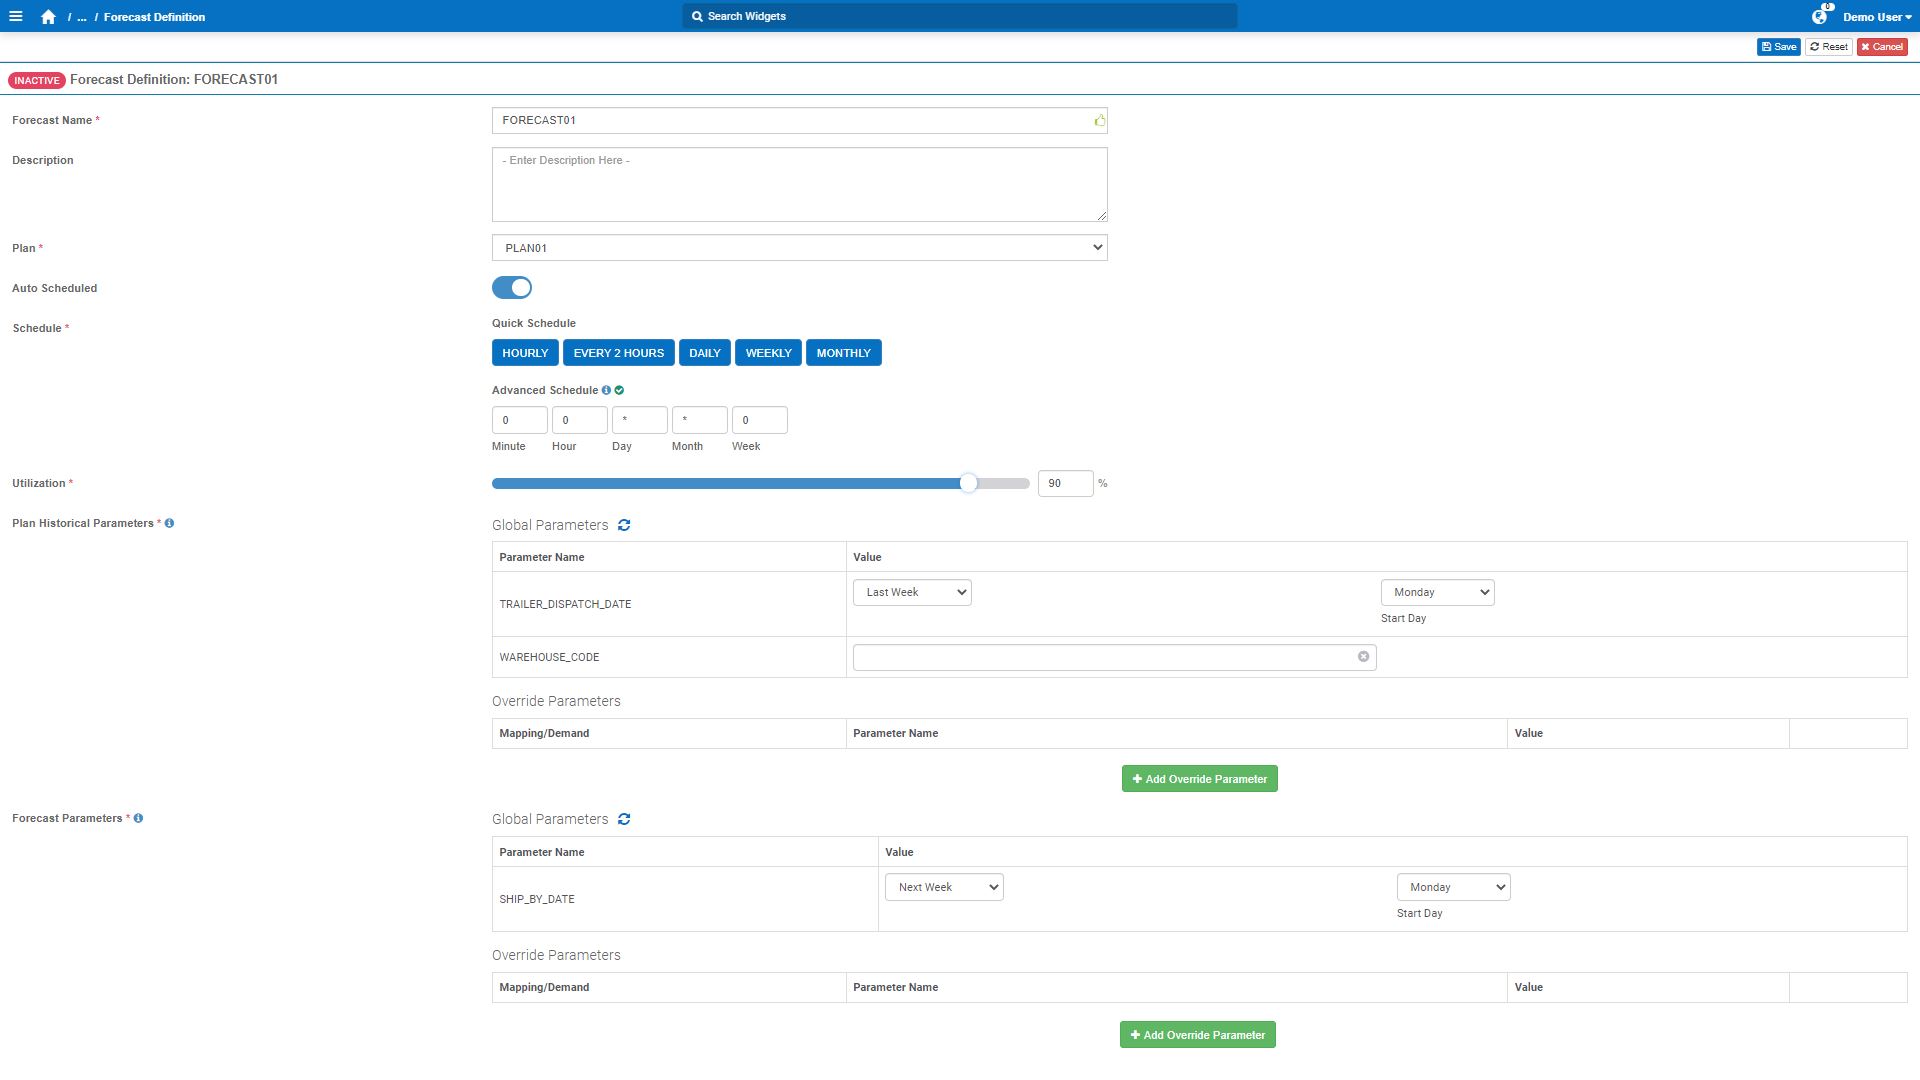
Forecast Definition Fields# Field
What You Enter…
Forecast Name
Name of the Forecast Definition.
Description
Description for the Forecast Definition.
Plan
Plan Definition.
Auto Scheduled
Whether to have Rebus automatically execute forecast instances according to a set schedule.
Schedule
Frequency at a forecast instance will be executed. You have two options:
Quick schedule: select one of the predefined schedules:
HOURLY
EVERY 2 HOURS
DAILY
WEEKLY
MONTHLY
Advanced schedule: specify a precise schedule by entering the appropriate numbers under ‘Minute’, ‘Hour’, ‘Day’, ‘Month’, and ‘Week’. To get the guidelines for entering a precise schedule, hover over the information icon
 .
.
Utilization
The percentage of total time all warehouse staff is spending in essential activities.
Plan Historical Parameters
Historical Parameters and their values under two sections:
Global Parameters: historical parameters apply to all the plan’s mappings.
Override Parameters: historical parameters apply only to a particular Plan Mapping. To add an override parameter, click ‘Add Override Parameter’. Then, selected the Plan Mapping and parameters, and then enter the desired value.
Click ‘Save’. You’ve created a Forecast Definition.
Result#
You’ve completed the Labor Planning setup. The Forecast Definition is inactive by default after creating it. It needs to be active to execute it. To activate it, turn on the ‘Active’ toggle:

Note
The ability to set up forecast shifts will be implemented in a future release. This functionality provides the option to specify the shifts during which a warehouse operates if it doesn’t operate continuously.
Cloning Forecast Definitions#
You can clone Forecast Definitions, Plan Definitions, Plan Mappings, Demand Types, and Labor Definitions. Doing so speeds up the creation of similar Forecast Definitions, Plan Definitions, Demand Types, and Labor Definitions.
Steps#
From the Rebus menu, go to Admin Tools > Labor Planning > Forecast Definition.
From the Forecast Definitions panel, select the Forecast Definition that you want to clone.
Click ‘Clone’. The Forecast Definition Clone form appears with two columns: Original and Clone.
Do one of the following:
Clone only the Forecast Definition
Forecast Definition and its corresponding Plan Definition, Demand Types, and Labor Definitions
Under the Clone column, enter the new Forecast Definition name.
Click ‘Full Clone’. The Original and Clone columns expand to display the names of the Plan Definition, Plan Mappings, Demand Types, and Labor Definitions.
Under the Clone column, enter the new names of the following:
Forecast Definition
Plan Definition
Optional: Plan Mapping
Demand Types
Labor Definitions
If a Demand Type or Labor Definition name is displayed under different Plan Mappings, the new name instantly updates across the different Plan Mappings as you enter it once in the form.
Click ‘Done’.
Result#
You have cloned a Forecast Definition. The results are different depending on what you have cloned.
You have cloned… |
Result |
|---|---|
Only the Forecast Definition. |
The cloned Forecast Definition’s associated Plan Definition, Plan Mappings, Demand Types, and Labor Definitions are identical to the originals. |
The Forecast Definition and its corresponding Plan Definition, Demand Types, and Labor Definitions. |
The cloned Plan Definition, Plan Mappings, Demand Types, and Labor Definitions appear in their respective configuration screens. |
In both cloning scenarios, the plan mapping attributes are cloned.