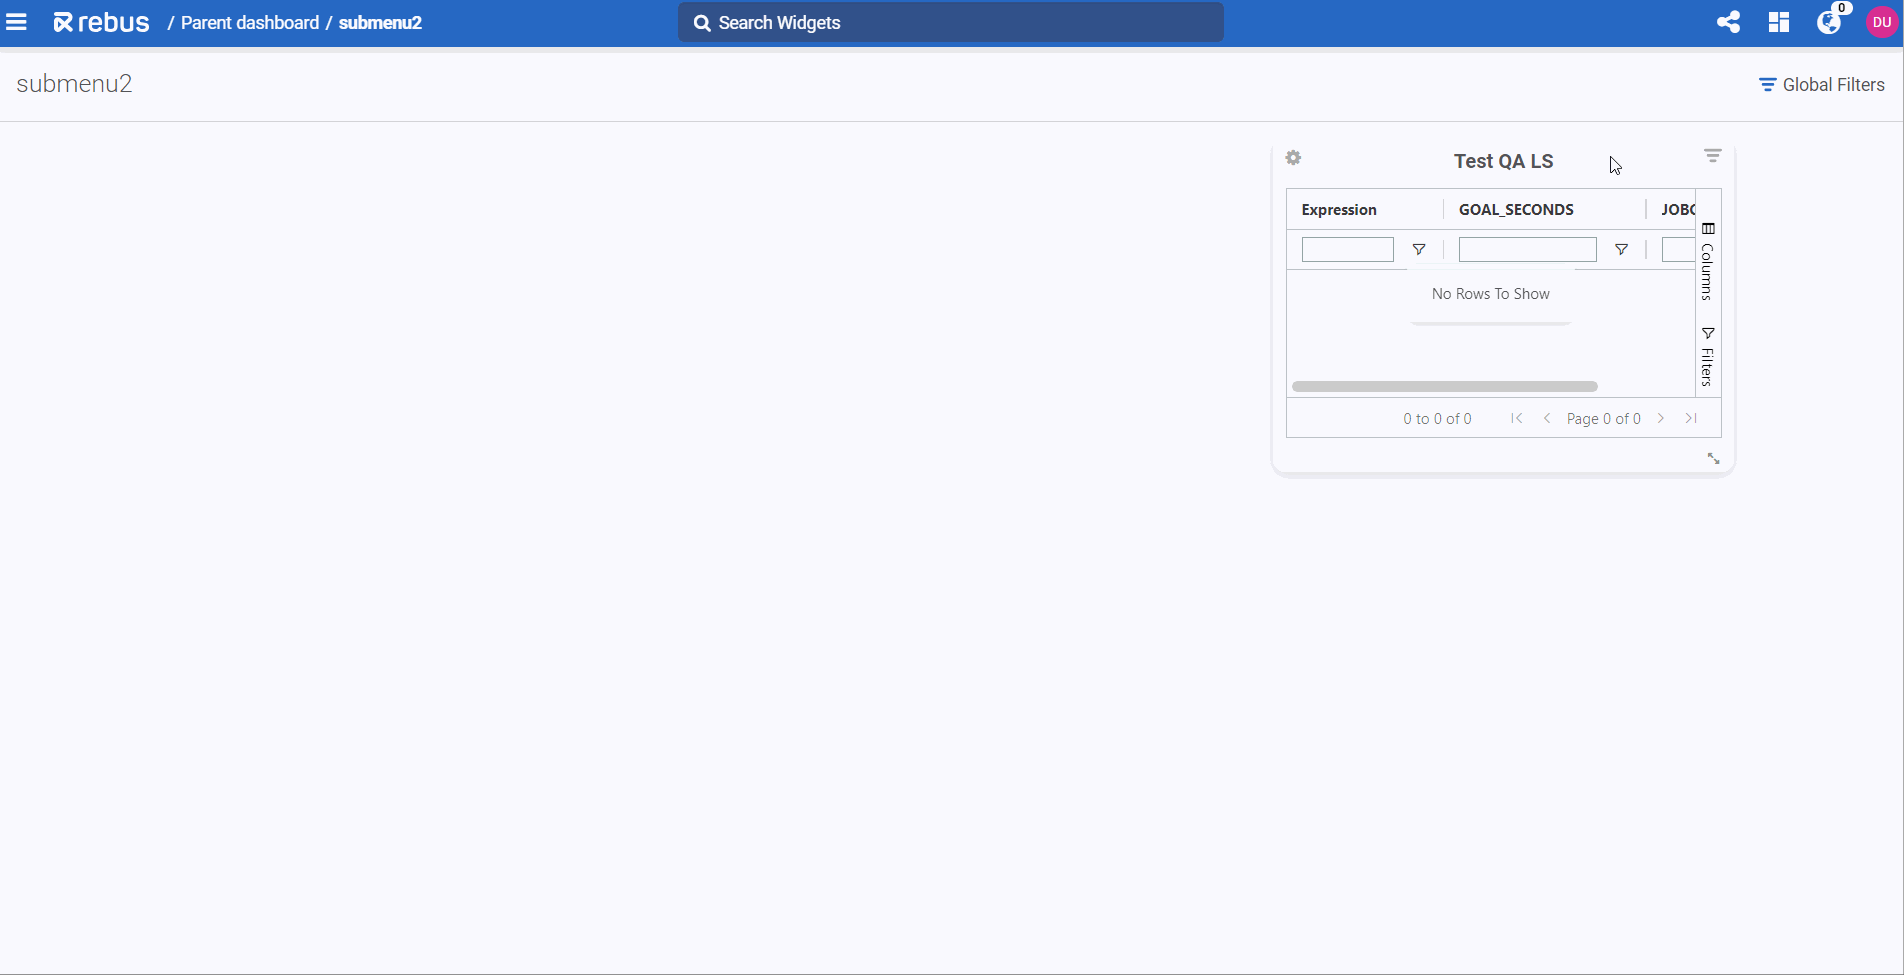
Managing Dashboards#
Setting Up Sub-Menus#
This procedure goes over how to set up a sub-menu.
You can have 10 sub-menus in the menu panel.
You can add up to 4 levels of sub-menus under a top menu. Here’s an example:

Pre-requisites#
Before you start, it’s helpful if you already know how you plan to organize your dashboards.
See Planning Dashboards for more details.
Steps#
In the Menu header, click the New Menu Item
 button. The Edit Name dialog appears.
In the Title field, enter the name of the new Sub-Menu and then click ‘OK’.
Note
 Rebus will not allow you to give a Sub-Menu the same name as an Administration menu option.
Result#
You’ve created a new sub-menu, which you can now access through the Menu panel.
Setting Up Dashboards#
This procedure goes over how to set up a dashboard in Rebus. You can set up a maximum of 30 dashboards.
Pre-requisites#
Before you start, it’s helpful if you already know:
Your dashboard’s purpose,
Its audience, and
How it’s going to be laid out.
See Planning Dashboards for more details.
If you’re going to organize your dashboards under sub-menus, these should already be set up. See Setting Up Sub-Menus for more details.
Your profile should be set up to access the widgets you’re going to put on the dashboard.
Steps#
Creating a Blank Dashboard#
Determine where in the menu you want to place the label for the new dashboard.
I want the label to be at the menu’s top level |
I want the label to be under a Sub-Menu. |
|---|---|
In the Menu header, click the ‘+’ button. |
In the label of the sub-menu, right-click and then select ‘Add a Sub-Menu’. |
The Edit Name dialog appears.
In the Title field, enter the name of the new dashboard and then click ‘OK’. The new dashboard appears in the Menu panel.
In the Menu panel, click the label of the new dashboard. The Menu panel slides off the screen to present a blank dashboard.
Now that you’ve created a blank dashbaord, you can start adding widgets to it.
Adding Widgets to a Dashboard#
Follow these steps:
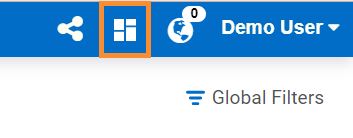
Open the Widget Library. You can do this in two ways:
If the dashboard is empty, click ‘Add Widgets’. The Widget Library opens.
If there are already widgets on your dashboard, click the Widget Library icon.
The Widget Library lists the widgets you can add to your dashboard.
Note
Each dashboard can hold up to 10 widgets.
Find a widget that you want to add to your dashboard. The widgets are organized into groups. Each group heading displays the number of widgets within the group. To see which widgets are in a group, click the group’s header. The Widget Library shows thumbnail images (i.e., miniature screenshots) of the widget’s chart type. The top of the panel lets you filter the list in the following ways:
By Date the widget was last modified. Click the appropriate date filter button.
By Search Term. Enter a search term in the Search field.
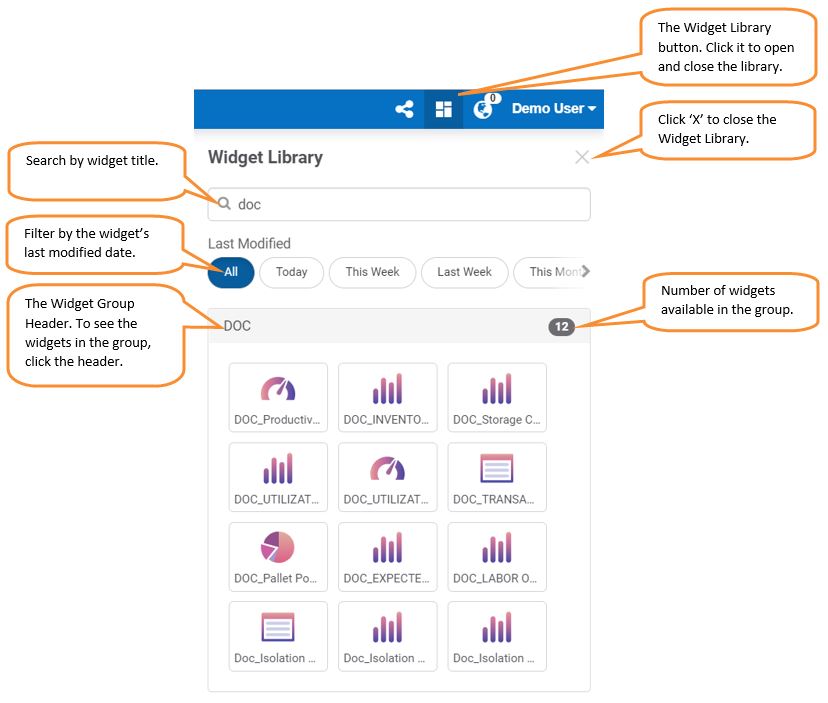
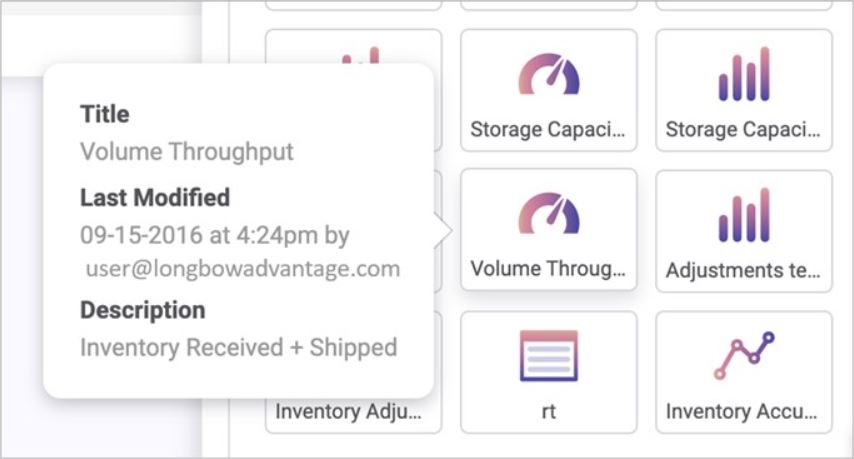
When you hover over a widget thumbnail, a tooltip appears and displays the widget’s title, the date it was last modified and by which user, and its description.
Drag the widget’s thumbnail to the desired position on the dashboard. A blue outline box shows you the area on the dashboard where you can drag the widget and a gray outline box shows where the widget will land when you drag it to the desired position.
Widgets are automatically lined up along invisible horizontal and vertical gridlines, which ensures that they don’t overlap. When you are adding a widget to a spot on the dashboard, Rebus places it as high up on the dashboard over that spot as the placement of existing widgets permits. If you’re putting a widget on an empty dashboard, it’ll always be placed in the top row no matter where your pointer happens to be when you release the click button.
The Widget Properties form appears once you’ve dragged the wigdet on the dashboard.
Fill out the fields in the Widget Properties Form.
Continue adding any other widgets you want displayed on the dashboard.
Result#
You’ve created a new dashboard, which you can now access through the Menu panel. The menu option now shows a gauge icon  , which denotes dashboards.
To set up a full screen rolling dashboard, see how you can select your Favorite Widgets and set up a Full Screen Display.
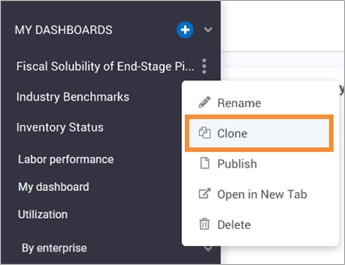
Cloning Dashboards#
You can clone sub-menus and dashboards that contain widgets if they meet at least one of the following criteria:
Shared to yourself,
Published and restricted, and you’re its publisher,
Published and public, and you’re its publisher or a subscriber.
You might want to do this if the same dashboard is needed, but with different parameter values.
Steps#
From the Rebus menu, hover over the dashboard or sub-menu that you want to clone.
Click the dashboard or sub-menu’s menu, and then click ‘Clone’. The Clone Dashboard or Sub-Menu form appears.
Fill in the fields for the cloned dashboard or sub-menu:
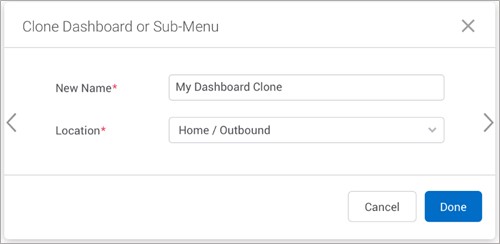
Field |
What You Enter |
|---|---|
New Name |
The name of the cloned dashboard or sub-menu. |
Location |
The menu under which the cloned dashboard or sub-menu will be located. If Home is selected, the dashboard or sub-menu will be located under MY DASHBOARDS as a main dashboard. |
Click ‘Done’. You’ve cloned a dashboard and can now modify it according to your needs.
Editing Widgets on a Dashboard#
This procedure goes over how to edit widgets that are displayed on a dashboard.
Steps#
Open the dashboard whose widgets you want to edit.
Make your desired changes to the widgets. The table below describes what you can do and how.
Option |
What to Do |
|---|---|
Move a widget |
Click and drag the widget to the desired location on the dashboard. If there’s another widget at the desired location, that widget will slide out of the way and the surrounding widgets will re-arrange themselves to make room for the moved widget. |
Remove a widget |
Open its Properties drop down menu by clicking its Settings |
Add a widget |
Click the Widget List button |
Resize a widget |
Hover your pointer over the bottom right corner of the widget and click and drag to expand or reduce the widget’s size. |


Optional: reset your dashboard layout to its last published state by clicking the Reset Layout button at the top of your dasboard. This will undo all unsaved changes.
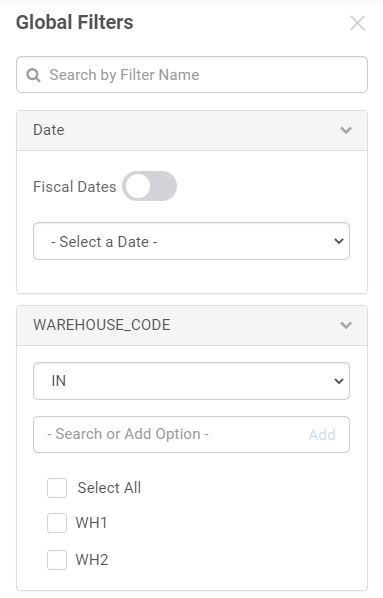
Applying Global Filters to a Dashboard#
A global filter is a filter you can apply to all widgets on a dashboard at once rather than filter each widget individually. You can use all widget parameters as global filters. Only widgets that have the parameter will be affected by the global filter.
Global Filters also include enhanced date filtering options:
Relative Date and Relative Range: automatically return the full day (00:00:00–23:59:59).
Last X Weeks: filter by a configurable number of weeks and choose the starting day of the week.
Fiscal Date Mode (Optional): Switches relative range options to fiscal periods.
Work Day Toggle (Optional): Defines a custom operational day (for example, Today = 2:00 AM to 2:00 AM).
Note
Work Day and Fiscal Date modes cannot be enabled at the same time in Global Filters. See Setting Up Facilities for more details.
Note
A widget’s available parameters are found in the Widget Properties form.
Note
Global filters are not available on the Favorite Widgets screen.
Applying Global Filters#
In the title bar, click on the Global Filter
 button. The global filter panel opens. This panel lets you:
add, edit, or remove filters,
search for filters, and
clear all filters.
The panel shows all parameters available from the widgets on the dashboard.
An information icon
displayed next to a parameter means that the parameter is used in two or more widgets and may hold different values in at least one of them. For more details, hover over the information icon. You can go to each designated widget’s Field Stage in the Widget Builder and ensure the parameter is used the same way across all of them.Specify the parameter values by which the widget data will be filtered.
Click ‘Apply’. The widgets that have this parameter show only the data that matches the specified criteria.
Once you apply the global filter, the filter name and its parameters are visible in the title bar.
Opting out of Global Filters through the Widget Properties Form#
If you don’t want the global filter to apply to a widget, set its Global Filters toggle button to Off.
After the Global Filters toggle has been set to ‘Off’, a widget’s parameter values can be changed.

Adding and Removing Widgets to Dashboards that have a Global Filter#
The following table describes what happens if you add a widget to a dashboard with a global filter.
Global Filters toggle on Widget set to… |
What happens on Dashboard… |
|---|---|
On |
Global filter is applied to the widget if the widget shares common parameters of dashboard’s global filters. Otherwise, the widget’s parameters are added to the Global Filter’s panel for use as a global filter. |
Off |
Global filter on dashboard is unaffected and is still applied to all widgets where the Global Filters toggle is turned on. |
Sharing Dashboards#
You can share with another user a dashboard that you’ve created.
Pre-requisites#
The other user must have the ability to view all widgets that are on the dashboard that you intend to share. Make sure that the widgets are available for the user’s profile.
Steps#
From the Rebus menu, hover over the dashboard you want to share.
Click the ‘Share’ button
 . The Share Dashboard form appears.
Fill in the fields in the form:
Create the list of users that you want to share the dashboard with: from the dropdown list, select the desired users. The list is ordered alphabetically. You can also start entering a user’s user name or email address to filter the list with what you’ve typed, and then select the desired user.
Enter the dashboard’s name.
Optional: Enter a note.

Click ‘Done’.
Result#
Users are notified that a dashboard has been shared with them.
Applying a Shared Dashboard#
If someone shares a dashboard with you, you will receive a notification whose subject line is ‘Dashboard Received’. You can access your notifications through the Notifications  option in the top toolbar.
Pre-requisites#
Before you apply a dashboard, know on which sub-menu you want to place it.
Steps#
Click Notifications
. A dropdown appears that lists your notifications. A Dashboard Received notification tells you the title of the shared dashboard and who shared it with you.
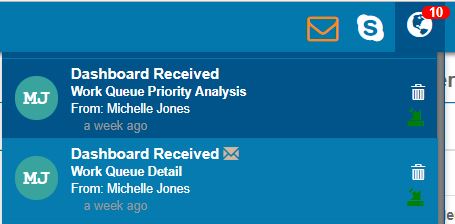
Click on the Dashboard Received notification. The Dashboard Received dialog appears showing the following details about the dashboard: its name, any notes provided by the sharer, the user who shared the dashboard, and the user who received the dashboard.
Next to ‘Location’, select the menu or sub-menu where you want the dashboard to be located.
Click ‘Done’.
Result#
The dashboard is added under the specified sub-menu.
Using AI Dashboard Insights#
You can use AI to analyze widgets and give you insights into the information your dashboard contains. This helps you better understand your data by automatically identifying trends, patterns, and outliers across your dashboard widgets, which then helps you make smarter and more informed decisions
Pre-requisites#
Rebus AI Dashboard Insights uses the widget Name and Description to help generate information. It’s important that your widget details accurately reflect the data in your widget. You should:
Be clear. Instead of having a title that reads “P-w12,” use “Pallets in Warehouse 12”.
Be precise. Instead of having a title of “Sales” and a description that reads “Monthly”, use the title of “Monthly Sales- North America” and a description that reads “Total gross revenue from all product lines in North America, grouped by month.”
Steps#
Click on the AI Insights button on the top left of your dashboard.
The AI Dashboard Insights panel opens.
Click Ask Rebus AI.
The system will provide a widget summary that explains data trends and highlights any anomalies.
You can also keep track of previously generated AI insights by clicking the dropdown at the top of the insights panel. To get more information on the dashboard widgets that were analyzed, click the information icon at the end of your generated insight. This info includes names and descriptions of all analyzed widgets.
Emailing Images of all Widgets on a Dashboard#
This procedure covers how to email images of all the widgets on a dashboard at once. For more on how to email a single widget, see Managing Widgets.
Pre-requisites#
Your company’s instance of Rebus is integrated with its Office 365.
You must be signed in as an FS user.
Steps#
Open the dashboard whose widgets you want to email as images.
In the top menu bar, click Email Dashboard as Attachments
 . A compose email form appears, which has an image attachment of each widget as it appears on the dashboard. The subject line is the dashboard title and a date time stamp.
In the ‘To’ field, enter the email addresses of the recipients.
Click ‘Send’.
Result#
The email is sent with an image attachment for each widget on the dashboard.
Editing Sub-Menus and Dashboards#
For each sub-menu or dashboard on the menu, you can open and select from a dropdown menu of edit actions. To open an item’s edit dropdown menu, hover your pointer over the item and right click. Through the dropdown menu, you can:
Rename the menu item,
Manage its dashboard publisher settings,
Delete it, or
Add a sub-menu underneath it.
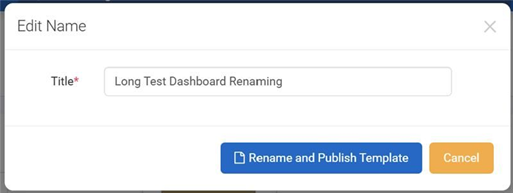
When a dashboard owner renames a published dashboard, a modal window appears with two options:
Rename and Publish
Cancel
Dashboard Publisher#
The dashboard publisher functionality allows you to create dashboard templates. A dashboard template is a configured set of widgets that you can share with your team members. It reduces the setup time for dashboard and helps to ensure that every team member has access to the same sets of widgets. You can turn a dashboard that you created into a dashboard template and then publish it to a user profile, whose users become the template’s subscribers. A dashboard template can be public or restricted.
Public Dashboard Template#
This type of template allows subscribers to edit and share the dashboard as they would one of their own. Public templates are like Sharing Dashboards, but the template is automatically applied to the menu of every users in the profile. To find a dashboard’s version number, hover your pointer over the item representing the dashboard. A tooltip with a version number appears.
Restricted Dashboard Template#
This type of template implements versioning and restricts subscribers from editing or sharing the dashboard. Every time a new version is published, the dashboard template and its version number are automatically updated for all the subscribers. You can also ‘Allow Filter Change’ on a restricted template to enable users to change a widget’s parameters.
Features |
Restricted |
Public |
|---|---|---|
Versioning |
Incremented by one each time a new version is published. |
Not maintained |
Adding or deleting widgets |
Allowed only to template’s owner. |
Allowed |
Deleting dashboard |
Not allowed |
Allowed |
Changing Dashboard title |
Allowed only to template’s owner |
Allowed |
Positioning and sizing widget |
Allowed |
Allowed |
Changing widget parameters |
Allowed if the ‘Allow Filter Change’ option is checked |
Allowed |
Changing widget title |
Allowed only to template’s owner |
Allowed |
Exporting/printing widgets |
Allowed |
Allowed |
Drill down and Cascading widgets |
Allowed |
Allowed |
Changing widget refresh timer |
Allowed |
Allowed |
When new users added to template’s profile |
Template applied to user with the most recent published version. |
Template applied to user. |
Setting Up/Editing a Dashboard Template#
This procedure covers how to set up and edit a dashboard template.
Prerequisites#
You have access to the ‘Dashboard Publisher Configuration’ screen.
The dashboard you want to use as a template is already set up.
Restrictions pertaining to profiles and isolation groups have been applied to the dashboard template. Make sure that all the subscribers are part of a profile that is allowed to see the widgets on the template and that no user is part of an isolation group that conflicts with the information displayed in the dashboard template.
For more information, see Profiles and Data Isolation.
Steps#
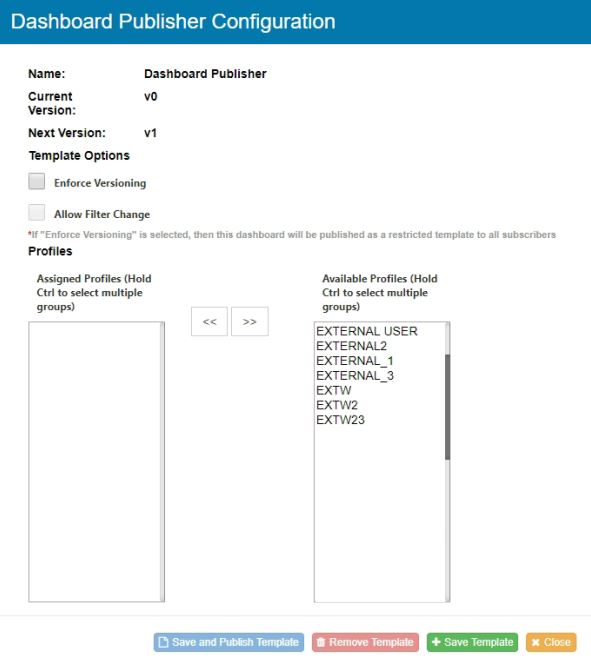
In the menu, right-click the label of the dashboard that you want to publish. A dropdown menu of edit options appears.
Click ‘Publish’.The ‘Dashboard Publisher Configuration’ screen appears.
Fill in the form:
Field Name |
Description |
|---|---|
Enforces versioning |
Selected this to make this template Restricted. Subscribers cannot share, delete or edit the dashboard. |
Allow Filter Change |
Allows subscribers of a restricted template to change a widget’s parameters. |
Profile |
Profiles with which the dashboard template will be automatically shared. |
Click on ‘Save and Publish Template’ and confirm that you want to share it with all the assigned profiles.
Results#
Note
When you publish a dashboard, an information dialog will pop up letting you know that your dashboard is being published. When the process finishes, a status update will be sent to you by email to notify you whether your dashboard published successfully, or if it failed to publish.
What You Did |
Result |
|---|---|
Published a new template. |
All the users that are part of the profiles you selected can see the dashboard in their menu. As the dashboard owner, you also see a green dot next to the dashboard’s title. If the template is restricted, the version number will be visible to all the subscribers when they hover their pointer over the dashboard label in the menu. If the template is public, the version number will always be 0 and will only be visible to the owner. |
Edited a Restricted Template. |
The changes are automatically applied to all the subscribers’ dashboards and the version number is incremented by 1. |
Edited a Public Template. |
A new version of the edited dashboard is automatically applied to the subscriber’s menu in addition to the previous version. |
Changing the Owner of a Dashboard Template#
This procedure covers how to change the owner of a dashboard template. You can change the owner of a dashboard template if it was published at least once as a Restricted Dashboard Template. Ownership cannot be changed on a Public Dashboard Template.
You can see who the owner of a dashboard template is by hovering your mouse over the template’s name in your menu.
Note
If you change the ownership of a currently public template that was published as a restricted template in the past, the dashboard template will revert to the last restricted template version.
Prerequisites#
You have access to the ‘Dashboard Publisher Reassignment’ screen.
The previous owner published the most recent changes made to the dashboard.
The template was published at least once as a restricted template.
Steps:#
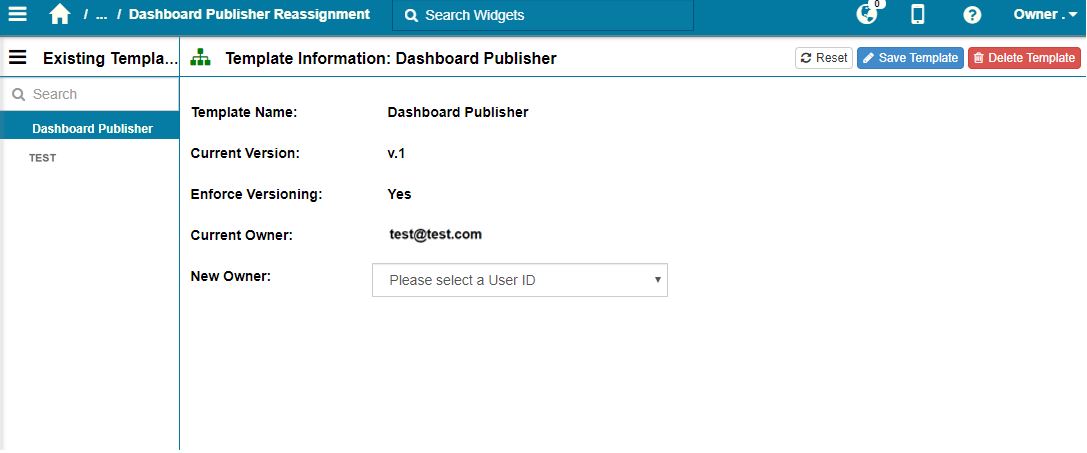
Go to Admin Tools -> Widget -> Dashboard Publisher Reassignment.
In the ‘Existing Template’ section, select the template that you want to modify.
Through the dropdown menu, Select a new Owner.
Click on ‘Save Template’.
Results#
The previous owner is still a subscriber. If the previous owner is removed from the dashboard template’s subscribers, he or she will retain a copy of the dashboard but it will no longer be updated.
Changing the Owner’s My Account Screen: Losing Access to Widgets#
If the owner of a dashboard template has his or her My Account screen changed, he or she may lose access to some or all widgets displayed on the dashboard. This issue must be fixed manually.
Steps#
Shift dashboard template ownership to another user with the correct My Account screen.
Move original user back to original My Account screen.
Shift ownership of dashboard template back to original owner.
Note
If you just change the original user’s profile back to the original profile, the lost widgets will not be restored.
Deleting a Dashboard Template#
This procedure goes over how to delete a dashboard template through the Dashboard Publisher Configuration screen or through the Dashboard Publisher Reassignment screen.
Prerequisites#
Have access to the ‘Dashboard Publisher Configuration’ screen or the ‘Dashboard Publisher Reassignment’ screen.
Deleting a Dashboard Through the Dashboard Publisher Configuration Screen#
In the menu, right-click the label of the dashboard that you want to publish. A dropdown menu of edit options appears.
Click ‘Publish’.The ‘Dashboard Publisher Configuration’ screen appears.
Click on ‘Remove Template’ to delete your dashboard template.
Deleting a Dashboard Through the Dashboard Publisher Reassignment Screen#
Go to Admin Tools -> Widget -> Dashboard Publisher Reassignment.
In the ‘Existing Templates’ section, select the template that you want to delete.
In the upper right corner, click ‘Delete Template’.
Result#
If the template was restricted, it disappears from all its subscriber’s menu. If the template was public, it remains accessible by all its former subscribers, but no new version is published.
Resetting a Widget’s Parameter Values on a Dashboard#
This procedure goes over:
Resetting a widget’s parameter values on a dashboard to the defaults specified in the Widget Builder.
Resetting a widget’s paramter values to their latest published version on a published dashboard with enforced versioning and filter changes allowed.
Steps#
From the desired widget, click the ‘Options’
 button.
Click ‘Properties’.
Follow the steps according to whether the widget is on a regular or published dashboard:
Dashboard
Step
Regular dashbaord
Click ‘Reset to Default’.
Published dashboard
Click ‘Reset to Published Default’.
Result#
If the widget is on a regular dashboard, the parameter values are reset to the defaults specified in the Widget Builder.
If the widget is on a published dashboard, the parameter values are reset to the latest published version.