Rebus API#
This section covers how you set up Rebus so that you can retrieve widget data from the Rebus database through the Rebus Application Programming Interface (API).
How the API works#
Each request to the Rebus database must come from an authenticated client (e.g., an application on your end that sends API requests.). The authentication details that a client needs are stored on the Rebus side in an API user account set up on the Organization Admin screen. An API user account is authorized to send API requests to the data collections of a set of specified widgets.
Note
 Authentication is stateless. No POST request or session cookie is required. Credentials are sent with every request.
Events of a typical Rebus API transaction:
Client sends GET query to get data from a widget that’s assigned to its API user account, which also contains authentication credentials.
Rebus API server responds with requested data in JavaScript Object Notation (JSON) format.
Creating API User accounts#
A tab on the Organization Admin screen, API Users, lets you set up API user accounts through which you can send GET queries to retrieve widget data from the Rebus database.
User Roles & Access Control#
Ensure users assigned for API integration have the proper access settings.
Access to the Organization Admin screen, where API user accounts are created and managed, is restricted to super users.
Before the API Users tab becomes available, your organization must first review and sign the official Rebus API Addendum. Once this addendum is signed and processed, the API configuration options will be enabled for authorized super users within the Organization Admin screen.
Creating User Accounts#
Pre-requisites
Access to the Organization Admin screen.
The IP address of the machine that will be sending requests. In most cases, this should be the static IP address of your external (public) network. The website https://www.whatismyip.com/ is a good online tool that can help you find the right IP address.
Steps
Go to the Organization Admin screen and click the API Users tab.
Click the ‘New User’ button and fill in the needed details. An API user account stores the following authentication-related details:
Field |
What You Enter… |
|---|---|
User ID |
Set up automatically. Identifier of account that is sending API requests. |
Password |
Password for account. Password must meet the following criteria: 1) Minimum length of 12 characters. 2) Contain at least one of each of the following: uppercase and lowercase letters, numbers, and special characters. |
White Listed IP |
The authorized IP address from where the API requests are sent. In most cases, this should be the static IP address of your external (public) network. |
Note
You cannot save addresses that fall in the 100.64.0.0 to 100.127.255.255 range. This is because this range is reserved for internal ISP network use and is not valid on the public internet. This is the only exception
For an application to be authenticated to send API requests, it needs to be configured with the user ID and password of an API user account and its IP address needs to be among the IP addresses whitelisted for that account. You can create up to five API user accounts.
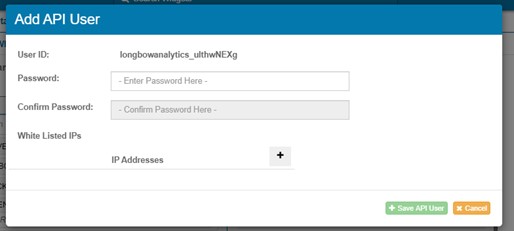
Click ‘Save API User’. The API user account is created.
Assigning Widgets#
Pre-requisites
Widgets set up that have the data you want to retrieve via API.
After setting up the API user account on the Organization Admin screen, do the following:
Open the API user account’s Assigned Widgets tab.
Assign to the user account the widget data collections from which this account is authorized to retrieve data. You can move widgets from the Available list to the Assigned list by clicking the ‘<’ button.
GET Requests: Setting the Endpoint URL#
A properly formatted GET query endpoint URL comprises two parts.
Part 1: The host and path name, which is constant
Part 2: The query string for the widget, which is taken from the API user account record on the Organization Admin screen.
Host and Path Name#
The base URL for the Rebus API endpoint consists of two parts:
Host: The internet address of the Rebus API server.
Path Name: The route inside the API server that points to a specific service.
Your company’s base URL may differ from the examples below. Always confirm your exact URL with Rebus Customer Support.
Example Calls
GET – Extract Service
Used to retrieve extract data.
https://api.rebusap.com/v2/inbound/extract/
POST – Load Service
Used to send load data into Rebus.
https://api.rebusap.com/v2/inbound/load
Creating the Query String#
Rebus uses a URL builder to help you create a query string. The GET query is what pulls the data from widgets. It controls filtering, sorting, or limiting which data is retrieved.
To set the endpoint URL of the GET query for an assigned widget, do the following:
Click the widget’s name and then click the gearwheel button. The widget’s URL Builder form appears. This form shows all the widget’s parameters and the default values that are used to populate the widget. At the bottom, the URL value shows the query string of the widget’s GET query endpoint URL.
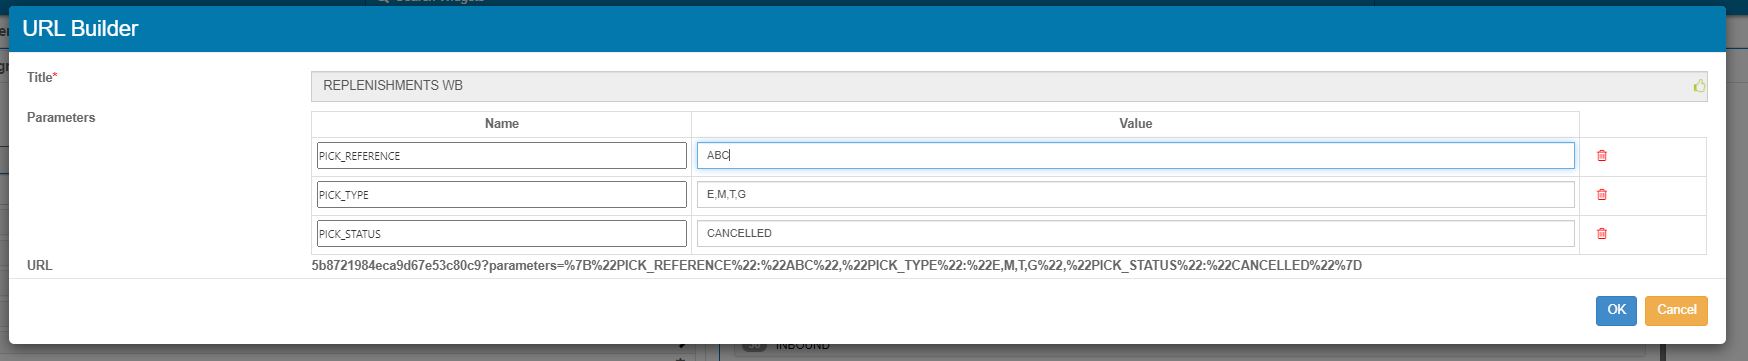
Adjust the parameter values to those you want the GET query to use when you are retrieving this widget’s data via API. The query string is changed to reflect any changes made to the parameter values.
Copy the query string at the bottom of the form and paste it someplace where you can easily get it when you are configuring the application that will be sending GET queries. You will append the query string to another value to build the full GET query endpoint URL for this widget.
Example of query string
5b8721984eca9d67e53c80c9?parameters=%7B%22PICK_REFERENCE%22:%22ABC%22,%22PICK_TYPE%22:%22E,M,T,G%22,%22PICK_STATUS%22:%22CANCELLED%22%7D
Sending GET Queries for a Widget#
Authenticating to Rebus API server
The Rebus API system uses a stateless approach to retrieve data from widgets. Stateless protocol does not require the server to retain server information or session details. Your authentication credentials will be included in the request header of each request.
In Postman, in the request Authorization tab, select Basic Auth from the Type dropdown list.
Enter your API username and password in the Username and Password fields. In the request Headers, the Authorization header will pass the API a Base64 encoded string representing your username and password values.
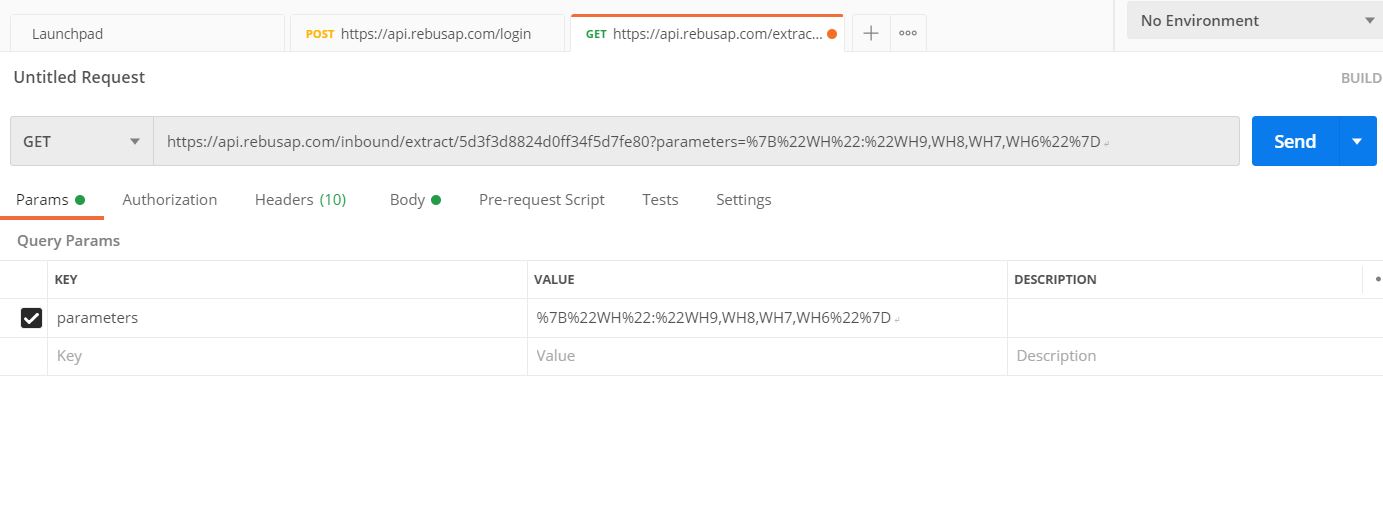
Example GET query endpoint URL
https://api.rebusap.com/inbound/extract/5b8721984eca9d67e53c80c9?parameters=%7B%22PICK_REFERENCE%22:%22ABC%22,%22PICK_TYPE%22:%22E,M,T,G%22,%22PICK_STATUS%22:%22CANCELLED%22%7D
Example in Postman:
POST Requests: Structuring the Payload#
When transferring data between your system and Rebus via the API, the data has to be packaged in a very specific format called the request payload.
Each payload includes two sections:
Metadata
Data
Metadata Requirements#
The Metadata portion of the request has all the technical details that Rebus needs to validate and process the data. This includes where the data is coming from, what kind of data it is, and how to treat the data. The table below outlines the metadata that is included in the request payload.
Field |
Expected Value |
|---|---|
Created |
<DATETIME that the API request was created> (in UTC) |
Account |
<Account_name – provided by Rebus team> |
Type |
SQL |
ID |
<unique endpoint configuration – provided by Rebus Team> |
DBMS |
Mongo or MySQL |
Collection |
<destination data collection – provided by Rebus team> |
SysVendor |
<Vendor Name – provided by Rebus team> |
SysType |
<System Type – provided by Rebus team> |
SysVersion |
<System Version – provided by Rebus team> |
TriggerValue |
<Identifier for the data trigger – provided by Rebus team> |
InsertType |
<Ingestion method provided by Rebus team> |
Identify |
<unique endpoint identifier – provided by Rebus team> |
TransactionID |
<Unique API Transaction ID> |
Data Requirements#
The Data portion of the request contains the actual data the system needs to ingest. The table below outlines the formatting of the data that is included in the request payload. Additional data is included for Labor-specific data transfers.
Data |
Description |
Example |
|---|---|---|
Field Names |
Must be uppercase with underscores |
ORDER_NUMBER |
Warehouse Code |
Always required, identifies which facility the data belongs to |
WAREHOUSE_CODE: “SITE1” |
Alphanumeric Fields |
Wrapped in quotes |
“ITEM_NUMBER”: “12345” |
Number Fields |
No quotes |
ORDER_QUANTITY: 100 |
Date Fields |
ISODate format (In UTC) |
2025-08-19T15:00:00.000Z |
Note
Note that anything null should be listed as null value. For example, “ITEM_LOT”: null
Setting up Authentication to 3rd Party APIs#
You can set up the credentials that Rebus uses to authenticate to the application programming interfaces (APIs) of third-party systems when it’s doing mass product status updates through the Quality Assurance (QA) module. A tab on the System Details screen, Communication, stores a set of credentials and API endpoints. For each third-party system, you can create a set of credentials that lets Rebus authenticate through one of the following:
Authentication Option |
Key Value pairs put in request header to authenticate API request |
|---|---|
API Key |
|
Basic |
|
You also set up details for the API endpoints to which Rebus is authorized to send its API requests when mass updating product statuses on the third-party system. The credentials are included in the header of the API requests sent to those API endpoints.
Creating a Set of Credentials to send API requests to a Third-Party System
Go to Admin Tools > System > Organization Admin > System Details tab. The System Information screen opens.
From the Existing Systems list, select the third-party system for which you want to set up a set of credentials to authenticate API requests. The main interface is filled with a System Information tab that’s populated with the details of the selected system.
Next to the System Information tab, click the Communication tab and then click ‘New’. Two fields, Method and Authentication, appear.
In Method, leave value at default, ‘API’.
In the Authentication field, select how Rebus will populate the request header with authentication information: API Key or Basic Authentication.
Selected API Key |
Selected Basic Authentication |
|---|---|
In the API Key field, enter the string of the API key. In the Header field, enter the Header value that, combined with the API Key, will authenticate the message to the third -party system. |
Enter Username and password combination that will authenticate Rebus to the third-party system |
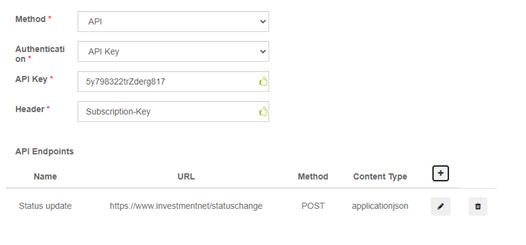
Create an API endpoint record for each API endpoint at the third-party system to which Rebus will be sending API requests: To create an API endpoint record, in the API Endpoints table:
Click the ‘+’ symbol.
Fill out the Create API Endpoint form. Its fields are described in the table below:
Field
Description
Name
Name of API endpoint.
URL
URL of API endpoint.
Method
HTTP request type that’s used on the endpoint
GET - to retrieve a resource.
PUT - to update a resource.
POST - to create a resource.
DELETE - to remove a resource.
Content Type
Data format of request:
Application/JSON
Text
Click ‘Create’. You have created an API endpoint record.
You have created a communication record: A set of credentials to authenticate to a third-party system. The Quality Assurance (QA) module lets you mass update the status of your products across different systems, send notifications for updates, and consult the module’ss change history.
API Ingestion Screen#
The API Ingestion Screen has two tabs. The first tab contains a list of your API sources, and the second contains a list of your Data Flows.
API Sources#
The API Sources tab contains a list of all existing sources. You can add, edit and delete sources directly from this tab. You can also see each source’s status, name, when it was last edited, and the number of requests made.

You can click on the source to view its requests.
Adding an API Source#
Click Add Source. A panel will open.
In the General tab, enter the required details in the available fields:
Name
URL
Rate Limit (requests per second)
Timeout (seconds)
Pagination Method (select from the dropdown)
Page Path, Page per Path, Total Path.
In the Advanced tab, add HTTP headers (optional).
Click Save.
Data Flows#
The Data Flows tab contains lists of your active and inactive data flows. You can add, edit and delete flows directly from this tab. You can also see each flow’s status, whether it’s executing, name, when it was last executed, its next run, and the number of requests made.

You can activate or deactivate a flow directly from the Status column.
Adding a Data Flow#
Click Add Flow. A panel will open.
In the General tab, enter the required details in the available fields:
Name
Source
CRON schedule
Active or non-active flow
In the Mapping tab, add a request (optional).
Click Save.
Deactivating a Flow#
You can deactivate an API Ingestion flow directly from the Data Flows tab and restart it later as needed.
Click the Data Flows tab.
Locate the flow you want to stop.
In the Status column, click Deactivate.
If the flow is currently executing, a pop-up message may appear indicating that the flow is still processing and that some data may already have been added before it fully stops.
Click Confirm to proceed with deactivation. The system will stop the flow. If the flow was in progress, it may take a short time to fully stop.
Restarting a Deactivated Flow#
Click the Data Flows tab.
Locate the inactive flow.
In the Status column, click Activate.
The flow will resume execution according to its configured schedule.
Troubleshooting#
To troubleshoot any issues with the API, visit Error Code Reference.