Collaborating through Outlook#
If your company’s instance of Rebus is integrated with its Office 365, you can use the functionality of Outlook Rebus to do the following:
What you can do… |
Link to More Info |
|---|---|
Log into Rebus using your business Office 365 credentials. |
|
Email all the widgets on a dashboard |
|
Send and Receive emails through Outlook |
|
Schedule meetings and events through Outlook |
Note
 Even when Rebus is integrated with Office 365, Outlook data is NEVER stored on Rebus itself.
Logging into Rebus through Office 365#
Rebus’s integration with Office 365 lets you sign in using your Office 365 credentials and Outlook functionality in Rebus.
Prerequisites#
Your company’s instance of Rebus is integrated with its Office 365.
You are set up as an FS user.
Steps#
In your web browser, open the Rebus Login page .
Click ‘Sign in with Microsoft’.
You are already signed into Office 365… |
You are not signed into Office 365… |
|---|---|
The Rebus Home page opens. |
You are prompted to enter your Office 365 credentials. Enter your Office 365 user name and password and then click ‘Sign In’. The Rebus Home page opens. |
Logging out of Rebus#
Note
If you logged into Rebus through Office 365, you will be automatically signed out of Office 365 when you log out of Rebus.
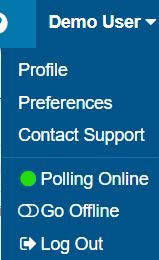
To log out of Rebus, select the Profile drop-down in the upper right and click ‘Log Out’.
You are at the Rebus Login page.
Outlook in Rebus#
If Office 365 is integrated with Rebus, one new buttons, Show/Hide Outlook  , will be added to the toolbar.
Task |
What You Do… |
|---|---|
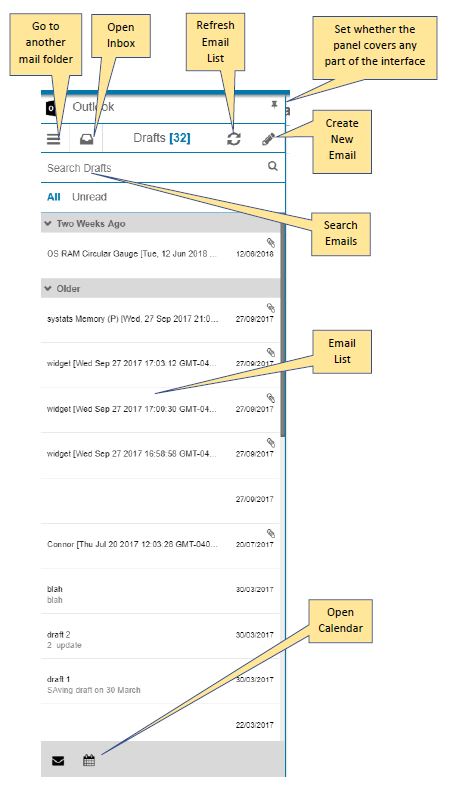
Show/Hide Outlook. |
In the top menu bar, click the Outlook icon |
Adjust the interface so that a panel doesn’t cover its edge. |
Click the panel’s PIN button |


Pop-up notifications also appear in the lower right to tell you when you’ve received new email.
Working with Emails through Outlook in Rebus#
The Outlook panel in Rebus works similarly to the Outlook desktop or web application.
Outlook Panel Example#
Task |
What You Do… |
|---|---|
Create a New Email |
Click the New Email button |
Search for an email |
In the Search Inbox field, enter your search term and press Enter. |
Open another mail folder |
Click the panel’s hamburger menu |
Open Inbox. |
Click |
Refresh the list of emails. |
Click |
Filter the list to show only unread emails. |
Click ‘Unread’. |
Open Calendar |
Click the calendar button |


Working with Rebus Calendar#
Through the Outlook panel, you can access the functionality of your Outlook calendar.
Note
Changes that you make to events through Rebus will be reflected in Outlook on your Office 365 and on your desktop application.
Creating Events#
Open the calendar and click ‘New Event’. An empty event form appears.
Fill in the form with the event’s details including title, date/time, location, recurrence, description, invitees (in the People field), and any attachments.
When you are finished filling out the form, click ‘Save’. The event is saved and meeting invitations are emailed out to the invitees.
Editing/Deleting Events#
Task |
Description |
|---|---|
Editing an Event |
In the calendar, click the event’s title and then click ‘Edit’. An event form that’s populated with the event’s details opens. Make your changes and click ‘Send’. Your changes are saved. |
Deleting an Event |
In the calendar, click the event’s title. Click ‘Cancel’, write a cancellation message, and then click ‘Cancel’ again. The event is deleted from your calendar. The cancellation notification with your message is sent to all invitees. |