Managing Users#
Setting Up Users#
This procedure covers how to set up a user account in Rebus. When it’s created, the user will have to set up their own dashboards and widgets. To create a user account that already has the widgets and dashboards of another user account, copy a user.
Pre-requisites#
To access the User Administration screen, your My Account screen needs to be set up with access.
- You should also know the following:
New user’s name and phone number.
The new user’s profile, which determines which screens and functionality he or she can access.
Whether the new user will be part of an isolation group.
Whether the user is an external user.
Whether the user will be logging in via Active Directory Federated Services (ADFS).
How often the user should reset his or her password.
Steps#
In the Menu, select Admin Tools -> Users -> User Admin. You are at the User Admin screen.
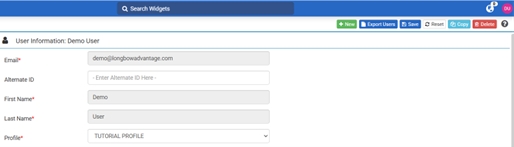
Click ‘+New’. You are at a blank User Information screen.
Fill in the fields to create a user account:
Field |
What You Enter… |
|---|---|
Email/Username |
User ID that is used to login. The initial login details will be emailed to this email address. |
Alternate ID |
Alternate ID that user can use to login to Rebus either through the login page or through SP-initiated SAML. Can not be used to login to Rebus through Office 365. Must be 1) made up of alphanumeric characters or special characters. It can be in email format although it doesn’t have to be. 2) Unique in the Rebus system. I.e., not already used as an alternate ID or email address/username for any other Rebus account. |
Profile |
The profile to which the user will be assigned. The profile determines which screens, widgets, and functionality the user has access to. Note - If the user is an external user, you must assign the user account to the External User profile. |
Local Authentication |
Whether the user logs directly onto Rebus using an account set up with a password of his or her own choosing. If the user logs in using an external login service like SAML or OAUTH, set the toggle to Off. |
Authentication Method |
This field will appear if Local Authentication is set to off. Select the method used to verify the user’s identity at login. Note To use other authentication methods, Rebus needs to be integrated with a single sign on solution. For more information, see Integrating Rebus. |
Isolation Groups |
To assign a user to an isolation group, select a group in the Available Groups list and click ‘<<’ to move it to the Assigned Groups list. For more on isolation groups, see Data Isolation - Showing Data based on Group Membership. |
Click ‘Save’.
Result#
The user account is created. An email invitation is sent to the user to start creating their account. This invitation expires in 14 days. Once the user accepts the invitation, they are prompted to request a temporary verification code that is sent to them by email. This code is used to get a form where the users must do the following:
Complete the My Account screen,
Set up a personal password, and
Signal acceptance of the privacy policy.
Copying Users#
You can create a user account by copying another. The new user account matches the copied one in the following:
Dashboards and widgets.
How often the user needs to reset his or her password.
Pre-requisites#
To access the User Administration screen, your My Account screen needs to be set up with access.
- You should also know the following:
- New user’s name and phone number.
Whether the user will be logging in via Active Directory Federated Services (ADFS).
Steps#
In the Menu, select Admin Tools -> Users -> User Admin. You are at the User Admin screen.
In the Existing Users list, select the user that you want to copy.
Click ‘Copy’. You are at a blank User Information screen. The Profile value is set to the profile of the copied user account.
Fill in the fields to create a user account. The following table lists the fields that you can either enter information into or whose values you can modify:
Field |
What You Enter… |
|---|---|
Email/Username |
User ID that is used to login. The initial login details will be emailed to this email address. |
First Name |
User’s first name. |
Last Name |
User’s last name. |
Business Phone |
User’s business phone number. |
Personal Phone |
User’s personal phone number. |
Language |
User’s preferred language. |
Super User |
Whether the user account is a super user. A super user has access to all screens. |
FS User |
Whether the user account is a FS user. |
Federated Services type |
This field appears when FS User is set to ‘Yes’. The cloud platform that provides the authentication credentials. The only option currently available is ‘Azure’. |
Isolation Groups |
To assign a user to an isolation group, select a group in the Available Groups list and click ‘<<’ to move it to the Assigned Groups list. For more on isolation groups, see Data Isolation - Showing Data based on Group Membership. |
Click ‘Save’.
Result#
The user account is created. An email is sent to the user with initial login details. The first time a user logs into Rebus, he or she is prompted to set up a personal password and a set of security questions and answers.
Editing/Deleting/Disabling Users#
To make changes to a user account, do the following:
Pre-requisites#
To access the User Administration screen, your My Account screen needs to be set up with access.
Steps#
In the Menu, select Admin Tools-> Users -> User Admin. You are at the User Admin screen.
Find the user account in the Existing Users list. You can filter the list by entering the name into the ‘Search’ box.
Select the user account and make your desired change.
Type of Change |
What You Do… |
|---|---|
Change account details. |
You can change all the settings in the My Account screen except the Email/Username value. For more information on the field definitions, see Setting Up Users. Make the desired change and then click ‘Save’. |
Disable the account. |
Click ‘Disable User’. This user account cannot be used to login to Rebus. |
Enable the account. |
Click ‘Enable User’. This user account can now be used to login to Rebus. |
Delete the account. |
NOTE, Deleting a user also deletes all the alerts that this user set up. Click ‘Delete’ and confirm the deletion. |
Tracking Logins#
You can track users who have not logged in for a specified number of days. This is useful for identifying inactive users and managing user accounts. Users’ last login dates are updated and saved in the system upon each successful login. You can export this data into Excel and filter the Excel document based on login activity to easily identify users who have not logged in within a specified timeframe (e.g., past x days).
Steps#
Go to the Rebus menu and go to Admin Tools>Users>User Admin.
On the top right navigation bar, select Export Users. An Excel sheet with user info will download.