Labor Admin - Editing#
Searching through Shifts and Editing#
These procedures go over how to search for shifts and edit them.
Searching for Shifts in a Facility#
Go to the Admin Tools -> Labor -> Shift Admin.
In the Existing Shifts panel, populate the following drop-down fields:
Field |
What You Enter… |
|---|---|
System |
Originating system. |
Facility ID |
Facility for which you want to add or edit a shift. |
The screen is populated with the details of the shifts already set up for that facility.
Editing Shift Details, Breaks, and Users#
Run a search for the shift that you want to edit.
In the search results, select the shift that you want to edit.
Make the desired change:
Type of Change |
What You Do… |
|---|---|
Edit a Shift’s Name or Leeway time |
Open the Shift Details tab, make the desired changes and click ‘Save Shift’. For field definitions, see Setup Procedure 1 of 7: Setting up Shifts. |
Edit a Shift’s Breaks |
Open the Break Details tab, select the break you want to edit, make the desired changes and click ‘Save Shift’. For field definitions, see Setting up Breaks. |
Edit a Shift’s Schedule |
Open the Shift Schedules tab, select the shift schedule user you want to edit, and click the pencil icon next to the shift schedule you want to change. Make the desired changes and click ‘Save Shift Schedule’. |
Add a Shift Schedule |
Open the Shift Schedules tab and select the ‘Add Shift Schedule’ button. Make the desired changes in the modal window and click ‘Save Shift Schedule’. |
Delete a Shift Schedule |
Open the Shift Schedules tab and select the ‘Delete Shift Schedule’ button. Select the shifts you want to delete and click ‘Delete’. |
Add Users to a Shift |
Open the User Details tab, click ‘+Add User’, select the users to be added to the shift, and click ‘Save User(s)’. |
Remove Users from a Shift |
Open the User Details tab, select the existing users to be removed and then click ‘Remove User’. |
Delete a Shift |
Open the Shift Details tab, click ‘Delete Shift’, and then click ‘Yes’ on the Confirmation dialog. |
Sorting Labor Associates#
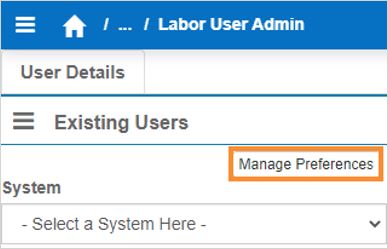
Go to the Admin Tools -> Labor -> Labor Associate Admin.
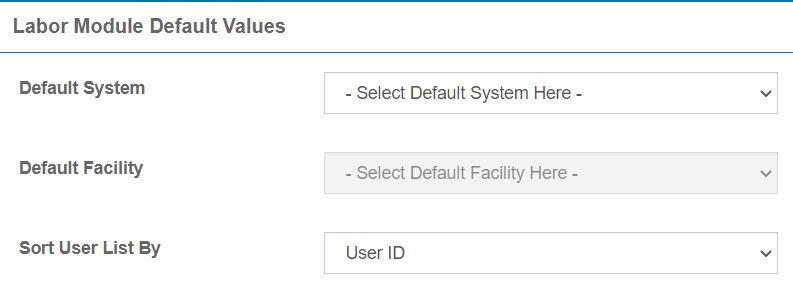
Select ‘Manage Preferences’. The Labor Module Default Values appear.
Fill in the fields explained below.
Field |
What You Do… |
|---|---|
Default System (Optional) |
From the dropdown, select the default originating system. To leave it blank, click ‘Clear’ |
Default Facility (Optional) |
From the dropdown, select the default facility. |
Sort User List By |
From the dropdown, select the sorting option: User ID, First Name, or Last Name. |

Click ‘Save Preferences’.
The set sorting option is applied to the other labor associate lists in the following places:
Labor Associate Admin screen
Activity Adjustment screen
On the Labor Associate Group Admin screen, in the User Group Details tab
On the Shift Admin screen, in the User Details tab
On the Transaction Error Review screen, both in the Quarantined and Incomplete Transaction tabs.
Editing Labor Associates#
Go to the Admin Tools -> Labor -> Labor Associate Admin.
In the System field of the Existing Users panel, select the system that has the labor associate(s) you want to edit. The Existing Users panel is populated with all that system’s labor associates.
In the Search field of the Existing Users panel, type the either the user ID, first name, last name, or email address of the labor associate. The list is filtered to show those labor associates that contain the search term.
Select the labor associate that you want to edit. A User Information form appears in the main interface area populated with the selected user’s details.
Make your desired changes to the record.
Type of Change |
What You Do… |
|---|---|
Edit a Labor Associate’s Name, Email, or Base Shift |
Make the desired changes in the fields and click ‘Save’. For field definitions, refer to Setup Procedure 3 of 7: Setting up Labor Associates. |
Delete a User |
Click ‘Delete’, and click ‘Yes’ on the Confirmation dialog. |
Note
 If you delete a user, the transactions will remain, but the user won’t be available in any labor module dropdown.
Tip
 You can maintain all existing and new labor associates in one CSV file. That way, when you import this file, new labor associate IDs result in new labor associate records, existing IDs with no changes are ignored, and existing IDs with changed information result in updated records in Rebus.
From the same .CSV file you used to create bulk users, change the desired information under these following columns:
firstName
lastName
laborUsergroupId
hireDate
baseShift
defaultShiftFlg
For the column definitions, see Setup Procedure 3 of 7: Setting up Labor Associates.
In Rebus, go to Admin Tools -> Labor -> Labor Associate Admin.
Click ‘Import CSV’.
Upload the .CSV file that contains the users’ information.
Adding a Labor Associate to a Scheduled Shift#
A scheduled shift is a pre-configured shift that is assigned to users based on a schedule. For more information on scheduled shifts, see Automatic Shift Scheduling.
You can set up several types of scheduled shifts:
Type of Scheduled Shift |
Steps |
Example |
|---|---|---|
Weekly Recurring Shift |
Select the frequency of weeks to iterate on (i.e., every 1st,2nd, or 3rd month) and specify which day of the week to apply. |
Apply the weekend shift every 2 weeks starting 04/06/2021 on Saturdays and Sundays. |
Monthly Recurring shift |
Select the frequency of months to iterate on (i.e., every 1st,2nd, or 3rd month) and specify day of the week to iterate on. |
Apply the special overtime shift every 2 months starting 04/06/2021 on the third Monday of the month. |
Yearly Recurring Shift |
Select the frequency of years to iterate on (i.e., every 1,2,3 year) and specify the day of the week of which month. |
Apply the special overtime shift every 2 years starting 04/06/2021 on the third Monday of April. |
Constraints#
A labor associate can be assigned to multiple scheduled shifts only if they do not overlap.
To be eligible for a scheduled shift, a labor associate must belong to a user group that is associated with the shift’s facility.
Start dates are required for scheduled shifts and recurring shifts.
Recurring shifts take effect as of the start date.
Pre-requisites#
Facilities, systems, labor associate groups, and labor associates must already be configured.
Shift must be properly configured in Shift Admin before a schedule can take effect.
Steps#
Go to Labor -> Labor Associate Admin.
Select the System and choose the User.
Go to the Shift Schedules tab. You are the Scheduled Shifts screen.
To add a scheduled shift, click the ‘+’ button in the Scheduled Shifts table:

The Add Scheduled Shift screen appears. Fill in the required information.
Field Name |
Meaning |
|---|---|
Shift Name |
The name of the pre-configured shift. |
Start Date |
The start date of the shift. |
End Date |
The end date of the shift. Optional. |
Recurrence Pattern |
Specify if the scheduled shift should repeat every week, month or year, the frequency, and the day of the week. |
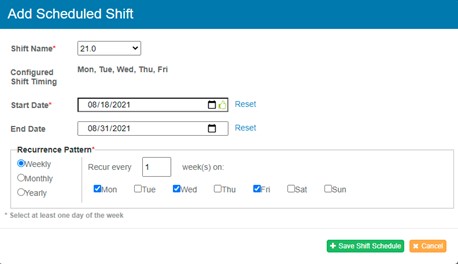
Click on ‘Save Shift Schedule.’
Result#
The labor associate is now scheduled for a specific shift recurrently within a specified period.
Note
A base shift can be selected as a labor associate’s default shift in the User Details tab. This means that if no assigned or scheduled shift can be found for that user and the base shift is set as default in the User Details screen, the base shift will be applied.
Editing Labor Associate Groups#
Go to the Admin Tools -> Labor -> Labor Associate Group Admin.
In the Existing User Groups panel, populate the following drop-down fields:
Field |
What You Enter… |
|---|---|
System |
Originating system. |
Facility ID |
Facility that has the user group you want to edit. |
The panel is populated with the labor associate groups set up for that facility.
In the Search field of the Existing User Groups panel, type the Group Name of the labor associate group. The list is filtered to show those labor associate groups whose group name contains the search term.
Select the labor associate group that you want to edit. A User Group Information form appears in the main interface area populated with the selected user group’s details.
Make your desired changes to the record.
Type of Change |
What You Do… |
|---|---|
Add a user to the user group |
Select the user in the Available Users list, click ‘<<’, and then click ‘Save’. |
Remove a user from the user group |
Select the user in the Selected Users list, click ‘>>’ and then click ‘Save’. |
Delete a User |
Click ‘Delete’, and then click ‘Yes’ on the Confirmation dialog. |
Editing Activity Groups#
Go to the Admin Tools -> Labor -> Activity Group Configuration.
In the Existing Activity Groups panel, populate the following drop-down fields:
Field |
What You Enter… |
|---|---|
System |
Originating system. |
Facility ID |
Facility that has the activity group you want to edit. |
In the Search field of the Existing Activity Groups panel, type the name of the activity group. The list is filtered to show those activity groups whose group name contains the search term.
Select the activity group that you want to edit. An Activity Group Information form appears in the main interface area populated with the selected user group’s details. For field definitions, see Setup Procedure 6 of 7: Setting up Activity Types for Imported Transactions.
Make your desired changes to the record.
Note
 Do NOT click the Enhanced Mapping checkbox to upgrade the activity group’s mapping scheme from simple to enhanced. Please contact Rebus Customer Support. For more on enhanced vs simple mapping, see Activity Groups.
Note
You are not allowed to change the name of an activity group after it’s already been assigned to an activity type and a mapping scheme through the Activity Configuration screen. If the activity group has an enhanced mapping scheme, however, you can migrate its mapping scheme to another activity group that also has enhanced mapping. If the activity group was designed with a simple mapping, a new group has to be created and designed with the desired mapping scheme.
Click ‘Save’.
Migrating Enhanced Activity Mapping to a New Activity Group#
You can easily overwrite the mapping scheme of one activity group with that of another when updating an activity type through the Activity Configuration Admin screen. When updating an activity group that uses enhanced mapping, you can import the mapping scheme from another activity group that uses enhanced mapping. This lets you easily edit an activity group’s name without having to configure the group again.
Note
Migrating a mapping scheme from one activity group to another works only when you are re-assigning an activity from an activity group that uses enhanced mapping to another that uses enhanced mapping.
For more on mapping schemes, see Activity Groups.
Go to the Activity Configuration Admin submenu, select the activity whose assigned activity group you want to update, and click the Activity Group tab.
From the Activity Group dropdown, select the activity group to which you want to assign the activity. A dialog window opens and asks you to confirm the change.
If you click ‘Yes’… |
If you click ‘No’… |
|---|---|
The mapping scheme, if any, in the activity group to which you want to assign your activity will be cleared. |
No change will take place regarding the activity group’s name, and its mapping scheme will remain the same. |
Click ‘Yes’. A second dialog window opens asking you if you want to import the already configured mappings.
If you click ‘Yes’… |
If you click ‘No’… |
|---|---|
The mapping scheme of the previously assigned activity group will be imported to the newly assigned activity group. Whatever mappings the newly assigned activity group had previously will be overwritten. |
No mapping scheme will be imported, and you will have to configure new mappings for your activity for its new activity group. |
Click ‘Yes’.
Example of Mapping Scheme Migration#
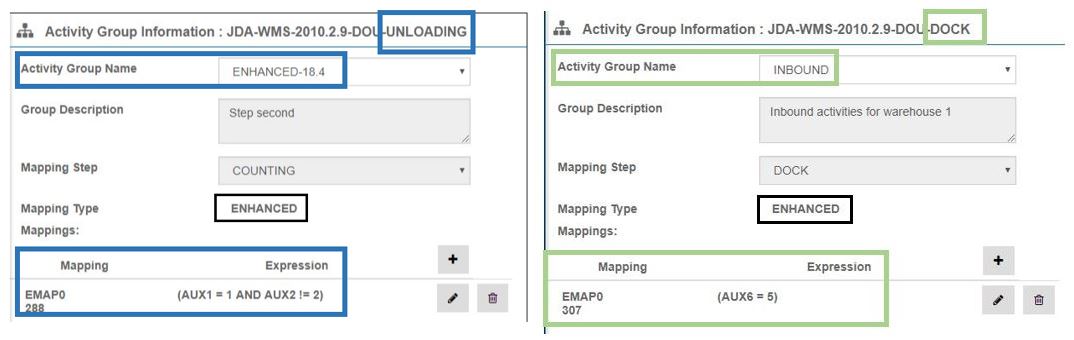
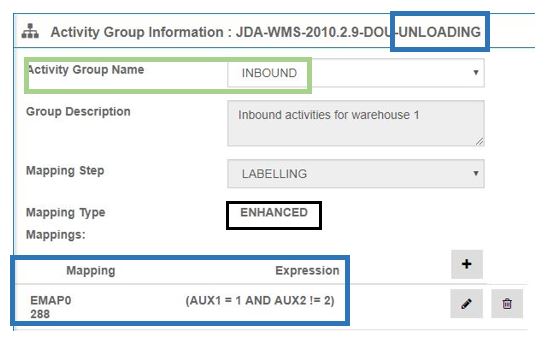
For example, we can update the Unloading activity that is assigned to the Enhanced-18.4 group so that it is assigned to the Inbound activity group. Note that both activity groups have an enhanced mapping type.
Enhanced-18.4 Activity Group |
Inbound Activity Group |
|
|---|---|---|
Assigned Activity |
Unloading |
Dock |
Mapping |
(AUX1 = 1 AND AUX 2 !=2) |
AUX6 = 5 |
This assignment results in the Dock activity losing its mapping scheme with the Inbound activity group. The Unloading activity is now assigned to the Inbound activity group and its old mapping scheme is carried over so you don’t have to configure it again.
The Enhanced-18.4 activity group and the Dock activity end up with no mapping scheme.
Enhanced-18.4 Activity Group |
Inbound Activity Group |
|
|---|---|---|
Assigned Activity |
None |
Unloading |
Mapping |
None |
(AUX1 = 1 AND AUX 2 !=2) |
Reprocessing Activities with Different Time Measurement through Activity Configuration#
You can reprocess activities of a given activity type with a different time measurement to update their total goal time. This lets you have accurate data for labor performance reporting.
How Does it Work?#
Let’s look at the following example.
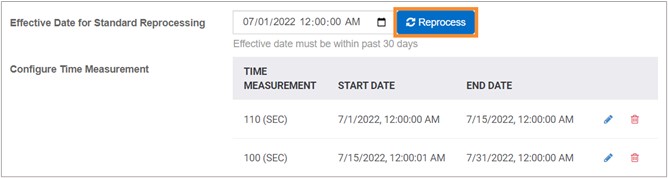
CASE PICKING activities that occurred as of July 1st, 2022, 12:00:00 AM must be updated with a new total goal time. The time measurements for CASE PICKING should be:
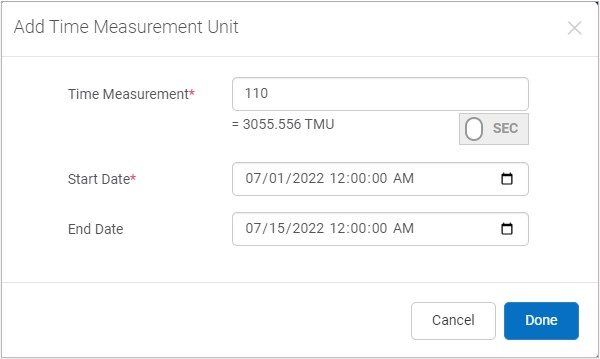
110 seconds from July 1st 12:00:00 AM to July 15th 12:00:00 AM
100 seconds from July 15th 12:00:01 AM to July 31st 12:00:00 AM
Two key elements are involved:
The Effective Date for Standard Reprocessing—The date as of when Rebus will evaluate all activities that occurred on or after that date and will reprocess only the elligible ones. In this example, the Effective Date for Standard Reprocessing is July 1st, 2022, 12:00:00 AM.
The new time measurement(s) and their date range
An activity’s MIN_STOP_DATE_LOCAL determines whether it is eligible for a given time measurement. An activity whose MIN_STOP_DATE_LOCAL occurs on or after the effective date for standard reprocessing will be reprocessed in one of the following ways:
If an activity’s MIN_STOP_DATE_LOCAL falls within the date range of a configured time measurement, it will get reprocessed to have the configured time measurement.
Otherwise, if an activity’s time measurement differs from its activity type’s Default Time Measurement, it will get reprocessed to have the activity type’s Default Time Measurement.
MIN_STOP_DATE_LOCAL is available in your standard labor collection.
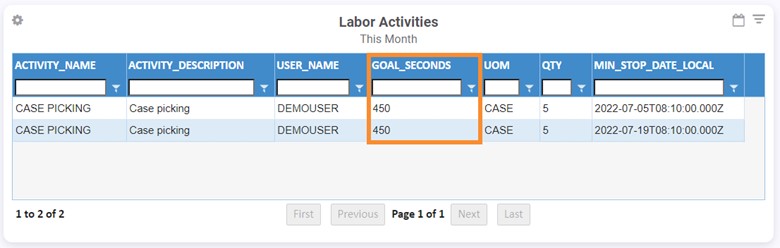
Currently, the two CASE PICKING activities below have a total goal time of 450 seconds (GOAL SECONDS)—with a quantity of 5 cases and the default time measurement of 90 seconds.
When the reprocessing starts, Rebus evaluates all activities whose MIN_STOP_DATE_LOCAL occurred on or after July 1st 2022 July 1st, 2022, 12:00:00 AM, and reprocesses the eligible ones.
Expected Results:
The first activity will get reprocessed with the 110-seconds standard because its MIN_STOP_DATE_LOCAL occurred within the date range of that standard. As a result, the activity’s total goal time will get updated to 550 (i.e., 5 x 110) seconds.
The second activity will get reprocessed with the 100-seconds standard because its MIN_STOP_DATE_LOCAL occurred within the date range of that standard. As a result, the activity’s total goal time will get updated to 500 (i.e., 5 x100) seconds.
Other activities whose MIN_STOP_DATE_LOCAL occurred on or after July 1st, 2022, 12:00:00 AM and whose current time measurement is different than the activity type’s default time measurement will get reprocessed with the activity type’s default time measurement.
Note
Labor transactions imported from your WMS will be processed with the added time measurement if they occur within the corresponding time measurement’s date range.
Prerequisites#
You should know:
The effective date for standard reprocessing the activities with the new time measurement. The effective date must be within the past 30 days.
The new time measurement(s) for the targeted activities and their date range
Note
We recommend doing the procedure outside of operating hours—i.e., after the activities are recorded in Rebus’ Activity Adjustment Admin screen. Otherwise, there’s a slight chance that the labor transactions imported to Rebus from your WMS at the same time as the reprocessing will not get updated with the right time measurement. If this happens, you can always reprocess the activities again a few minutes later.
Steps#
Open the Rebus menu, and go to Admin Tools -> Labor -> Activity Configuration Admin.
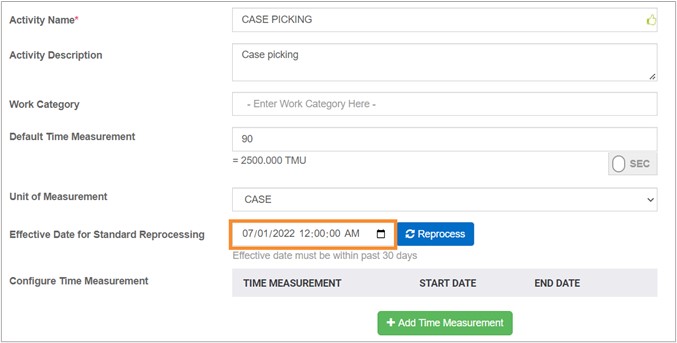
From the Existing Activity tool panel, select the System, Facility ID, and find the activity type. You’re at the activity type’s configuration screen.
Enter the Effective Date for Standard Reprocessing. When the reprocessing starts, Rebus evaluates all activities that occurred on or after that date and will determine the ones eligible for reprocessing.
Configure an additional time measurement. To do so, follow these steps:
Click ‘+ Add Time Measurement’. The Add Time Measurement Unit form appears.
Fill in the fields explained in the table below.
Adding a Time Measurement# Field
What You Enter…
Time Measurement
The time measurement either in seconds or TMU.
Start Date
The date as of when the activities should be updated with the new time measurement (i.e., total goal time).
End Date (optional)
The date that indicates the end of the time measurement’s date range.
Note
You can configure a maximum of ten time measurements each with a different date range.Click ‘Done’.
Note
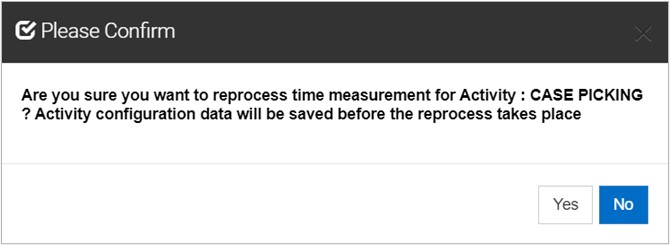
The Default Time Measurement of the activity type cannot be changed once a new time measurement has been added. You can always delete the added time measurement, change the default time measurement, then add back the new time measurement.Click ‘Reprocess’.
A confirm message appears. Confirm if you want to proceed with reprocessing the activities of that activity type.
The reprocessing starts, and when it’s done you can see the updated GOAL_SECONDS in your widget:

You can also see this update in the Activity Adjustment Admin screen:

The values in the Unmeasured Time Seconds, Measured Time Seconds, and Goal Seconds columns are automatically updated when the Default Time Measurement is updated and the activity is reprocessed.