Labor Admin - Travel Time#
Setting up Travel Time Matrices#
The Rebus Labor module’s matrix configuration functionality can calculate an extra time value for each activity. Usually, this functionality is used to calculate the expected travel time of the labor user performing the activity, but it can also be used to add time to activities to account for the following situations:
Heavy products
Special handling
Lifting and lowering time
Slow moving equipment type
As calculating an activity’s expected travel time is the most typical use of this functionality, the documentation below describes it using time travel examples. You can see the expected total time in labor activity widgets and in the Activity Adjustment Admin page.
Term |
Definition |
|---|---|
Matrix |
A table that holds a set of coordinates called ‘vectors’ and an associated ‘lookup value’. |
Vector |
A coordinate that when combined with other vectors in the same matrix row points to an associated ‘lookup value’ like a time value or an attribute. |
Numeric Matrix |
A matrix that has up to three locations as vectors and a numeric time value as a lookup value. |
Attribute Matrix |
A matrix that has strings (a.k.a. attributes) instead of time values as lookup values. The attribute is usually a defined zone (e.g., ZONE1, ZONE2, ZONE3) that can be used in another numeric matrix to arrive at a time value. |
Time Component |
A subset of the time it takes to complete an activity. Each time component is added to calculate a user’s expected time to complete an activity. Time components are added to activity types in the Activity Configuration screen. A time component maps an activity type to one or more matrices. |
Matrices are mapped to activities and activity groups. When converting transactions from the WMS into activities, Rebus uses auxiliary field values from the transactions to look up the right time values and attributes from the matrices and to calculate the activity’s expected time.
Time Components and Activities#
In each transaction that’s converted into an activity, Rebus looks for auxiliary fields that are also set up in the activity type’s time components. If the values of those auxiliary fields match what’s set up in a time component, Rebus takes the auxiliary field values and uses them to look up their associated time value in the time component’s matrix. Rebus uses the time components to calculate the expected time for the activity.
More about Numeric Matrices#
Numeric matrices are the default. They are mapped to activities through the Activity Configuration Admin screen.
Consider Matrix A below:
Vector A |
Vector B |
Vector C |
Lookup Value (Time) |
|---|---|---|---|
ZONE 1 |
ZONE 2 |
15 |
|
ZONE 2 |
ZONE 3 |
10 |
A ZONE can come either from your WMS data or from a corresponding attribute matrix.
Matrix A tells you the following:
The coordinates in Vectors A and B form key pairs that Rebus uses to look up the corresponding lookup value.
It takes you 15 seconds to travel between ZONE 1 and ZONE 2.
It takes you 10 seconds to travel between ZONE 2 and ZONE 3.
If the base goal to complete a certain activity is 60 seconds but you also need to commute from ZONE 1 to ZONE 2, then the time component will update the transaction’s total goal time to 1 minute and 15 seconds.
Note
 If a numeric matrix is being used for time values, the lookup value will always represent seconds, not TMUs.
Using Auxiliary Fields as Constants to Calculate Time#
You can also use auxiliary fields as constants (AUX constant) in time component calculations in Rebus’s Labor Module.
Instead of manually adding constants to time components, you can have Rebus refer to auxiliary fields. An AUX constant must hold a numerical value, but the value itself doesn’t necessarily have to be constant. For example, if you have multiple tasks whose durations are calculated based on a variable value in an auxiliary field, then you can set it up as an AUX constant and use it as a time component for those tasks.
For example, suppose you have the following auxiliary fields:
AUX1 = 100
AUX2 = BULK
AUX3 = REACH_TRUCK
And suppose you also have the following Matrix A:
A |
B |
C |
Value |
|---|---|---|---|
BULK |
REACH_TRUCK |
60 |
If you have the expression:
AUX1 + (A.A = AUX2, A.B = AUX3),
then your expression will evaluate to
100 + (A.A BULK, A.B = REACH_TRUCK), which is equal to 60+100 = 160.
Attributes and Activity Groups#
If the activity type is part of an activity group that’s mapped to an attribute matrix, Rebus will refer to the activity’s auxiliary fields to look up the attribute, usually another location, in the attribute matrix. That attribute will be assigned as a value to a specified ‘Main Aux’ field, which can then be used in the time components mapped to the activity types of the activity group. An activity group can be mapped to more than one attribute matrix.
More about Attribute Matrices#
An attribute matrix’s rows resolve to strings (a.k.a. ‘attributes’) instead of time values. It works in the same way as a numeric matrix, except that it is used to look up a location. In each row an attribute matrix’s coordinates are locations whose lookup value is a user-defined zone, which in turn can be used in numeric matrices where travel time is being calculated.
Attribute matrices are optional and require that activity types and activity groups are properly configured with auxiliary fields. Attribute matrices are mapped to activity groups through the Activity Group configuration screen.
Consider Matrix B:
Vector A |
Vector B |
Vector C |
Lookup Value (Attribute) |
|---|---|---|---|
BLD 1 |
ZONE 1 |
||
BLD 2 |
ZONE 2 |
Matrix B tells you the following:
BLD 1 is in ZONE 1.
BLD 2 is in ZONE 2.
Operators for Attribute Mappings and Time Components#
When mapping an attribute mapping to an activity group or a matrix to a time component, you can use the following operators. For background information on time components, see Time Components and Activities. For background information on attribute matrices, see More about Attribute Matrices and Attributes and Activity Groups.
Operator |
What it Means… |
|---|---|
= |
Matches if AUX field value equals vector value. |
!= |
Matches if AUX field value does not equal vector value. |
In |
Effectively works the same as ‘=’. |
Not In |
Effectively works the same as ‘!=’. |
Like |
Matches if there’s any text in the AUX field value that’s the same as the Vector value. |
Not Like |
Matches if there’s no text in the AUX field value that’s the same as the Vector value. |
< |
Matches if the Vector field value is less than the AUX field value. |
<= |
Matches if the Vector field value is less than or equal to the AUX field value. |
> |
Matches if the Vector field value is greater than the AUX field value. |
>= |
Matches if the Vector field value is greater than or equal to the AUX field value. |
These operators let you build more complex mappings that account for different situations. For example, if you want to create a mapping for any AUX value that has the text ‘DOCK’ in it (e.g., DOCK1, DOCK2, DOCK_SOUTH etc), you just have to create a single mapping using the LIKE operator to cover all possibilities.
Note on Data Types#
An AUX value is stored as a string even when it’s a number (e.g., 45 is stored as “45” in the database). When the AUX value is a number in string format, Rebus converts it to a number for the purposes of finding matches. For the comparison operators (>,>=,<=,<), however, if the AUX value is not a number in string format (for example, “LOCATION”), then the conversion will fail and Rebus will quarantine the transaction. When looking for matches with AUX values, Rebus does not consider case. E.g., the string “DOCK” will be considered a match with “dock” or “Dock”.
Setting Up a Matrix#
The following procedure goes over how to set up a matrix. If your WMS data already includes zone-based information you don’t need to set up attribute matrices; however, if you plan to set up zones through attribute matrices, set them up in the attribute matrices before setting up the numeric matrices.
Pre-requisites#
Activities and steps must be properly configured with auxiliary fields.
Constraints#
You can only add numbers as lookup values in numeric matrices.
You must input at least one vector into each matrix and one value for each row.
You cannot delete a matrix if it has already been mapped to an activity group or time component.
You cannot add duplicate rows.
The difference between the minimum and maximum values for the x and y coordinates cannot exceed 3000 units.
Steps#
Go to Admin Tools -> Labor -> Matrix Configuration.
Select the System and Facility ID of the source warehouse.
In the top right, click ‘New Matrix’.
Type the Matrix Name.
Input values to create the matrix:
Input vectors manually… |
Upload a Matrix from CSV… |
|---|---|
Add vectors directly onto the grid with their lookup values. |
NOTE: Make sure to have the columns properly labeled as shown in the Matrix table. (i.e. A, B, C, Value). NOTE: If you upload a csv with key values matching an existing row, the existing row’s values are updated. Otherwise, a new row is added to the matrix. Click on Import from CSV button to import a file. |
Note
Make sure that the matrix full name, including system and facility, is 50 characters or less. Otherwise, Rebus won’t let you “Import from CSV” or “Save Matrix”. The buttons will be greyed out.
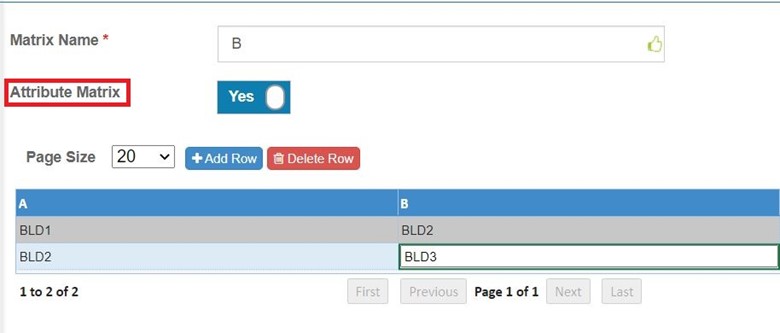
If you are creating an attribute matrix, set the Attribute Matrix toggle button to ‘Yes’.
Note
 Alphanumeric values are required, and numeric values are not accepted in an attribute matrix.
Click ‘Save Matrix’ in the top right corner.
Result#
You have configured a matrix, which can now be used in time components and attribute mappings.
Creating Attribute Mappings#
This procedure covers mapping an attribute matrix to an activity group. An attribute mapping specifies not only the attribute matrix, but also the values used to look up a particular attribute in the attribute matrix.
Pre-requisites#
At least one attribute matrix is set up.
Note
Each attribute mapping can have only one default value.
Note
You can add multiple attribute mappings to an activity group.
Steps#
Go to Admin Tools -> Labor -> Activity Group Configuration.
Choose the System and Facility ID of the source warehouse. A list of activities will appear.
Click the activity group where you wish to add the attribute.
Click on the Attribute tab.
Click ‘+’. The Add Attribute Mapping form appears.
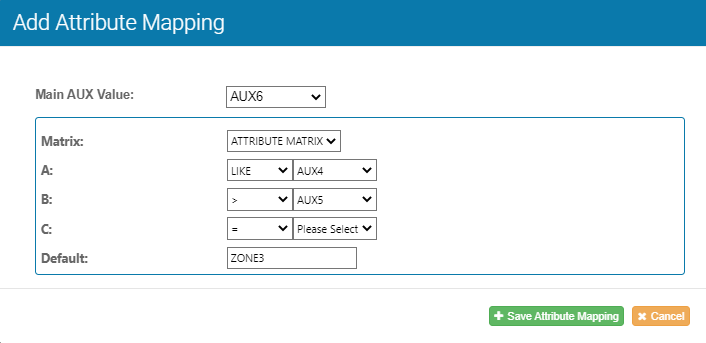
Fill in the form fields:
Field |
What you enter… |
|---|---|
Main Aux Value |
The activity’s auxiliary field that takes the looked-up attribute as a value. |
Matrix |
The attribute matrix where Rebus looks up the attribute to be assigned to the auxiliary field selected in Main Aux. |
A, B, C |
For each vector in the attribute matrix, select an operator and an auxiliary field from the imported transactions. The auxiliary field values and the relationships specified by the operators are used to look up a matching row in the attribute matrix. The attribute from the matching row (e.g., ‘ZONE2’) is assigned as the value of the auxiliary field selected in Main Aux. For more information on operators, see Operators for Attribute Mappings and Time Components. |
Default Value |
The default value that will be assigned to the Main Aux field if no matching row is found. |
In this scenario, an expression where we are looking for the row in Matrix B where Vector A contains AUX4’s value and Vector B is greater than AUX5’s value.
Click ‘Save Attribute Mapping’.
Result#
You have created an attribute mapping for the activity group. You can now use the Main Aux field in a time component expression when adding time components to activity types. The values that can be assigned to the Main Aux field (e.g., ZONE1, ZONE2, ZONE3 etc.) can be used as coordinates in numeric matrices to look up time values.
Adding Time Components to Activity Types#
This procedure covers adding time components to activity types.
Steps#
Go to Administration -> Labor Administration -> Activity Configuration Admin.
Choose the System and Facility ID of the source warehouse. A list of corresponding activities appears.
Click on the activity to which you want to add a time component.
Click on the Time Components tab.
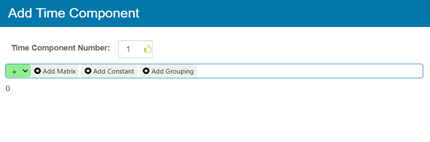
Click on the + button. A new row appears.

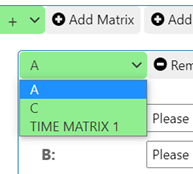
A pop up appears. Input the time component number (1-10). You can have up to three per activity.
Adding a Matrix to a Time Component
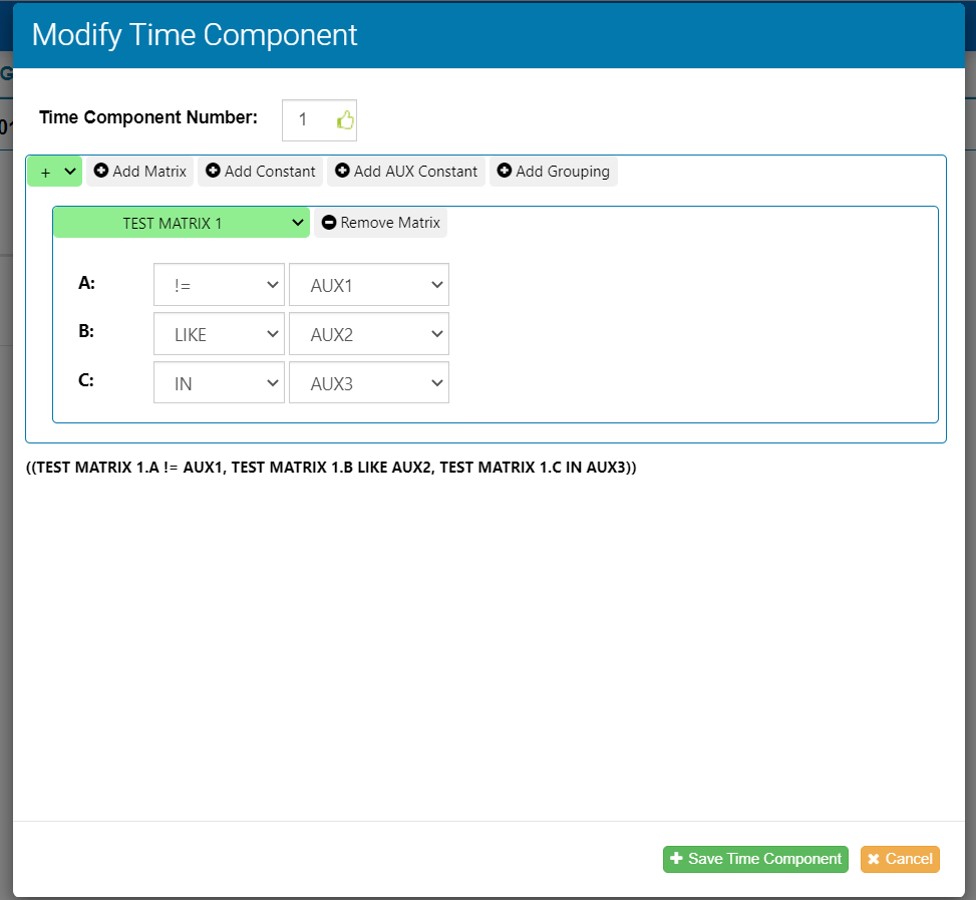
Click ‘Add Matrix’. A form appears that has a dropdown menu for of the matrix’s vectors.
Note
When mapping a matrix, make sure you have a mapping value for each vector in the matrix (unless it is null).

Based on the setup in the above screenshot, Rebus refers to the relationships specified by the operators and looks for the row from Matrix A that contains the transaction’s AUX1 value in vector A, and that is greater than AUX2’s value in Vector B. These search terms translate to the expression displayed at the bottom (A.A LIKE AUX1, A.B > AUX2, A.C = N/A), which resolves to the time value ‘15’. For more information on operators, see Operators for Attribute Mappings and Time Components.

Note
A time component can have more than one matrix.
In the form’s green drop-down menu, select the matrix you want to map to the activity.
For each vector, select the auxiliary field and the operator.
Click ‘Save Time Component’.
Result#
You have created a time component for the activity. The expected total time calculation is available to be added in your labor activity widgets and in the Activity Adjustment Admin page table. You can display your time components in labor activity widgets. The new time component fields will appear in your Labor Activity collection. See Seeing the Results of your Time Components.

Seeing the Results of your Time Components#
Pre-requisites#
Have at least one time component set up. See Creating Time Components.
Steps#
Go to Admin Tools -> Labor -> Activity Adjustment Admin
Select the search terms. To find out how to search for an activity, you can look at Searching through Activities.
In the grid on the right, scroll until you see the Time Component columns.
Editing/Exporting Matrices#
Constraints#
You can only add numbers as lookup values in numeric matrices.
You must input at least one vector into each matrix and one value for each row.
You cannot delete a matrix if it has already been mapped to an activity group or time component.
You cannot add duplicate rows.
Steps#
Go to Admin Tools -> Labor -> Matrix Configuration.
Select the System and Facility ID of the source warehouse. A list appears that shows the matrices that match the search criteria.
Select the matrix you want to edit. The screen’s main display area shows the values of the selected matrix. If you want to filter the rows, see Filtering Matrices.
Make the desired changes to the matrix.
Action |
What you do… |
|---|---|
Change an existing value. |
Double-click the cell that has the data that you want to change and make the desired changes to the value. |
Add a row. |
NOTE: You can add rows only to the bottom of the matrix. You cannot insert rows. Click ‘Add Row’. An empty row appears at the bottom of the matrix. Populate the empty row with the desired values. |
Delete a row. |
Select the row that you want to delete and then click ‘Delete Row’. |
Click ‘Save Matrix’. The changes are saved.
This screen also has buttons that let you export the matrix to CSV or Excel. When you click on an export option, the matrix’s content will be downloaded to your computer’s Downloads folder in the desired format.
Filtering Matrices#
You can filter the matrix so that only rows that match a particular filter criteria are shown.
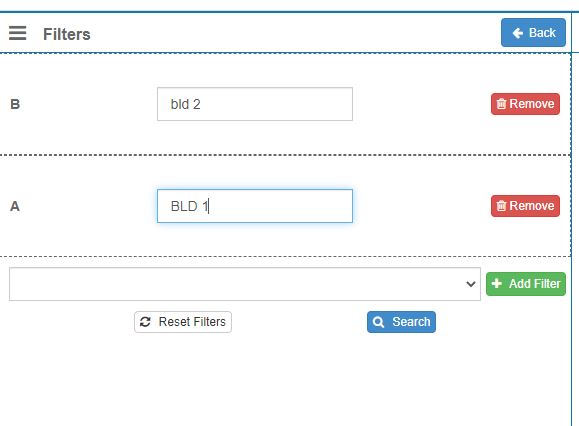
Click ‘Filters’. The left panel changes to become the Filters panel.
Create the filter criteria. You can set a filter term for each vector. To be selected to be displayed, a row must match the filter criteria. To match the filter criteria, a row must have the vector’s filter term as its value in that vector. The match must be exact, not just partial, although case is not considered. To create a filter term, follow the steps below:
From the dropdown, select the vector on whose values you want to filter the matrix.
Click ‘Add Filter’. A text box appears next to the label of the selected vector.
In the text box, type the term by which the matrix will be filtered.
When you are finished creating the filter criteria, click ‘Search’.
The matrix is filtered to show only the rows the match the filter criteria.
Copying Attributes, Time Components, and Matrices#
You can also copy the attributes and time components. Here’s a list of the procedures available according to what you want to copy:
I want to copy… |
Procedure |
|---|---|
Time components to another activity |
|
Matrices |
|
Activities with their time components and/or attributes |
Copying Time Components to Another Activity#
Copying validations: When copying time components, you are automatically prevented from doing the following:
Overwriting an existing time component mapping in the target activity type. When copying a time component, you specify time component number (1-10).
Adding to an activity type more than the maximum number of mappings to time components.
Copying to the same activity type (so that no duplicates are created) or to a sign-on/sign-off activity (which are not configured for time components).
Go to the Activity Configuration Admin screen. Open the Rebus menu, and go to Admin Tools -> Labor -> Activity Configuration Admin.
From the Existing Activity tool panel, select the System, Facility ID, and find the activity type. You’re at the activity type’s configuration screen.
Click the Time Components tab and locate the time component that you want to copy.
Click the ‘Copy Time Component’ button of the time component that you want to copy. The Copy Time Component to another Activity form appears.
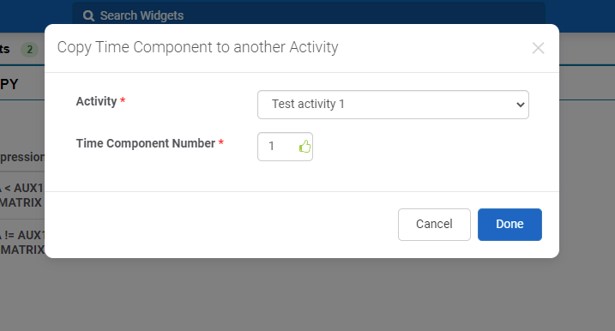
In the form, select the activity type to which you want to copy the time component and select the time component number (1-10).
Click ‘Done’. The time component is copied to its target activity type.
Calculating an Activity’s Shortest Path#
Rebus’s Travel Distance Functionality can find the shortest path that a labor user can take to complete an activity.
The Travel Distance functionality works with the Matrix Configuration (Travel Time) functionality. For more information about matrix configuration and how it works, see Labor Admin - Travel Time.
Term |
Definition |
Example |
|---|---|---|
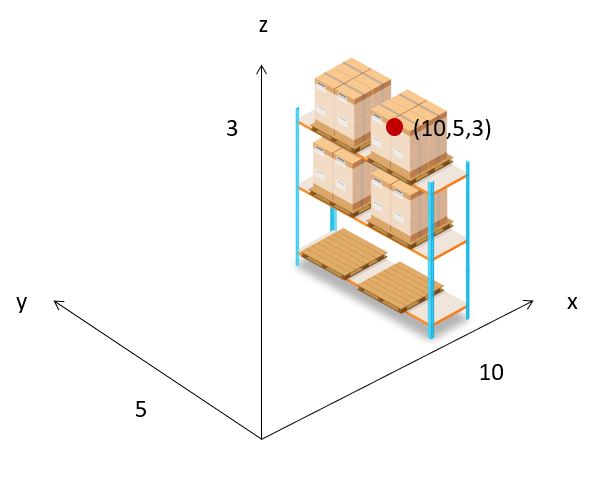
Location X, Y, Z coordinates |
Cartesian coordinates that locate a warehouse location by its distance from an origin (0,0,0) where three orthogonal axes cross. The x-coordinate is measured along the east-west axis, the y-coordinate is measured along the north-south axis, and the z-coordinate measures height or elevation. In this example, a location’s X,Y,Z coordinates are (10,5,3). |
|
Horizontal travel distance |
The distance travelled on a ground level from one location to another; it’s calculated along the X and Y axis of a warehouse’s cartesian map. It partly makes up the travel distance. |
– |
Vertical travel distance |
The distance travelled to pick or deposit inventory on a given level; it’s calculated along the Z axis of a warehouse’s cartesian map and counted twice for a given location. It partly makes up the travel distance. |
– |
Travel Distance |
The distance travelled from one location to another location to complete an activity. Rebus always calculates the shortest travel distance. It can comprise the horizontal distance, the vertical distances, or both. |
– |
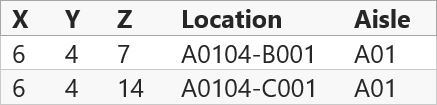
Travel Distance Map |
A configured table that Rebus uses to determine the shortest travel distance; it contains the following information about all the warehouse’s locations: 1) the location’s identifiable attribute value, which are taken from transactions pulled from your WMS and stored in Rebus; 2) the identifiable attribute value of the aisle associated to the location; and 3) the location’s X,Y,Z coordinates |
|
How Travel Distance Works#
In each transaction that’s converted into an activity, Rebus looks for the starting and destination location values and tries to match them to the right ones in the Travel Distance Map. The Travel Distance Map is set up in the activity type’s time component and is what Rebus uses to determine the shortest travel distance; it contains the following information about all the warehouse’s locations:
The location’s identifiable attribute value, which are taken from transactions pulled from your WMS and stored in Rebus.
The identifiable attribute value of the aisle associated to the location.
The location’s X,Y,Z coordinates.
Next, if the transactions’ starting and destination location values match what’s set up in the Travel Distance Map, Rebus calculates the shortest possible travel distance.
Finally, Rebus calculates the expected travel time by multiplying the horizontal and the vertical distances by the right lookup values in the vertical and horizontal speed matrices also set up in the activity type’s time components. Such time components can be configured in different ways, which include:
Using an AUX constant that holds a flat speed to multiply the horizontal and vertical distances by the AUX constant’s value. For more information, see Using Auxiliary Fields as Constants to Calculate Time.
Using matrices of vehicles’ horizontal and vertical speed to multiply the horizontal and the vertical distances by the right lookup values in the matrices. For more information, see Setting Up Matrices of Vehicles’ Horizontal and Vertical Speed.
Important
Ensure the per unit used for the vehicle speed is the same as the unit used to measure the travel distance. For example, if you’re measuring the travel distance in feet, the vehicle speed would be seconds per foot (s/ft).
Note
If no time component is provided, the default vehicle velocity will be 1 second per foot.
See also
Aisle Identifiable Values#
This section provides essential information about Aisle values stored in the Travel Distance Map.
Why Store Aisle Values in the Travel Distance Map?#
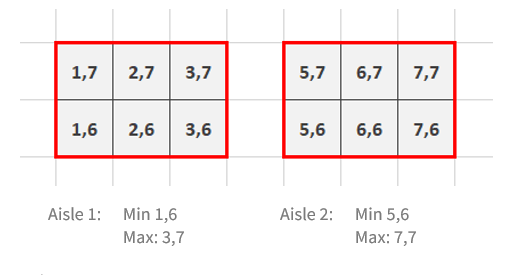
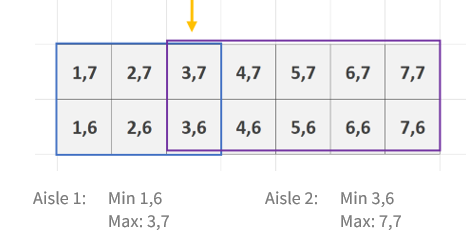
Aisles in the travel distance map represent walkable paths. Aisles must connect to one another, or “intersect,” to allow travel from one location to another. By storing the identifiable attribute value of the right aisle for each location in the Travel Distance Map, Rebus can interpret the aisle’s locations as accessible points. To establish sets of locations as accessible points, enter at least the location coordinates at both ends of the corresponding aisle. Consequently, Rebus will accurately calculate the travel distance.
For example, the below image demonstrates that * Locations share the same aisle and are labelled with their respective coordinates. * If we use the coordinates of only the locations at the ends of the aisle and enter them in the Travel Distance Map, then Rebus interprets the whole set of locations as an accessible aisle.
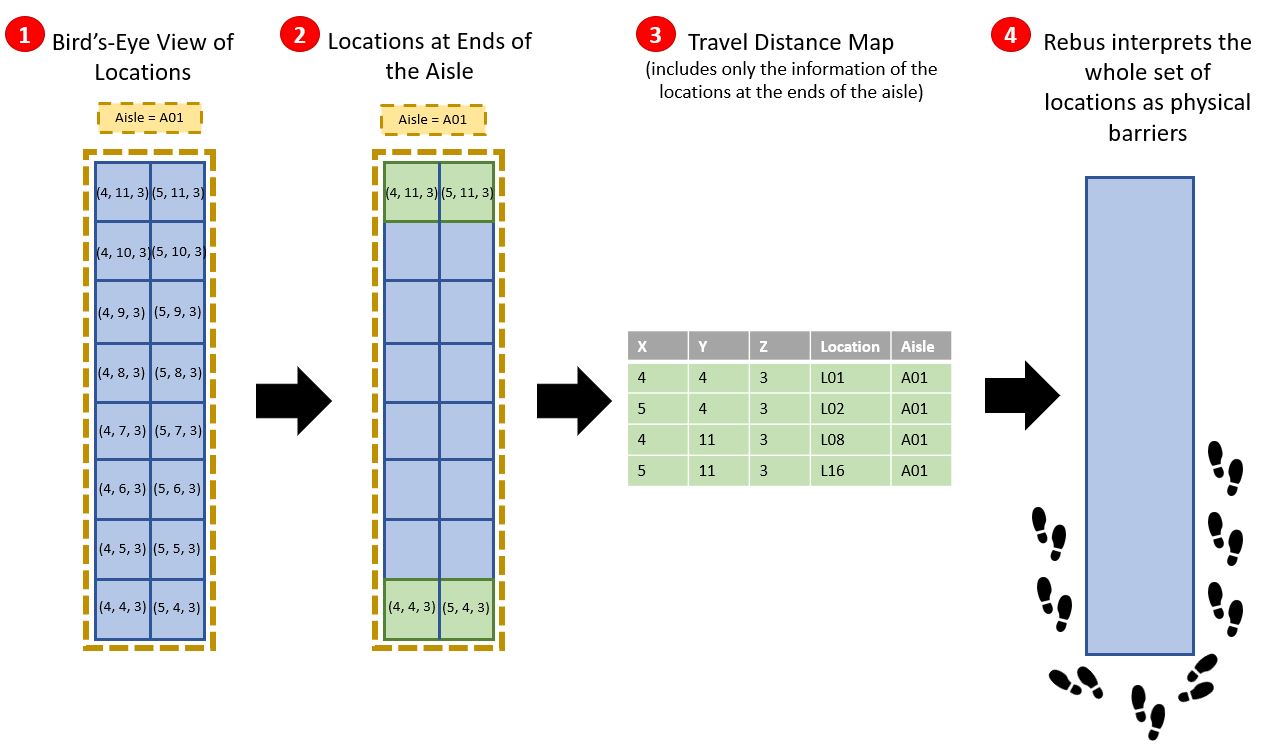
The ‘Aisle’ column eliminates the need to enter all X,Y,Z coordinates for each location, reducing the time and effort required for configuring the map. This also minimizes the chances of missing coordinates and creating gaps in the map. However, if you need Rebus to calculate the distance travelled from and to locations that are between the ones on the aisle’s extremities, you must include their information in the Travel Distance Map.
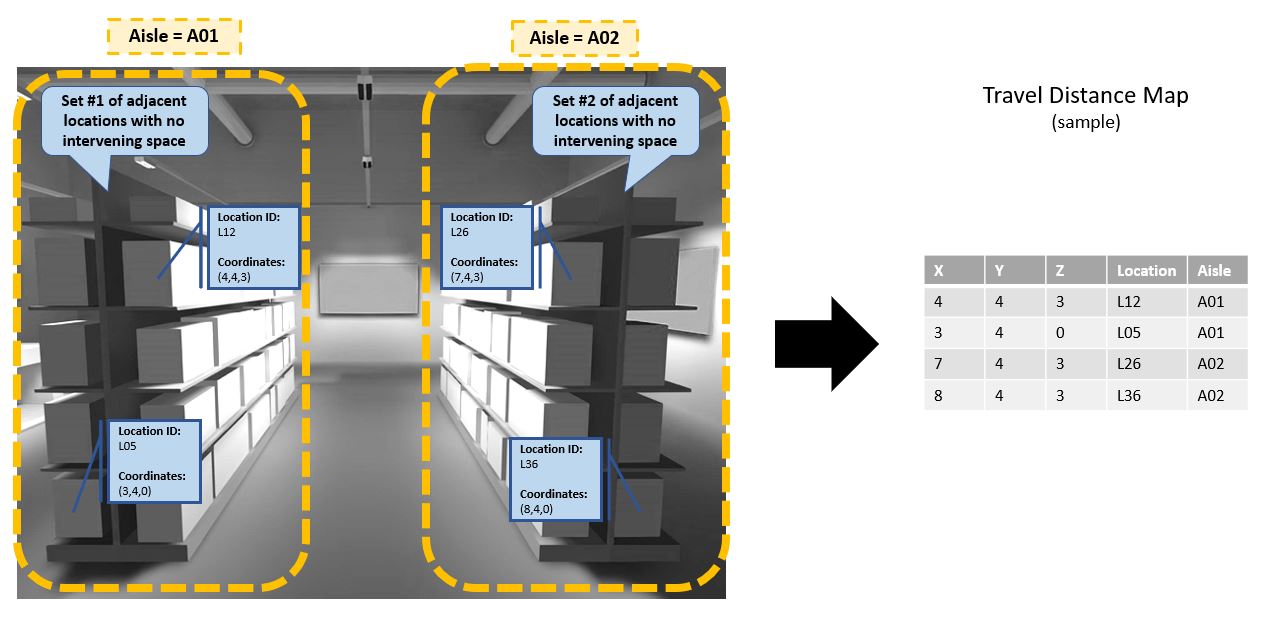
How to Store Aisle Values in the Travel Distance Map?#
When configuring the Travel Distance Map, you store the same Aisle value for a group of adjacent locations with no intervening space. For example, the below image shows a ground-level view of two sets of adjacent locations with no intervening space. The adjacent locations in each set should share the same Aisle value in the Travel Distance Map.
Note
If your WMS captures Aisle values in the manner described in How to Store Aisle Values in the Travel Distance Map?, and you wish to have the Travel Distance Map automatically populated with the data, contact Rebus Customer Support to turn on Polls and Flows.
Setting Up Matrices of Vehicles’ Horizontal and Vertical Speed#
You can configure matrices that let Rebus look up the horizontal and vertical speeds of vehicles (e.g., forklifts) and multiply the right vehicle speed value by the travel distance. You choose which type of distance (i.e., horizontal versus vertical) you want Rebus to calculate and multiply by the respective vehicle speed matrix.
To configure these matrices, you should:
Have your WMS transactions store an AUX field that captures the value of a vehicle’s identifiable attribute (e.g., the type of forklift or the vehicle’s name).
Configure two matrices that associate the vehicle’s horizontal and vertical speeds to the vehicle’s attribute value.
Consider what’s below—the WMS transaction, Matrix_Vehicle_Speed_Horizontal, and Matrix_Vehicle_Speed_Vertical—and that seconds per foot (s/ft) is the speed unit.
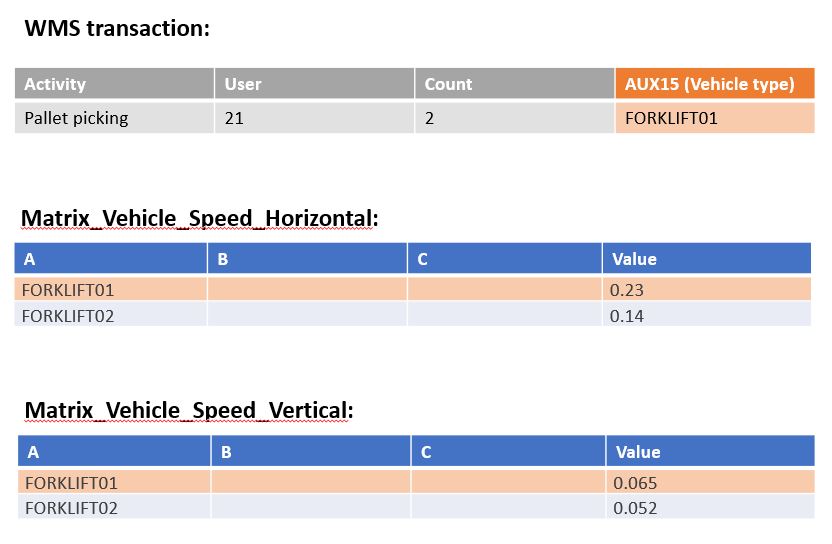
The horizontal and vertical speed matrices tell you the following:
Vector A is assigned to different vehicle names that Rebus uses to look up the corresponding lookup value (i.e., the vehicle speed in s/ft).
For FORKLIFT01, the vehicle’s horizontal and vertical speeds are 0.23 s/ft and 0.065 s/ft.
For FORKLIFT02, the vehicle’s horizontal and vertical speeds are 0.14 s/ft and 0.052 s/ft.
Given that AUX15 in the WMS transaction is FORKLIFT01, Rebus will multiply the horizontal travel distance by the horizontal speed of 0.23 s/ft and the vertical travel distances and by the vertical speed of 0.065 s/ft.
Note
The vehicle’s speed can be determined in the following ways:
Perform a stopwatch time study with the help of industrial engineers.
Use a forklift monitoring system.
Consult the vehicle’s specifications sheet provided by its supplier. Caution: Vehicle specifications usually provide the maximum speed rather than the average. Therefore, maximum vehicle speeds may not help in finding the most accurate travel time.
Using Either the Horizontal, the Vertical, or Both#
You can have Rebus calculate the horizontal distance, the vertical distance, or both. If you choose only one type of distance to be calculated, you can replace the horizontal or vertical distance with respectively the following numeric matrices:
A matrix that looks up the time to travel between zones
A matrix that looks up the time to travel up and down a bay’s levels
For more information about a numeric matrices’ setup, see Time Components and Activities.
Setting up Time Components to Calculate Travel Distance#
This procedure goes over setting up a time component for an activity type so that Rebus calculates the travel distance and expected travel time.
Prerequisites#
The transactions imported from your WMS include the Location values of the starting and destination locations.
You’ve identified at least the locations at both ends of their corresponding aisle, and their X,Y, and Z coordinates.
You’ve identified the identifiable attribute values of the aisles associated to each defined location.
Your matrices for vehicle’s horizontal and/or vertical speeds are set up are set up.
Constraints#
Only positive numbers can be entered for X, Y, and Z coordinates.
Each Location value must be unique in the Travel Distance map.
Each time component can be mapped to only one Travel Distance map at a time.
Step 1: Creating a Travel Distance Map#
From the Rebus menu, go to Admin Tools > Labor Hub > Setup > Travel tab.
Select the System and Facility ID.
Click ‘Create Map’.
Enter a ‘Map Name’.
Enter the location’s X, Y, Z coordinates and the location values. To do so, two options are available:
Manual Input |
CSV File Import |
|---|---|
In the first available row, enter the X,Y and Z coordinates; and the Location and Aisle identifiable values. To add as many rows as needed and enter more values, click ‘+Add row’ |
Fill out a .CSV file with column names that are the same as the ones found in Rebus: X, Y, Z, Location |
Click ‘Save’. You’ve created the Travel Distance Map.
Step 2: Editing a Travel Distance Map#
Through the Aisle Details tab in the Travel Distance Configuration screen, you can view and modify the minimum and maximum X and Y coordinates of each aisle. You can also export this data in CSV and Excel.
Changing Aisle Details
From the Rebus menu, go to Admin Tools > Labor Hub > Setup > Travel tab.
Select the Aisle Details tab next to Map Details at the top of the screen to view the minimum and maximum aisle values for your map.
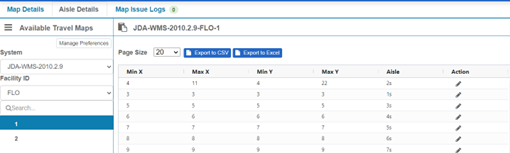
To modify an aisle minimum or maximum, click the edit button located in the Action column, which will open a modal window. Adjust the minimum and maximum X and Y values as desired and save to apply the changes.
Note
Aisle size can only be expanded, not reduced, in size. The new minimum X and Y values cannot exceed the existing minimum values, and the new maximum X and Y values cannot be less than the existing maximum values.
Step 3: Validating a Map#
Aisles in the travel distance map represent walkable paths. Aisles must connect to one another, or “intersect,” to allow travel from one location to another. Below is an example of aisles that do not intersect.
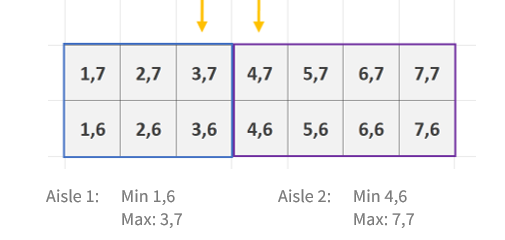
Two aisles “intersect” when one of the following is true:
They share at least one X, Y coordinate, OR-
They have at least one adjacent X, Y coordinate.
If you create a new map configuration/modify an existing map that is missing aisle intersections, you will receive a notification. The map can still be used, but you will not be able to complete transactions between locations that are not connected by aisles.
To resolve the issue(s), refer to the Map Issue Log tab. This tab displays logs with information about specific aisles that have errors. You can search and sort this data based on the “Modified” date.

When you encounter a log indicating a configuration problem, you can resolve it manually or automatically from the Map Issue Log tab using the buttons located on the top right of the screen.
Resolve Manually
Click the edit icon, which opens a modal window.
Enter the new coordinates for the source and destination aisles.
Click the Done button.
If the issue is resolved, it will no longer be visible in the log.
Resolve Automatically
Click on the ‘Resolve Automatically’ button.
A new aisle will be created to connect the source and destination aisles. The new aisle will begin at the minimum X and Y coordinates of the source aisle and will extend to the minimum X and Y coordinates of the destination aisle.
The issue will no longer be visible in the log
Step 4: Setting Up the Time Component with the Travel Distance Map#
Note
If no time component is referenced, the default vehicle velocity is set at 1 second per foot.
From the Rebus menu, go to Admin Tools > Labor > Activity Configuration Admin.
From the Existing Activities panel on the left, select the System and Facility, and find the activity type. You’re at the activity type’s configuration screen.
Go to the ‘Time Components’ tab.
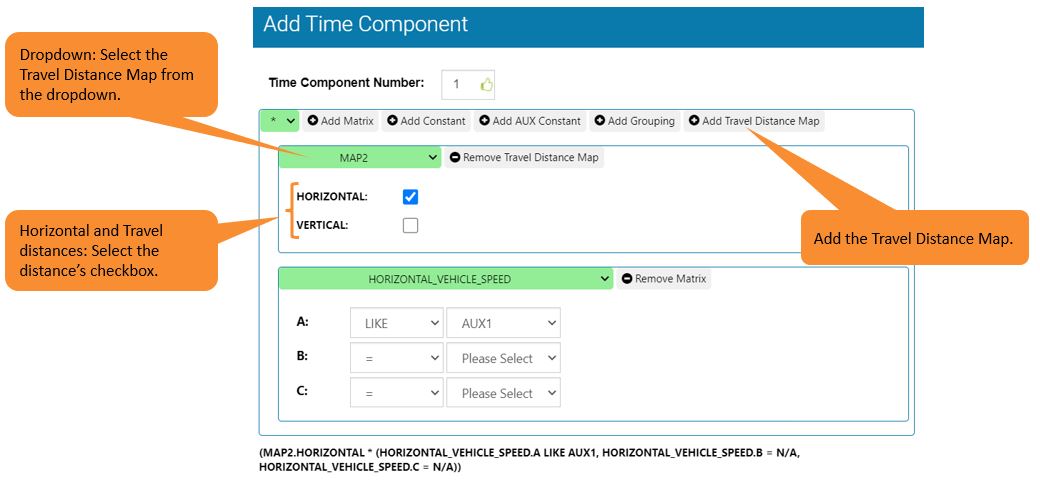
Click the ‘+’ button. The ‘Add Time Component’ form appears.

Input the time component number (1-10). You can have up to ten per activity.
To add the desired map to the time component, click ‘Add Travel Distance Map’.
Configure the time component with the Travel Distance Map according to your needs. In this example, the time component is configured to multiply the horizontal distance by the right vehicle speed value in matrix HORIZONTAL_VEHICLE_SPEED.
Note
When a labor user must travel across physical obstacles (e.g., doors) to travel a distance, you can add a matrix that adds time to account for such obstacles.
Click ‘+ Save Time Component’.
Result#
You have set up a time component for an activity type so that Rebus calculates the travel time based on the horizontal and vertical distances. You now have the following new fields that you can display in labor activity widgets:
Distance Traveled Horizontal
Distance Traveled Vertical
These fields are also available in the Activity Adjustment Admin screen.