Third Party Billing#
If your company provides third party logistics (3PL) services, you can use Rebus’s optional 3PL Billing module to generate invoices systematically or manually for a client based on activities done for that client.
Note
 If you would like the 3PL Billing Module turned on in your Rebus environment, please contact your Rebus representative.
How 3PL Billing Works#
Rebus ingests billing events data from your company’s host system. For each billing event, the 3PL Billing module supports a flexible data structure for billing events with a minimum set of required fields and an extended set of generic attribute fields.
The Billing module imports each event’s attribute data from the host system and does the following:
Based on attribute data, matches each billing event to a charge configuration, which lets Rebus calculate how much to charge for that event. A billing event can be matched to multiple charge configurations, which will result in multiple billing transactions being created for that event.
Processes billing events and, based on client configuration and charge configuration, generates a set of billing transactions.
Generates the invoices and processes the billing transactions, putting them on the invoices as line items.
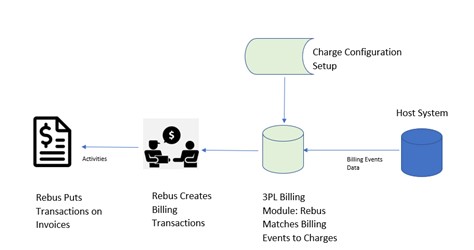
4. At the end of the billing cycle, puts each invoice into ‘Waiting for Approval’ status and you can then review it and make any needed changes to it. After you’re finished reviewing, you can ‘Approve’ the invoice. Invoices are automatically emailed out following approval.
If the module cannot match a billing event to a charge configuration, the event will be stored in an ‘Error Bullpen’ for your review and correction. A charge can be either a one-time charge or a recurring charge: one that recurs at a certain frequency (e.g., monthly, weekly). You can also set up certain charges to require approval before they become line items on a client invoice. These charges are not added to an invoice until they are approved.
Each client has its own configurations for charges, invoices, and billing cycles. Through these configurations, you determine the following:
How the amount charged for each billing event is calculated,
How often recurring charges are levied.
Whether the invoice is detailed or summarized.
How long the billing cycles are.
Event Sequence |
Rebus Processing Description |
Example Attributes and Calculations |
|---|---|---|
1 |
Rebus receives from host system a billing event for the receipt of three pallets. |
Attribute of Billing Event: Quantity = 3 |
2 |
Rebus matches the billing event’s attributes to the charge mappings of the Receipt and Handling Fee charge configuration. |
Settings of Receipt and Handling Fee charge configuration: Rate = $10, UOM = Pallet |
3 |
Rebus creates a billing transaction for the Receipt and Handling Fee |
Fee = Quantity * Rate -> Fee =3 * $10 -> Fee = $30 |
4 |
Billing transaction processed. Rebus adds the $30 Receipt and Handling fee to the client’s active invoice. Rebus refers to the client’s Billing Cycle configuration to determine to which invoice the fee is added. |
– |
3PL Billing Glossary#
Term |
Definition |
|---|---|
Billing Cycle Configuration |
How often invoices are generated and sent to clients. Billing cycles are set up for each client and are linked to functional areas. |
Charge Configuration |
A configuration setup that lets you determine how much is charged for a billing event. |
Client |
A client of a 3PL service provider. |
Billing Event |
Activity done for a client, is chargeable to the client, and whose details are captured by the host system. |
Billing Transaction a.k.a. Transaction |
A billing event for which Rebus has calculated a charge. |
Functional Area |
A category that can be applied to a set of related activities. For example, the following activities could all be grouped in the ‘Receiving’ functional area: 1) truck unload by lift truck, 2) truck unload by hand, 3) shrink wrap received pallet, 4) put away received pallet. When setting up the 3PL Billing module, you assign functional areas to billing cycle configurations, which are linked to invoice configurations. |
Future Transaction |
A recurring transaction that has not yet reached its effective date. |
Host System |
The system that provides the billing event data to Rebus 3PL billing module. Usually a warehouse management system (WMS). |
Invoice Configuration |
A template that defines which details are shown on an invoice and how the line items are grouped. |
Recurring Transaction |
A billing event that’s scheduled to regularly repeat. E.g., a recurring storage fee. |
Unit of Measure (UOM) |
A customizable unit of measure that you configure in the 3PL module and that’s used to calculate the charges for billing events. |
Setting Up 3PL Billing Module - Global Configuration and Functional Areas#
The 3PL Billing module lets you set up charges, billing cycles, and invoice templates for each client. Setting up the 3PL Billing module involves the following procedures:
Setting up global configurations like functional areas, activities, and units of measure (UOM).
Setting up each client and its invoice, charge, and billing cycle configurations.
You configure the functional areas, UOM, and Activity Mapping on the Billing Configuration screen. It has three tabs: Functional Areas, UOM, and Attribute Mapping.
Prerequisites#
Access to the 3PL Billing module screens.
Have planned out the functional areas, UOM, and activities that will be needed to set up all your 3PL clients.
A list of the type of data that each of the billing event attribute fields brings over from the WMS.
Setting Up Functional Areas and Attribute Mapping#
Go to Admin Tools -> Billing -> Billing Configuration. You are at the Billing Configuration screen.
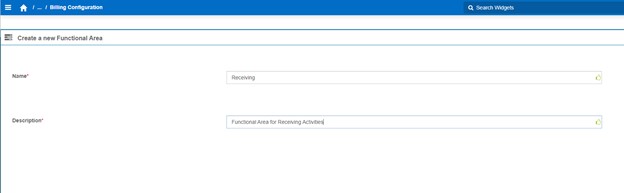
- On the Functional Areas tab, set up the functional areas and the activities associated with each functional area. You use these functional areas when setting up billing cycles to determine which charges are put on an invoice. To set up a functional area, do the following:
Click ‘New’ and then fill in the Name and Description of the new functional area.
Click ‘Add’.
On the Attribute Mapping tab, map the billing event attribute fields to aliases. This mapping accomplishes the following:
Makes it easier for you to identify the information that each attribute field holds. The aliases you set up here appear throughout the 3PL Billing module screens and make setup easier.
Puts the field on ‘detailed’ (as opposed to ‘summary’) invoices.
To set up an attribute mapping, do the following:
Click ‘Add Attribute’. A blank mapping row appears.
In the Attribute dropdown, select the attribute field that you want to map to an alias.
In the Name field, enter the alias of the attribute field.
Click the checkmark. The attribute is mapped to an alias.
Setting Up UOMs#
A UOM is a customizable unit of measure that’s used to calculate the charges for billing events.
You determine the billing event attribute that Rebus uses to calculate a particular UOM. For each billing event, Rebus takes the attribute field value mapped to ‘Quantity’ and divides it by the divisor to come up with the UOM value that’s used to calculate a charge for a billing event.
For example, if ATTR1 is unit quantity and ATTR2 is units per pallet then you can set up a ‘Pallet’ UOM by mapping the Quantity field to the attribute field that has the number of units and then setting the divisor ATTR2.
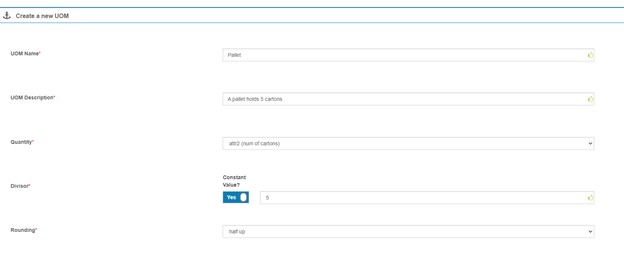
On the UOM tab, define all the units of measure (UOM) to be used in the 3PL billing module. To add a UOM, do the following:
Click ‘New’ and fill in the fields:
Field |
What You Enter… |
|---|---|
UOM Name |
Name of UOM (e.g., pallet, carton) |
UOM Description |
Description of UOM. |
Quantity |
Attribute field whose value is used to calculate the UOM value for a billing event. |
Divisor |
Value by which the Quantity value is divided to arrive at the Pricing UOM quantity for a billing event. Can be a constant or another attribute field. Pricing UOM quantity for billing event = Quantity value / Divisor value |
Rounding |
For those times when Quantity / Divisor isn’t a whole number, you can set the rounding method that Rebus uses to get the UOM quantity: None – no rounding is done. Up – Always round up to the next whole number. Down – Always round down to the previous whole number. Half up – Default rounding convention: If the quotient has a fraction of 0.5 or above, round up to the next whole number. Otherwise, round down to the previous whole number. Half down – Inverse of half up: If the quotient has a fraction of 0.5 or below, round down to the previous whole number. Otherwise, round up to the next whole number. Half even – Works like half-up except that if the quotient fraction is exactly 0.5, round to the nearest even whole number. |
Click ‘Save’. You have created a UOM.
Setting Up 3PL Billing Module - Client Configurations#
On the Client Configuration screen, set up your company’s 3PL clients and their corresponding charges, billing cycles, and invoices. The Client Configuration screen has four tabs: General, Charge, Invoice, Billing Cycle.
Prerequisites#
Access to the 3PL Billing module screens.
Have planned the charges, billing cycles, and invoice configurations.
To set up a client, do the following:
Setting Up General Details#
Go to Admin Tools -> Billing -> Client Configuration. You are at the Billing Configuration screen.
Click New. You are at the Create New Client screen.
Enter the required details to create a client record including company name, currency, and business address.
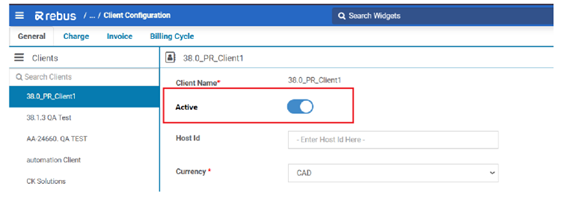
Set a client’s Active status by toggling the Active button. The client selection dropdowns in the Billing Invoice Configuration, Future Transactions, and Error Bullpen screens are divided into two sections—Active and Inactive—with Active clients listed first, alphabetically.
Click ‘Create’. The client record is created.
Note
You can assign Inactive status to a client without affecting any incomplete tasks or losing data.
Setting Up Charge Configurations#
A charge configuration determines how and when a particular charge is levied for the client. A charge is levied for each billing event that is matched to a charge configuration. A billing event is matched to a charge configuration when its attribute field values match the charge mapping of that charge configuration.
To set up a charge configuration, do the following:
Open the client’s Charge tab. It has a top area that shows the charge configuration’s details and a bottom area that shows the charge mappings.
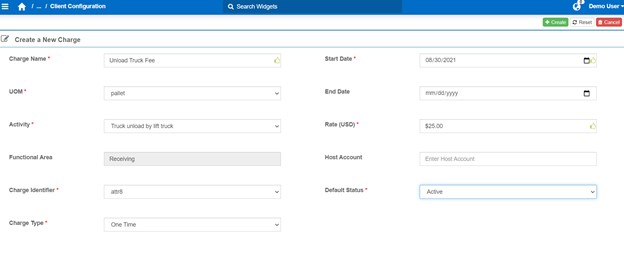
Click ‘New’. You are at the Create a New Charge screen.
Fill out the fields needed to set up a charge configuration:
Field |
What You Enter… |
|---|---|
Charge Name |
Name of the charge. This value appears on the invoice. |
UOM |
The UOM that is used to calculate the charge for this billing event. For each activity, the charge is calculated as the Rate times the number of UOMs of product involved in the billing event. |
Activity |
The activity type for which the charge is levied. This value appears on the invoice. |
Functional Area |
Filled in automatically with the activity type’s functional area. |
Charge Identifier |
Attribute that identifies a type of item held in inventory. Used to track how many items of that type are still in inventory during recurring fee calculations. |
Charge Type |
Whether the charge is applied one-time for an activity or whether it’s levied on a recurring basis. |
Start Date |
When the 3PL Billing module starts levying the charge. |
End Date |
When the 3PL Billing module stops levying the charge. |
Rate |
Rate used to calculate charge. |
Host Account |
Optional field. Can be used to link this charge to a particular account. |
Default Status |
Whether a charge must be approved before appearing on a client invoice: Active – Charge appears on invoice without any approval needed. Pending – Charge only appears on invoice when it’s approved. |
Recurring Period |
For recurring charges: How often the charge is levied. (Annually, Monthly, Weekly) |
Day Number |
For monthly and annually recurring charges, on what day of the month the charge is levied. |
Month |
For annually recurring charges, in which month the charge is levied. |
Weekday |
For weekly recurring charges, on which day of the week the charge is levied. |
Click ‘Create’. The charge configuration is created.
Setting up Charge Mappings of Charge Configuration#
Charge mappings are conditions that must be true for a billing event to be matched to this charge configuration and for the charge to be applied. Through the Charge Mapping form’s dropdown menus, you create ‘conditions’ by selecting fields, operators, and data types and then put them together using ‘OR’ and ‘AND’ logical operators. A condition is an expression that’s evaluated to see if it’s true. A billing event is evaluated against all the conditions in the charge mapping. Those billing events that evaluate as ‘true’ are matched to this charge configuration.
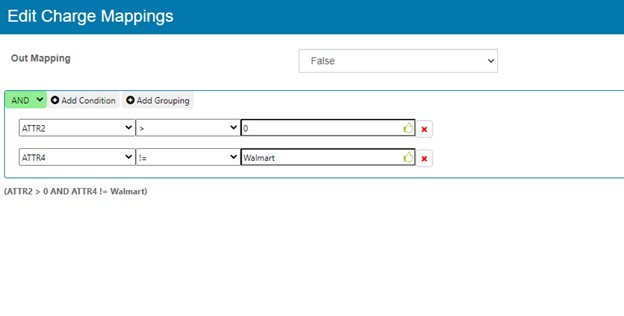
To set up a charge mapping, do the following:
If it’s a charge to be applied to an Outbound transaction, set Out Mapping to ‘True’. Otherwise, leave it at ‘False’.
In the Mappings Area, click ‘+’. The Charge Mapping form appears.
Set up the Charge Mapping conditions.
Click ‘Save Mapping’. The Charge Mapping is saved.
Setting Up Invoice Configurations#
An invoice configuration has the details that are provided on client invoices. Each client can have multiple invoice configurations.
To set up an invoice configuration, do the following:
Open the client’s Invoice tab and then click ‘New’. You are at the Create a new Invoice Configuration screen.
Fill in the fields needed to create an invoice configuration.
Field |
What You Enter… |
|---|---|
Invoice Name |
Name of invoice configuration. Used to distinguish it from other invoice configurations. |
Type |
Whether the invoice provides a summary of the charges or shows a detailed breakdown. 1) Summary – All attribute fields are hidden. 2) Detailed – Aliased attribute fields appear on invoice. |
Break On Value |
How the invoice’s line items are grouped. There are three options: * 1) Client – no grouping * 2) Functional Area – grouped by functional area. 3) Activity – grouped by activity type |
Description |
Invoice description |
Bill To Address |
Business address of client. |
Click ‘Create’. The invoice configuration is created.
On the Invoice tab, enter the email addresses of the invoice recipients.
Note
Automatic emailing of invoices to clients contacts will be developed in an upcoming release.
To enter an email address, do the following:
Click ‘Add Email’. An empty line appears in the Email Recipients section.
Enter the email address of the invoice recipient.
Click the checkmark.
Setting up an Invoice Configuration to Generate a PDF#
Go to Admin Tools -> Billing > Client Configuration.
Select a Client on the ‘General’ Tab, then navigate to the ‘Invoice’ Tab .
Select (or create) an Invoice configuration in the left nav.
In the dropdown field ‘PDF Template’, select ‘JBDetailed’, and then save the configuration.
The invoice is now configured to be exported as a PDF using the JBDetailed PDF template.
Setting up Billing Cycle Configuration#
A billing cycle configuration links a billing cycle (annually, weekly etc.) to an invoice configuration and determines the following:
How often the client is invoiced.
Which charges appear on invoice.
To set up a billing cycle configuration, do the following:
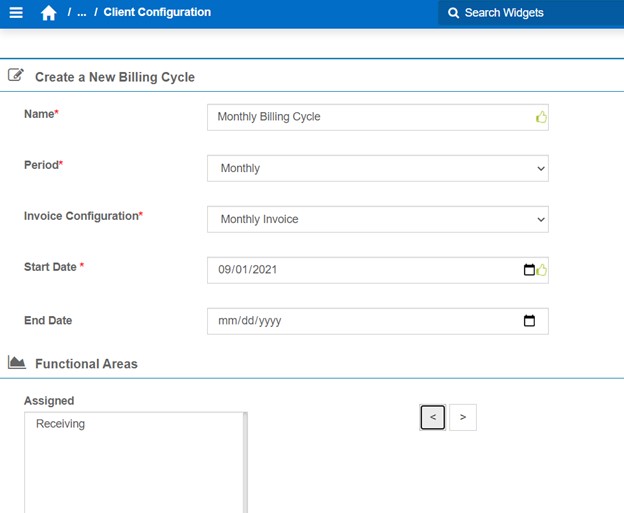
Open the client’s Billing Cycle tab and then click ‘New’. You are at the Create a New Billing Cycle screen.
Fill in the fields to create a billing cycle configuration:
Field |
What You Enter… |
|---|---|
Name |
Name of Billing Cycle configuration.” |
Period |
Select the length of the billing cycle. I.e., how often the invoice is generated (Annual, Monthly, Weekly). The module calculates the billing cycle’s recurring dates from the Start Date. E.g., a start date of 08 Sept 2021 and a monthly period means that the next invoice will be generated on 08 Oct 2021. For an annual period, the next invoice will be generated on 08 Sept 2022. |
Invoice Configuration |
Select the invoice configuration that’s associated with this billing cycle configuration. |
Start Date |
Effective start date of billing cycle configuration. |
End Date |
Effective end date of billing cycle configuration. |
Functional Areas |
Determine the charges that appear on the invoice by assigning functional areas. Charges related to activities that are in the assigned functional areas appear on the invoice. A functional area can be assigned to only one billing cycle configuration. |
If the Billing Cycle Configuration is changed in the middle of a Billing Cycle…#
You can change a billing cycle configuration through the Billing Cycle tab of a client’s Client Configuration page. Changing the period affects the current billing cycle:
If you increase a billing cycle configuration’s period (e.g., from weekly to monthly), the end date of the current billing cycle will be postponed so that its length matches the new period value.
If you decrease a billing cycle configuration’s period (e.g., from monthly to weekly), a new billing cycle will be created with today’s start date and an end date to match the new period value.
Recurring Fees#
A recurring fee is charged to a client once per the recurring period of the charge. E.g., a monthly storage fee that’s charged to a client based on the amount of inventory being held. When Rebus receives a billing event that’s matched to a charge configuration that has a ‘recurring’ type, Rebus does the following:
Generates a billing transaction that has an effective date in the future. The charge configuration determines the effective date.
At the effective date:
Processes the transaction and puts it on the client’s active invoice.
Generates another future transaction with an effective date in the next recurring period.
The recurring fee continues to be charged once per recurring period until Rebus receives from the host system an offsetting transaction that, in effect, turns the recurring fee ‘off’.
Use Case: Storage Fees Using the Granular Method#
A storage fee is one type of recurring fee that can be set up. The 3PL module offers flexibility in how you levy storage fees. The most precise method for levying a storage fee is the granular method, which you can use if the host system tracks the receipt and exit of inventory items individually. In the granular method, Rebus processes billing events that record when individual items are shipped into or out of a facility. This tracking of individual items is done through a ‘charge identifier’ value. When setting up a charge configuration, you must specify which of the billing event attributes is the charge identifier. For the purposes of levying a storage fee, the charge identifier value identifies a particular inventory item (e.g., a single case or a single pallet).
Rebus starts levying the storage fee when it first receives a billing event that’s mapped to a recurring-type charge configuration. This billing event represents the receiving of the item identified by the charge identifier. Rebus continues to charge the storage fee once per recurring period until it receives an offsetting billing event generated by the item leaving the facility. This billing event has the same charge identifier as the billing event of the inbound transaction.
Date |
What happens… |
Example Attribute Values |
Rebus Processing Notes |
|---|---|---|---|
01 February |
Facility receives ABC pallet. |
Pallet ID is the charge identifier. Charge Identifier = ‘ABC’ |
Rebus receives from the host system a billing event for the receipt of the pallet.The billing event is matched to two charge configurations: 1) Receipt and Handling Fee, which is put on the client’s active invoice. 2) Monthly Storage Fee, which is a recurring fee that’s set to recur every month on the 15th. Rebus creates for the monthly storage fee a future transaction whose effective date is 15 February. |
15 February |
Monthly Storage Fee is levied. |
Rebus puts a line item for the February monthly storage fee on the client’s active invoice. Rebus generates another future transaction that has an effective date of 15 March. |
|
15 March |
Monthly Storage Fee is levied. |
Rebus puts a line item for the March monthly storage fee on the client’s active invoice. Rebus generates another future transaction that has an effective date of 15 April. |
|
20 March |
ABC pallet is shipped out of facility. |
Charge Identifier is ‘ABC’. |
Rebus receives from host system a billing event for the shipping of the pallet. The billing event is matched to one charge configuration: Shipping and Handling FeeThis charge configuration has an Out mapping of ‘True’, which means that it involves the shipping out of an item. Shipping and Handling Fee is put on client’s active invoice.Rebus deletes the future transaction for 15 April and stops levying the monthly storage fee for that item. Note that while you don’t have to set up a Shipping and Handling Fee, there must be a charge configuration with an Out mapping = True to be matched to billing events that record the shipping out of items. |
Modifications on the Granular Method#
The charge identifier does not have to represent a particular inventory item; It could represent some larger entity, like a client. In this case, all billing events that pertain to the same client would have the same charge identifier. Those billing events could be matched to the charge configurations of monthly storage fees. For each billing event that represented an inbound transaction, the count used to calculate the client’s monthly storage fee would increment by a certain amount. For each billing event that represented an outbound transaction, that count of items would be reduced.
Date |
What happens… |
Example Attribute Values |
Rebus Processing Notes |
|---|---|---|---|
01 March |
Receive 50 pallets for client ABC. |
The event’s charge identifier is ‘ABC’. |
Rebus receives from host system a billing event for the receipt of 50 pallets. Your facility already stores 400 pallets for client ABC. The billing event is matched to a charge configuration for a monthly storage fee. Rebus increments by 50 the count of the future transaction for the monthly storage fee, which is set to be levied on 15 March. |
15 March |
Monthly Storage fee is levied. |
– |
Rebus puts a line item for the March monthly storage fee on the client’s active invoice. The fee is calculated based on a count of 450.Rebus generates another future transaction that has an effective date of 15 April. |
20 March |
150 of ABC’s pallets are shipped out. |
Charge Identifier is ‘ABC’. |
Rebus receives from host system a billing event for the shipping out of 150 pallets. The billing event is matched to one charge configuration: Shipping and Handling Fee. This charge configuration has an Out mapping of ‘True’, which means that it involves the shipping out of an item. Shipping and Handling Fee is put on client’s active invoice. Rebus decreases by 150 the count for the future transaction of 15 April. |
Points for setting up Recurring Storage Fees#
To set up a recurring storage fee, you could set up an ‘Inventory’ functional area with a ‘Storage’ type activity. When setting up charge configurations for recurring storage fees at the client configuration level you must take into account the Out mapping flag:
Out mapping = False means that the charge pertains to Inbound transactions (receiving).
Out mapping = True identifies transactions that represent inventory items going out so that inventory items are removed from customer’s count in the calculation of storage fees.
Use Case: Storage Fees Using the Snapshot Method#
In the Snapshot method, Rebus processes billing events through comparing snapshots of data throughout the day. This is done by having two datasets: the recurring fees that have been set up (Set A), and the current inventory of a warehouse (Set B). When the datasets do not match, Rebus takes action to adjust the recurring fees. This allows for automation for multiple use cases, including:
If a pallet is partly depleted
If a pallet is split up
If a pallet is relabeled or moved to QA
To set up this method, you must contact the implementation team.
Scenario 1: Complete match
Both the recurring fees (Set A) and the snapshot (Set B) match exactly. No adjustments are necessary. This scenario typically occurs during late-night processing when inventory movement is minimal.
Scenario 2: Missing pallet in snapshot
A pallet ID exists in recurring fees (Set A) but is missing from the inventory snapshot (Set B). Possible reasons:
The pallet might have been shipped.
The pallet might have been relabeled.
The pallet might be depleted (all cases picked).
The recurring charge for this pallet is removed to prevent perpetually charging for inventory that no longer exists.
Scenario 3: New pallet in snapshot
A new pallet ID is present in the snapshot (Set B) but does not exist in recurring fees (Set A). Possible Reasons:
New inventory was received but not yet processed for recurring charges.
An inventory item was relabeled (e.g., Pallet 001 to Pallet 002).
The Pallet ID could have been adjusted in after previously being adjusted out.
A recurring charge is created for the new pallet ID.
Managing Future Transactions#
You can see the future transactions that are going to be charged to a client on the Future Transactions screen.
To access the Future Transactions screen:
Go to Admin Tools -> Billing -> Future Configuration. You are at the Invoice Configuration screen.
From the ‘Select a Client’ dropdown, select the client whose future transactions you want to see.
The screen shows the client’s future transactions for the current billing cycle. For each future transaction, it shows the aliased fields and important details like the following:
Charge Name
Charge Identifier
Warehouse Code
Quarantined Flag - Whether the transaction is quarantined. Should be ‘0’. A value of ‘1’ means that the transaction has been automatically quarantined. So long as it is quarantined, the transaction cannot be processed. This will happen if Rebus cannot match the transaction to
Processed Flag – Whether the transaction has been processed and added to an invoice. Should be ‘0’.
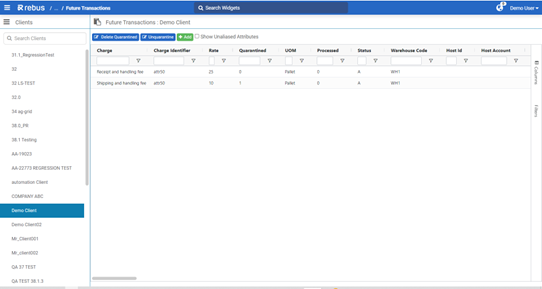
Through the Future Transactions screen, you can do the following:
Creating Future Transations#
Before creating a future transaction, you should know the following:
What the transaction’s charge configuration will be.
That charge configuration’s charge mappings
Click ‘Add’. The Add a Future Transaction form appears.
Fill out the form:
Field |
What You Enter… |
|---|---|
Field |
Select from the list of charge configurations. |
Quantity |
Quantity that is used to calculate the fee amount. |
Warehouse Code |
Warehouse code associated with the transaction. |
Effective Date |
When the transaction will be processed and put on the client’s active invoice. Must be a future date. |
In the Attribute table, add the transaction’s associated attributes and their values.
Note
The attributes must agree with the charge mappings of the transaction’s charge configuration. Otherwise, the transaction will be quarantined.
- To add an attribute to a transaction, do the following:
Click ‘Add Attribute’. A blank row appears.
In the Attribute dropdown, select the attribute field that you want to add to the transaction
In the Name field, enter the value of the attribute field.
Click the checkmark. The attribute is added to the transaction.
Managing Quarantined Transactions#
If a quarantined transaction is a future transaction, it will appear as a record on the Future Transaction screen. To manage quarantined transactions on the Future Transactions screen, you can do either of the following:
Deleting Quarantine Transactions#
Click ‘Delete Quarantined’. The table is filtered to show only quarantined transactions. A checkbox appears as the first column.
Select the quarantined transactions that you want to delete.
Note
If a set of rows share the same charge identifier value, you must select the entire set or none of them.
Click ‘Confirm’. The selected transactions are deleted.
Unquaranting Transactions#
Unquaranting a transaction means to set the quarantine flag to ‘0’ and have it re-evaluated by the billing event process when it runs again. If the underlying issue isn’t repaired, the transaction will be re-quarantined.
Troubleshoot the underlying issue that caused the transaction to be quarantined.
Refer to the charge mappings and find out how the transaction’s attribute values don’t meet the charge mapping criteria.
Make the appropriate adjustments to the charge mappings.
On the Future Transaction screen, click ‘Unquarantine’. The table is filtered to show only quarantined transactions. A checkbox appears as the first column.
Select the quarantined transactions that you want to unquarantine.
Note
If a set of rows share the same charge identifier value, you must select the entire set or none of them.
NOTE: If a set of rows share the same charge identifier value, you must select the entire set or none of them.
Click ‘Confirm’. The selected transactions are unquarantined. The Quarantined Flag is set to ‘0’.
Note
Even if the unquarantining seems to have worked, if the underlying issue wasn’t repaired, the transaction will be re-quarantined when the billing event process runs again.
Reviewing and Editing Invoices#
The 3PL billing module lets you do the following:
View invoices
Edit Invoice details
Add line items to an invoice
Approve an invoice’s pending line items
Create manual invoices
Export invoices to Excel
Go to Admin Tools -> Billing -> Invoice Configuration. You are at the Invoice Configuration screen.
From the ‘Select a Client’ dropdown, select the client whose invoices you want to see.
The left-hand panel shows lists of systematically generated invoices and manual invoices for the selected client and buttons that let you filter the list by invoice status:
Invoice Status |
Definition |
|---|---|
Active |
Applied to the following: 1) A manual invoice that can still be modified. 2) A systematically generated invoice that has been created for the client for the current billing cycle. The invoice can be modified. |
Waiting for Approval |
Applied to a systematically generated invoice whose billing cycle is finished and that needs to be reviewed and approved. The invoice can be modified. |
Completed |
Invoice has been approved and sent to clients. Its details cannot be changed. |
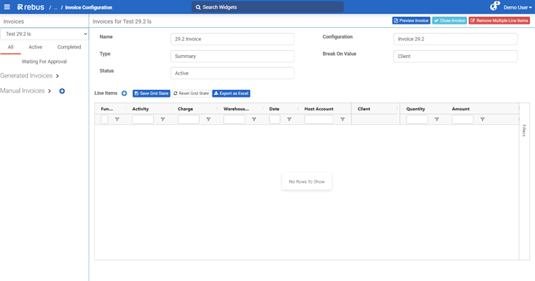
Viewing Invoices#
Click the invoice whose details you want to see. The top of the main display area shows the invoice’s details and table beneath it has the line items, each of which describes a charge on the invoice.
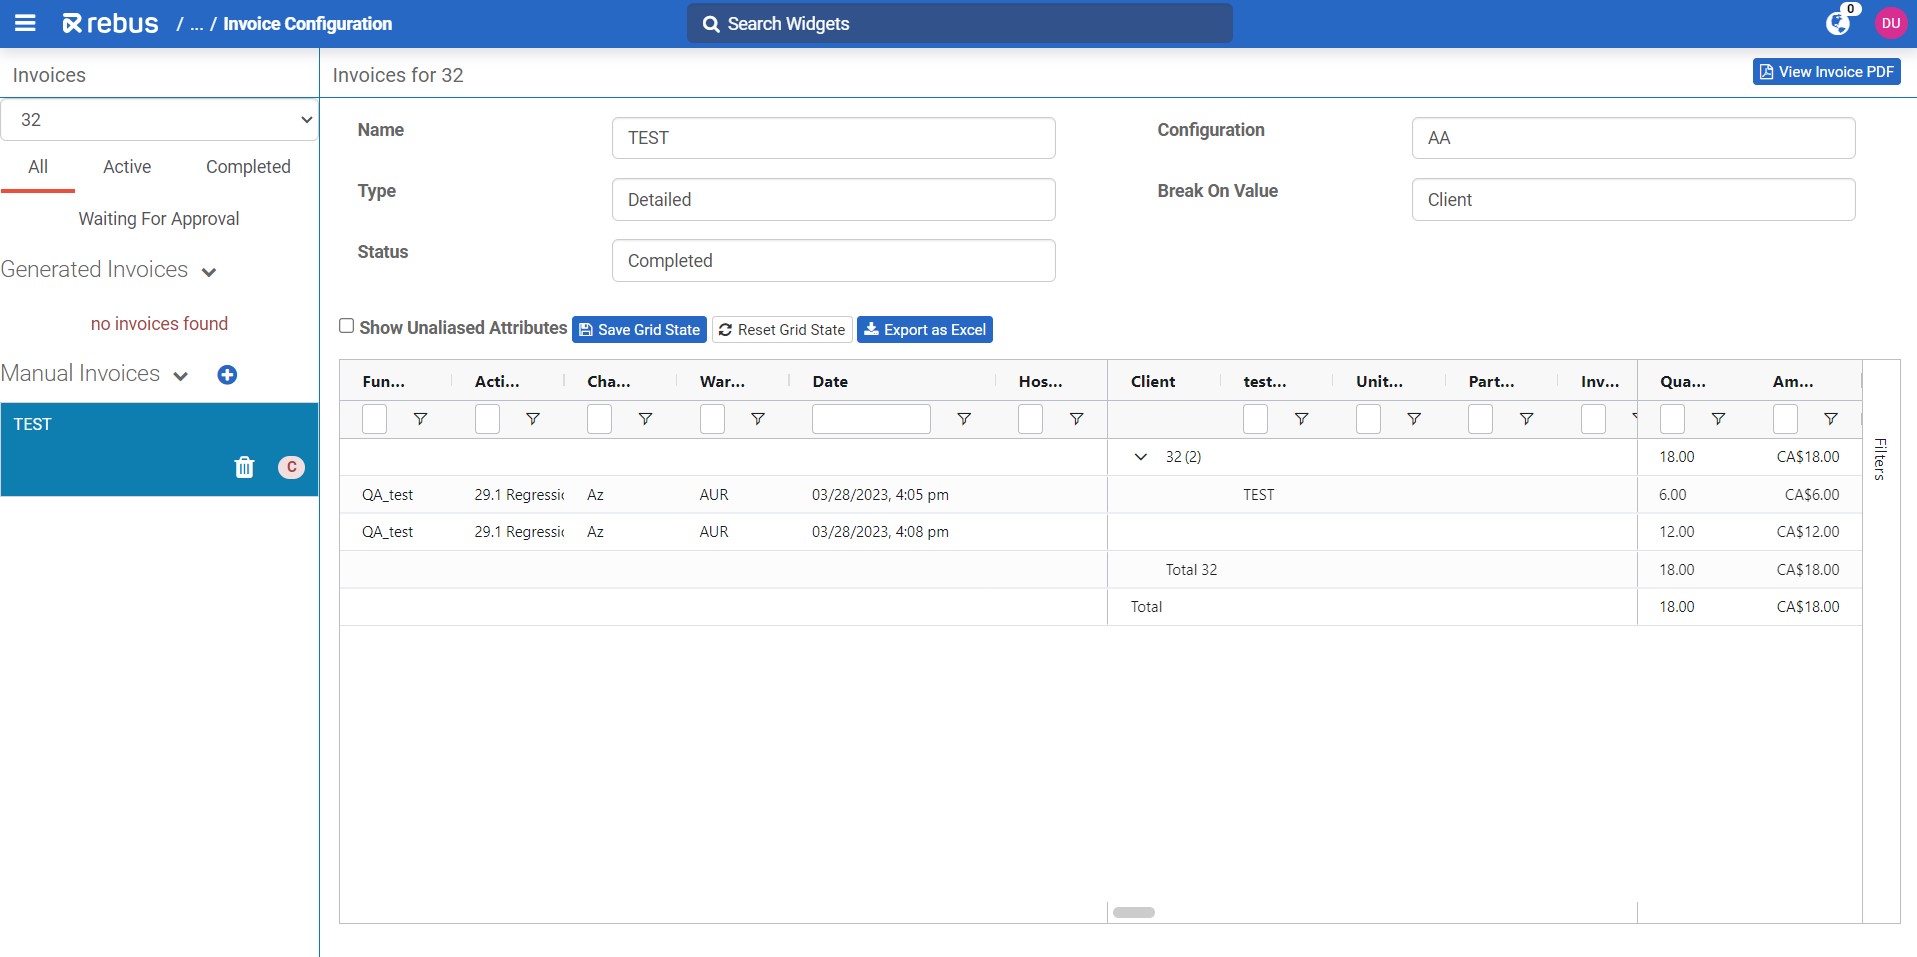
Each line item displays the following:
On Summary Invoices: * Functional Area * Activity * Charge Name. * Warehouse Code * Date of Billing Event * Quantity – i.e., Pricing UOM quantity used to calculate the fee. * Amount of fee
On Detailed Invoices: * All the fields that are on Summary invoices, plus all attribute fields set up with aliases.
Creating Manual Invoices#
Click the ‘+’ button next to the heading ‘Manual Invoices’. The Create an Invoice form appears.
Enter the name of the manual invoice and select the invoice configuration.
Click ‘Apply’. The invoice is created.
Approving/Editing Invoice Details#
You can approve invoices that are waiting for approval or edit active invoices in the following ways:
Note
Approving an invoice will automatically send it out to the list of email recipients.
Action |
What You Do… |
|---|---|
Approve an invoice. |
Click ‘Approve’. A modal window displays a list of email recipients that the PDF invoice will be mailed to. You can then click ‘Approve’ to send out the invoice. |
Change an invoice’s name or invoice configuration. |
Click the invoice’s edit button, |
Delete an invoice. |
Click the invoice’s delete button |
Edit an invoice’s line item. |
Click the line item’s edit button, update the line item’s details in the form, and then click ‘OK’. |
Delete an invoice line item. |
Click the line item’s delete button, and then click ‘Yes’ to confirm. |


Adding Line Items to Invoice#
Click the invoice whose details you want to edit.
Click the ‘+’ button next to the Line Items heading. The Add Line Item(s) form appears.

Fill in the fields to specify the details of the line item including the Charge Configuration and Quantity, which are used to calculate the Amount.
- If you want to add attribute field values to the line item, do the following:
Click ‘Add Attribute’. A blank row appears in the Attributes table.
Select the attribute and then enter an alias, which becomes a label for the attribute field value on the invoice.
Click OK. You have added a line item to the invoice.
Approving/Deleting Pending Line Items#
If a line item is in pending status, it must be manually approved and then Rebus will add it to the invoice.
Click the invoice whose details you want to edit.
Click the ‘+’ button next to the Line Items heading. The Add Line Item(s) form appears.
Click the Pending Line Item(s) tab. The tab shows the pending line items assigned to this invoice.
Click the checkbox of the line item that you want to approve.
Approve or delete the line item.
Approve the Line Item |
Delete the Line Item |
|---|---|
Click ‘OK’. The line item is added to the invoice. |
Click ‘Delete’. The line item is deleted from the Pending Line Item(s) tab. |
Note
Deleting Invoice Line Items (transactions) does not delete the transaction, but removes it from the invoice.
Exporting Invoices to Excel#
Click the invoice that you want to export.
If the invoice is detailed, decide whether you want to include in the invoice unaliased attribute field values. These are attributes that weren’t mapped to an alias at the global configuration setup stage.
I want to include Unaliased attributes in the invoice… |
Otherwise… |
|---|---|
Click the checkbox ‘Show Unaliased Attributes’. The Line Items table shows all the attribute field values. |
Proceed to the next step. |
In the upper right corner, click ‘Export to Excel’. An excel spreadsheet with the invoice details is downloaded to your computer’s Downloads folder.
Note
Exporting an invoice to excel does not change its status from Active to Completed.
Managing Billing Event Errors#
Billing events that can’t be matched to a charge configuration and invoices that fail to close or email to the client appear on the Error Bullpen screen. Here you can review the billing events, invoices and their error messages and resubmit them for processing after the module’s configuration has been fixed.
Events Quarantine#
To resolve a mismatched billing event, do the following:
Go to Admin Tools -> Billing -> Error Bullpen-> Events Quarantine tab.
In the Clients panel, click the client whose mismatched billing events you want to review. The main display area is populated with the client’s mismatched billing events.
Review the error messages of the mismatched billing event and, if applicable, make any needed corrections to the module’s configuration.
Select the checkbox of the mismatched billing event.
Decide whether to resubmit for processing or remove the event.
Invoice Quarantine#
To resolve a failed invoice, do the following:
Go to Admin Tools -> Billing -> Error Bullpen-> Invoice Quarantine tab.
In the Clients panel, click the client whose quarantined invoices you want to review. The main display area is populated with the client’s quarantined invoices.
Review the error messages of the quarantined invoice and, if applicable, make any needed corrections to the module’s configuration.
Select the checkbox of the quarantined invoice.
Decide whether to resubmit for processing or remove the invoice.
Resubmit for Processing… |
Remove the Event… |
|---|---|
Click ‘Resubmit for Processing’. A message confirming re-submission appears and the item disappears from the table. |
Click ‘Mark as Removed’. A message confirming the item’s removal appears and the item disappears from the table. |
Editing Configurations#
Setting Clients to Active/Inactive#
The client selection dropdowns in the Billing Invoice Configuration, Future Transactions, and Error Bullpen screens are now divided into two sections—Active and Inactive—with Active clients listed first. This sorting makes it easier to find and select clients without having to scroll through a long list of inactive clients.
You can change a client’s Active status on the Client Configuration page by toggling the new Active button.
When you switch a client to Inactive status, you get a warning listing any incomplete client-related tasks (active invoices, unassigned transactions, etc.). You can make a client inactive without affecting any incomplete tasks. You can also re-activate inactive clients. No data or transactions will be lost when a client is de-activated.