Managing Organization Details#
Note
 An organization record’s setup affects the polls and flows that bring data from the WMS into Rebus. Before setting up these details, consult with Rebus Customer Support.
Setting Up an Organization Record#
When setting up a Rebus environment, you first need to set up the organization record along with its associated systems and facilities. Other setup screens, particularly for the labor module, refer to the organization record for needed details about systems and facilities. Rebus refers to the system and facility records to convert times and dates of transactions to the times and dates of the facilities where those transactions took place.
Prerequisites#
Before setting up the Rebus environment’s organization record you should have the following details handy:
How your organization’s accounting calendar year works and the fiscal year start and end.
The details of the systems and databases that Rebus will be connecting to including name, version number, vendor, time zone, and the column name of the key value for facilities in the database.
Address and time zone of each facility whose information is going to be passed to Rebus.
Setting up an organization record involves populating the organization record, creating the system records, and then for each system creating a record for each facility whose data is stored on that system:
Step 1 of 3: Populating the Organization Detail Tab#
Go to the Admin Tools -> System -> Organization Admin screen. You are at the Organization Details tab.
In the Organization Information form, populate the fields or make your desired changes:
Field |
What You Enter… |
|---|---|
Name |
Organization name. |
Organization business email. |
|
Address Line 1 and Address Line 2, City, State/Province, Zip/Postal Code |
Organization’s business address. |
Telephone |
Organization’s business phone number. |
Website |
Organization’s website URL. |
Fiscal Year Start |
The month and day of the year when the organization’s fiscal year starts. These values allow you to set date ranges in widgets that are based on the fiscal year rather than the calendar year. |
Accounting Calendar |
The pattern of weeks per month in each quarter of your organization’s fiscal year. Each quarter comprises three months. In the normal course of a non-leap year, two months of four weeks each are followed by one month of five weeks and the pattern continues. E.g., If in each fiscal year quarter, two months of four weeks each are followed by one month of five weeks, you would select ‘4-4-5’. If your fiscal year matches the calendar year, select ‘Calendar Month’. |
Password Expiration Policy |
Number of days before a user account password expires and the user is forced to change it. This setting can be overridden at the user account level. |
Password History Restriction |
The number of most recently used password you want to restrict users from re-using. |
Allow Adjustment Future Dates |
Whether to process a future-dated activity adjustment entered on the Activity Adjustment screen. |
Optional: Set up your organization’s fiscal calendar to define the Fiscal Relative Range Options that you can then use to filter your widgets: under Fiscal Calendar, fill in the fields:
Field |
What You Enter… |
|---|---|
Fiscal Year |
The organization’s fiscal year’s start and end dates. The total number of days and weeks display next to the end date. |
First, Second, Third, Fourth Quarter |
The fiscal quarters date filters for widgets. In a #-#-# format, enter the number of weeks that make up each month in each quarter of the fiscal year. For example, entering ‘4-4-5’ divides a quarter into 3 ‘months’ each comprising 4, 4, and 5 weeks respectively. After entering the number of weeks for a quarter, the total number of weeks appears next to them. |
Use ISO Week |
Whether week-based date filters (e.g., Last Fiscal Week or This Fiscal Week) start on a Monday and end on a Sunday. ISO weeks are defined by the International Organization for Standardization (ISO).Keeping the toggle off results in Rebus reading week-based date filters as starting on Sunday and ending on Saturday. |
Click “Save”.
You have updated/created the organization record. Now set up a record for each system that Rebus will be connecting to.
If you have set up your organization’s Fiscal Calendar, you can now set up your widgets across Rebus to filter them with relative fiscal date ranges.
Configuring Fiscal Years with Different Start and End Dates#
If your organization’s fiscal calendar has varying start and end dates for each fiscal year, you can add each fiscal year to your Fiscal Calendar and set their start and end dates, and four quarters differently. Steps 1. Turn off the ‘Apply Every Year’ toggle. By default, the ‘Apply Every Year’ toggle is turned on to set up your organization’s Fiscal Calendars with years that have the same start and end dates.
To add a fiscal year, click the ‘+’ button on from the upper right corner of the table.
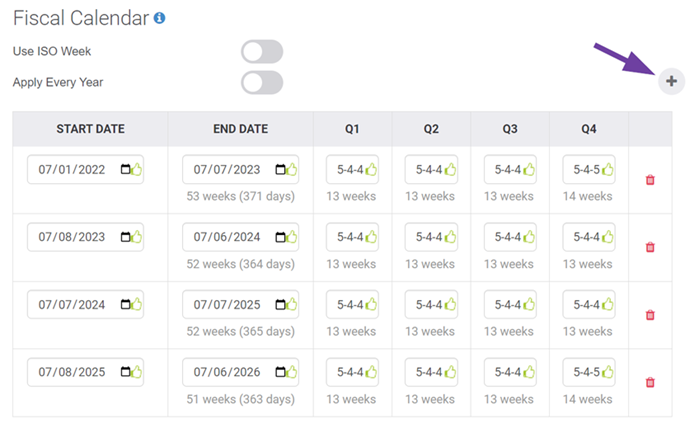
For the added fiscal year, enter the desired values of the Start Date, End Date, Q1, Q2, Q3, and Q4.
Repeat steps 2 and 3 for each fiscal year you want to add.
Click ‘Save’.
Step 2 of 3: Setting Up Systems#
Create a record for each of the organization’s systems that Rebus will be connecting with.
Go to the Admin Tools -> System -> Organization Admin screen.
Click the System Details tab.
Click ‘+New’. You are at the System Information form.
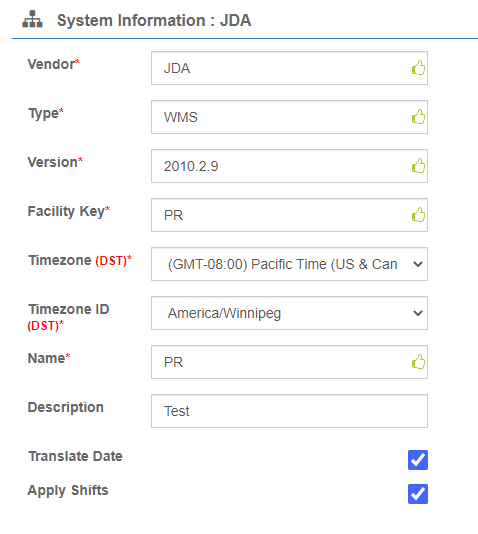
Populate the fields to create a new system record:
Field |
What You Enter… |
|---|---|
Vendor |
The vendor who developed the system. E.g, ‘JDA’. |
Type |
Short identifier that reveals what the system does. E.g., ‘WMS’, ‘Analytics’. |
Version |
System’s version number. |
Facility Key |
Name of the column that holds the key value in the database table that lists the organization’s facilities. |
Timezone (DST) |
Timezone of the system’s physical location. |
Timezone ID (DST) |
Timezone ID of the system’s physical location. |
Zip/Postal Code |
Zip or postal code of the system’s physical location. |
Name |
Name of the system. This value together with Vendor, Type, and Version are used to identify the correct system to connect to. |
Description |
Short description of the system and what it’s for. |
Translate Date |
Whether the dates and times in a facility’s data are converted to the facility’s local date and time when displayed in widgets. If this is unchecked, the dates and times will be displayed in whatever time zone the system records them, usually Co-ordinated Universal Time (UTC) |
Click ‘Save’. The system record is created.
After you’re done creating a record for each of the organization’s system that Rebus is going to connect to, create the facility records.
Step 3 of 3: Setting Up Facilities#
For each system record, create a record for each facility whose data is stored on that system.
Go to the Admin Tools -> System -> Organization Admin screen.
Click the System Details tab.
Select the system that stores the data for the facility whose record you’re creating.
Click the Facility Details tab.
Click ‘+New’. You are at the Facility Information form.
Populate the fields to create a new system record:
Field |
What You Enter… |
|---|---|
Facility ID |
Key value that uniquely identifies the facility in the system. |
Address Line 1 and Address Line 2, Country, State/Province, City, Zip/Postal Code |
Facility’s address details. |
Timezone (DST) |
Timezone of the facility. |
Timezone ID (DST) |
Timezone ID of the facility. If the facility’s system’s Translate Date flag is checked, this value will be used to convert time and date values to the facility’s local time. |
Click ‘Save’. The facility record is created.
Optional Step: Setting Up Facility Shifts#
Facility shifts are facility-specific recurring periods of time in which similar tasks are performed. They can be used to filter data in a widget so you can dispay more details about the transactions that took place during the shift.
Note
 Facility shifts differ from shifts in the Labor Module. To learn more about shifts in the Labor Module and how to configure them, see: Setup Procedure 1 of 7: Setting up Shifts.
Step 1: Enabling shifts#
To use shifts as a filter, you need to enable them for your organization.
Go to Admin Tools > System > Organization Admin > System Details.
On the ‘System Information’ screen, make sure that ‘Translate Date’ is selected.
Select ‘Apply Shifts’.
Result: You have enabled the ability to use shifts as a filter. You now need to configure shifts for your facilities.
Note
The shift filter will only be usable on data coming into Rebus after the ‘Translate Date’ and ‘Apply Shift’ checkbox have been selected.
Step 2: Configuring your organization’s shift#
This step goes over how to configure shifts for your organization in your Rebus application. If your organization uses Rebus’s Labor Module, you can import your labor module’s shifts by clicking on ‘Import Shifts From Labor’ in the upper right corner.
Prerequisite:
Have facilities set up for your system
Know the details of the shifts that you intend to set up
Steps:
Go to Admin Tools > System > Organization Admin > Facility Shifts.
Click ‘+New shift’.
Fill in the required information in the ‘Shift Information’ page:
Field |
What You Enter… |
|---|---|
Shift ID |
Name of the Shift |
Start Time |
Start time of the shift. |
Plus Day |
Must be used for shifts that go past midnight (12:00 AM). If you set this to ‘1’, this shift will be considered part of the previous day even if it runs past midnight. |
Stop Time |
Shift’s end time. |
Days of the Week |
The days of the week during which this shift is scheduled. |
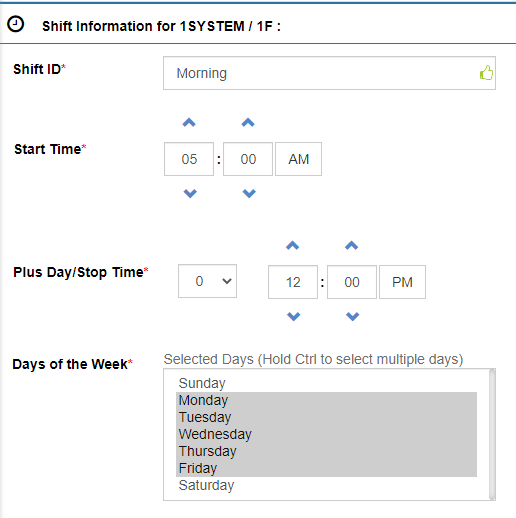
Click ‘Save’.
Result: You have configured shifts for your facilities. To use them as a filter in the Widget Builder, you need to configure your collections.
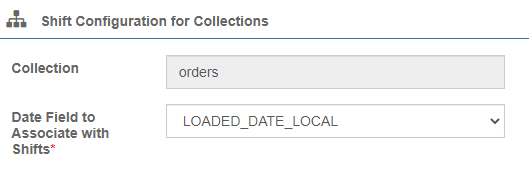
Step 3: Select the local date field in the collection to be used for the shift#
Of all the local date fields in the collection associated with your shift, select the one that’s used to track the time of the activity being recorded. This date will be used to select the data for a shift when the filter is used. For example, the ‘Orders’ collection records its main activity in the ‘Loaded_date_local’ field. You can associate a local date field with as many collections as you want.
Consider the ‘Morning’ shift configured in the previous step and the data sample below, configured using the ‘Loaded_date_local’ field:
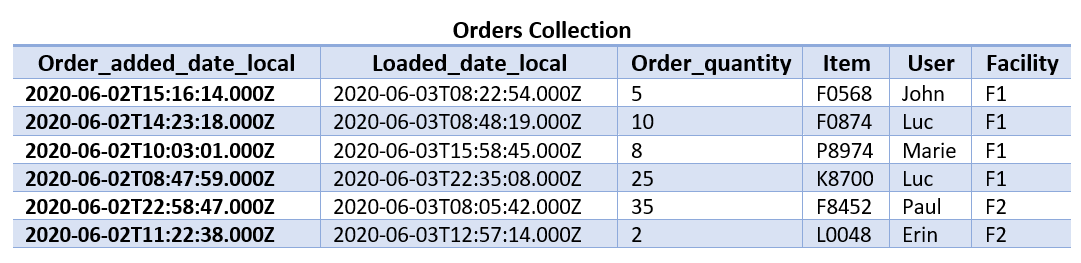
Associating the order’s collection with the ‘Loaded_date_local’ field and applying the ‘Morning’ shift as a filter results in only the two first rows being displayed. That is because they are the only one having a Loaded_date_local value occurring during the morning shift, which takes place between 5:00 AM and 12:00 PM for the F1 facility.

Steps
Go to Administration > System Administration > Organization Admin > Shift Details.
Click ‘+New Configuration’.
Select the collection that you want to associate with the shift.
Select which local date field you want to associate to the collection.
Click ‘Save’.
Result: You can now use the shift you created as a filter in the Widget Builder by selecting ‘Shift_Id’ through the field dropdown and entering your shift’s id in the text box.
Optional Step: White Labeling#
The white labeling functionality allows you to customize the logo, favicon and title in your Rebus application by an image of your choice and changing the title that appears on the tab of the application.
Go to System > White Labeling
Click on the tab of your choice and make the desired changes:
Tab |
What it Changes |
|---|---|
Logo |
The image you upload will appear anywhere on the site where the Rebus logo usually appears, as well as on the login page. It will also change the logo on the reports you create through the Report Viewer. |
Favicon |
The image you upload will appear instead of the Rebus logo on the tab or the bookmark icon in your browser. |
Title |
You will see the title you enter on the tab when you access Rebus. The default title is ‘Rebus Analytics Platform’. |
Click ‘Save’.
To see how white labeling works, watch the System Administration tutorial.
Editing Systems and Facilities#
Editing Systems#
Note
Editing the system or the facilities can affect the polls and flows that bring data from the WMS into Rebus. Before editing these details, consult with Rebus Customer Support.
Go to the Admin Tools -> System -> Organization Admin screen.
Click the System Detail tab.
In the search box, type the name of the system record that you want to edit. The Existing Systems list filters to show those systems whose names contain the search term you entered.
In the search results, select the system that you want to edit.
Make the desired change:
Type of Change |
What You Do… |
|---|---|
Edit a System’s details |
In the System Information form, make the desired changes and then click ‘Save’. For field definitions, see Step 2 of 3: Setting Up Systems. |
Delete a System |
Click ‘Delete’, and then click ‘Yes’ on the Confirmation dialog. |
Editing Facilities#
Note
Editing the system or the facilities can affect the polls and flows that bring data from the WMS into Rebus. Before editing these details, consult with Rebus Customer Support.
Go to the Admin Tools -> System -> Organization Admin screen.
Click the System Detail tab.
In the search box, type the name of the system record that stores the data of the facility that you want to edit. The Existing Systems list filters to show those systems whose names contain the search term you entered.
In the search results, select the system whose facility you want to edit.
Select the Facility Details tab.
In the search box, type the Facility ID of the facility record that you want to edit. The Existing Facilities list filters to show those facilities whose Facility ID contains the search term you entered.
Select the facility record and make the desired change:
Type of Change |
What You Do… |
|---|---|
Edit a Facility’s details |
In the Facility Information form, make the desired changes and then click ‘Save’. For field definitions, see Step 3 of 3: Setting Up Facilities. |
Delete a Facility |
Click ‘Delete’, and then click ‘Yes’ on the Confirmation dialog. |