Creating and Copying Warehouse Maps#
This procedure explains how to create warehouse maps, which are interactive two-dimensional maps used as templates for creating Warehouse Maps widgets.
Note
 We recommend that you be familiar with Warehouse Maps Creator concepts before starting these procedures.
Step |
Why do this |
|---|---|
A map must exist in Rebus to design or import it. |
|
To set up the layers’ hierarchical relationships that create an interactive map. |
|
To represent the warehouse on a map. At this stage, you either design or import the map. |
|
You can do this if you want to overlay the map with the warehouse’s layout. You can design the layout with elements like doors, supporting poles, rooms (e.g., break room, receiving room, office, etc.), areas (e.g., staging, packaging, loading, unloading, etc.). By overlaying the map with the warehouse layout, you can see where map objects are in relation to these elements. |
Step 1: Adding a New Map#
From the Rebus menu, go to Admin Tools > Widgets > Warehouse Maps Creator.
Click ‘New’ to access the Create New Map screen.
Fill in the following fields:
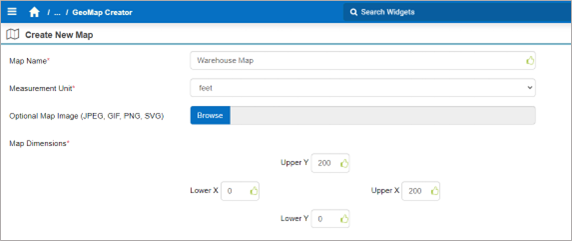
Field |
What You Enter… |
|---|---|
Map Name |
Name of the warehouse map. |
Measurement Unit |
The unit used to define the warehouse’s dimensions in the real-world. |
Optional Map Image Template (JPEG, GIF, PNG, SVG) |
An image of the warehouse’s map and layout to display as the background while designing the warehouse. |
Map Dimensions |
The lower and upper X and Y coordinates to define the map dimensions based on the real-world warehouse. |
Click ‘Save’ to add a new warehouse map.
Step 2: Creating Layers#
Select the map you’ve added.
Click ‘Create Layers.’
Fill in the following fields:
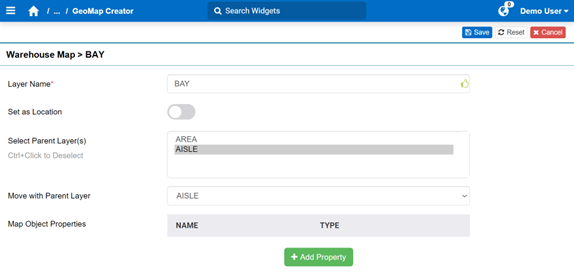
Field |
What You Enter… |
|---|---|
Layer Name |
The name of the layer that composes the warehouse map. |
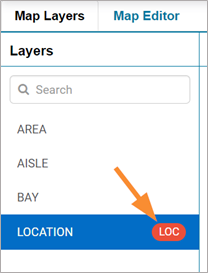
Set as Location |
Whether the layer represents the location. A layer configured as Location lets you create multiple levels on the map. Only one layer can be set as such, and it cannot be a parent to any other layer. |
Select Parent layer(s) |
The layer(s) to which the current layer will be chained to. |
Move with Parent Layer |
The parent layer to which the current layer’s map objects will follow geometric changes made to the parent layer’s map objects. |
Map Object Properties |
See the next step (step 4). |
Configure map object properties by clicking ‘+Add Property’ and filling in the necessary fields for simple, automated, or composite properties.
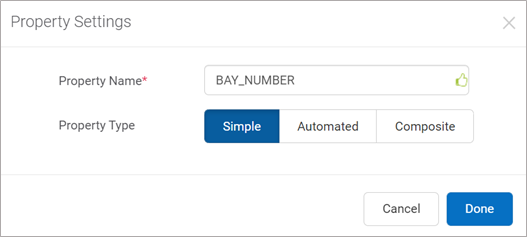
Do one of the following depending on the property you’re configuring:
Field |
What You Enter… |
|---|---|
Property Name |
Enter a name for the property. |
Property Type |
Select one of the three types of properties: simple, automated, or composite. |
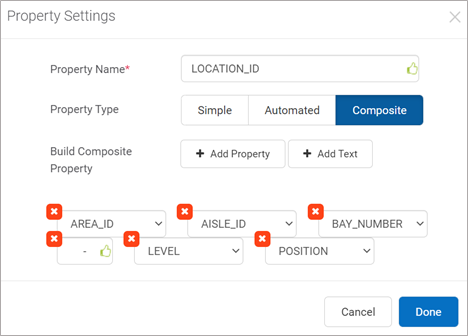
Click ‘Save’. You’ve created a new layer.
To create another layer, click ‘+ New Layer’ and repeat the steps until all map layers are created.
Step 3: Mapping the Warehouse#
The process of mapping the warehouse depends on the configured properties:
Configured Properties |
What You Do… |
|---|---|
Simple and Composite |
|
Automated |
Designing Warehouse Maps#
This section covers manual design of the warehouse maps and assigning ID values to map objects. The procedure varies depending on the design method used, which can be either top-down or bottom-up.
Design method |
Procedure |
|---|---|
Top-down |
|
Bottom-up |
Tip
You can overlay layers to see child objects’ positions within parent objects, which is useful for objects that do not move with the parent object. For more information on overlaying layers, see Map Interaction Tools. For objects that move with the parent layer, see Map Objects that Move with Parent Layer.
Designing Warehouse Maps—Bottom-Up Method#
This procedure covers:
Building components,
Assigning values to child components’ simple properties,
Adding components to the warehouse map, and
Assigning values to simple properties of components added to the map.
Step 1: Building Components#
From the created map, click ‘Edit’.
Go to the ‘Components’ tab.
Start building a component by
Clicking ‘Create Component’, or
‘New Component’ from the upper right corner of the screen.
Fill in the required fields.
Field |
What You Enter… |
|---|---|
Name |
The name of the component you’re creating. |
Layer |
The layer to which the component belongs. |

Depending on the type of layer, configure the component:
Enter the ‘Width’, ‘Length’, and ‘Height’.
Action |
Steps |
|---|---|
Add locations to a level |
In the ‘Number’ text box, enter the desired number of the location component to add to the level. In the ‘Select Component’ dropdown, select the desired location component to add. Click ‘+Add’. The locations are added to the level and appear in the level’s Preview dialog. |
Delete locations on a level |
From the level’s Preview dialog, just click the desire location to delete. |
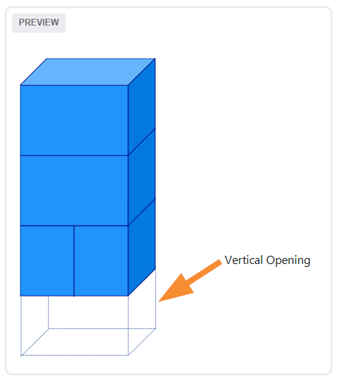
Add a vertical opening to indicate possible circulation under a shelf. |
Turn on the ‘Add Vertical Opening’ toggle. Next to Height, enter the vertical opening’s height. Click ‘+Add’. As a result, the component’s final preview shows the vertical opening. |
Add a level |
Click ‘+Add Level’. |
Duplicate the latest configured level |
Click ‘+Add Duplicate Level’. |
Delete a level |
Click the ‘delete’ button. |
View a child component’s name in the Preview dialog |
From the level’s Preview dialog, hover over one of the components; a text label appears indicating the component’s name. |
Change the component color |
Select the colored square to next to ‘Component Color’ to customize the component’s color, or copy and paste a hex code into the field. |
In the ‘Number’ text box, enter the desired number of child components to add to build the parent component.
In the ‘Select Component’ dropdown, select the right child component to add.
Click ‘+Add’.
Action |
Steps |
|---|---|
Add locations to a level |
In the ‘Number’ text box, enter the desired number of the location component to add to the level. In the ‘Select Component’ dropdown, select the desired location component to add. Click ‘+Add’. The locations are added to the level and appear in the level’s Preview dialog. |
Delete locations on a level |
From the level’s Preview dialog, just click the desire location to delete. |
Add a vertical opening to indicate possible circulation under a shelf. |
Turn on the ‘Add Vertical Opening’ toggle. Next to Height, enter the vertical opening’s height. Click ‘+Add’. As a result, the component’s final preview shows the vertical opening. |
Add a level |
Click ‘+Add Level’. |
Duplicate the latest configured level |
Click ‘+Add Duplicate Level’. |
Delete a level |
Click the ‘delete’ button. |
View a child component’s name in the Preview dialog |
From the level’s Preview dialog, hover over one of the components; a text label appears indicating the component’s name. |
Click ‘Save’ to create a component.
Type of Layer |
Action |
|---|---|
Location |
Click ‘Save’. |
Parent to the Location Layer |
See Step 2: Assigning Values to Child Components’ Simple Properties |
Parent to the non-location layer |
See Step 2: Assigning Values to Child Components’ Simple Properties |
Otherwise |
Click ‘Save’. |
Repeat the steps to create all needed components.
Step 2: Assigning Values to Child Components’ Simple Properties#
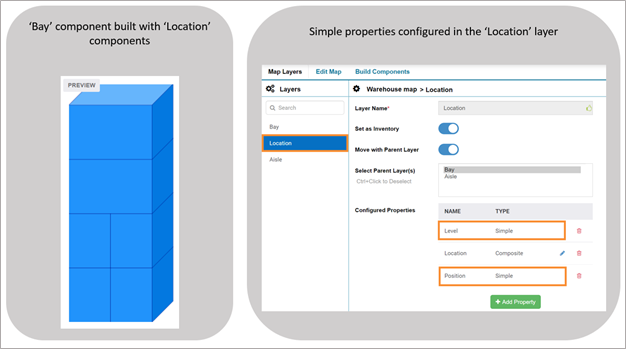
As you’re building a parent layer’s component, you assign values to the simple properties of the child components used to build the parent component. For example, consider this ‘Bay’ component (parent) built with ‘Location’ components (children) and the ‘Location’ layer’s simple properties:
As a result, as we’re creating the ‘Bay’ component, we assign values to the simple properties of the ‘Location’ layer’s components ‘Level’ and ‘Position’. Note that…
You can assign or reassign values to simple properties after saving the component.
Assigning values to all a components’ simple properties automatically populates its composite property. But, you can override the latter with a value that deviates from the usual naming convention. For more information on how to do so, see Assigning Values to Composite Properties Manually.
Under ‘Child Component Properties’, click ‘+’. The Label Properties form appears.
Select the simple property and assign values manually or in bulk.
Click ‘Apply’ to populate the textboxes with values.
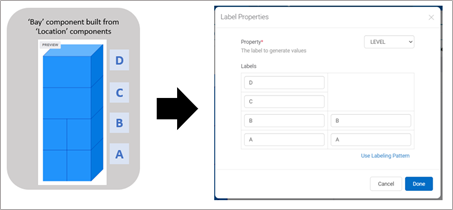
Field |
What You Enter… |
|---|---|
Starting Value |
The value at which to start assigning to the map objects’ simple property. The starting value can be a number, a letter, or a combination of letters. |
Increment Value |
The value to increment the next simple property’s value. |
Specify Number of Digits |
Appears if a numeric value is entered in the ‘Starting Value’ field. Whether to specify a number of digits to be displayed in the simple property’s value. |
Number of Digits |
The number of digits to be displayed in the simple property’s value. For example, if the number is 3, and the Starting Value is 1, the simple properties’ values would be 001, 002, 003, 004, etc. |
Increment Condition |
One or more of the following options to indicate when the value increments: Column–The value increments on the next column (left-to-right direction). Level–The value increments on the next level (the locations’ vertical levels). |
Reset Condition |
One or more of the following options to indicate when the value resets to the starting value: Column Level Reset at Value |
Value that indicates when the labeling pattern resets to the starting value. |
|
Labeling Pattern |
The direction in which to systematically assign a value to each component’s simple property. |
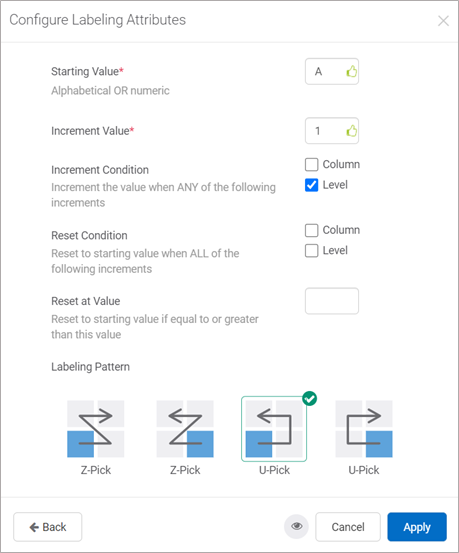
Click ‘Done’. .
Step 3: Adding Components to the Warehouse Map#
Go to the ‘Map Editor’ tab.
Go to the layer to which you want to add the component:
From the map’s interaction tools, click the ‘Add component’
 button.
Do one of the following based on the type of component you’re adding:
Location Component |
Otherwise… |
|---|---|
|
Select the component. |
Click ‘Done’. The component is added to the map. You can move it to its appropriate place. The values assigned to all the simple properties are copied.
Step 4: Assigning Values to Simple Properties of Components Added to the Map#
You can assign values to simple properties in bulk or manually, as needed.
You can do this in two ways:
Assign values to simple properties in bulk
Assign values to simple properties manually
Note
 A composite property’s value is automatically populated by its simple properties, but you can override it with a value that deviates from the usual naming convention. For more information on how to do so, see Assigning Values to Composite Properties Manually.
Assigning Values to Simple Properties in Bulk#
Go to the layer in which you want to assign values to the map objects:
To select the map objects that you want to assign values to their simple properties, move through the map.
Click the desired labeling pattern. A labeling pattern is the direction in which to systematically assign a value to each map object’s simple property.
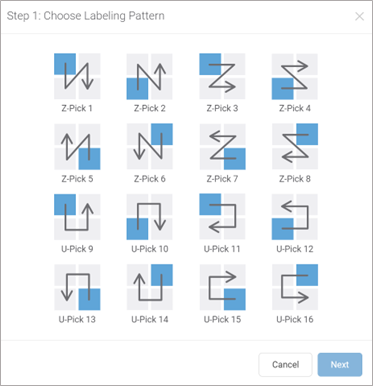
Click ‘Next’. The Step 2: Configure Labeling Attributes form appears.
Fill in the fields needed to configure the pattern’s attributes. You can click the eyeball icon
 to preview where values are assigned to each map object.
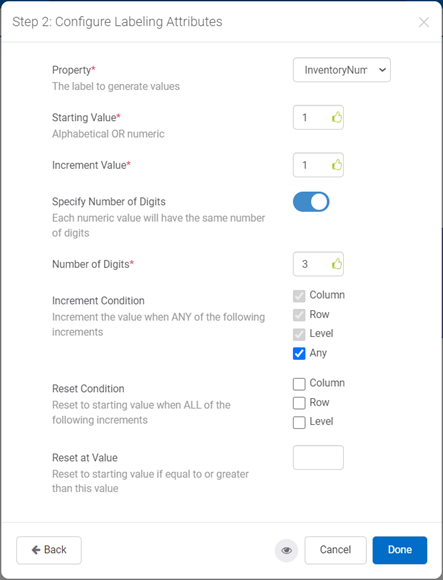
Field |
What You Enter… |
|---|---|
Property |
The simple property to which you’re assigning values in bulk. |
Starting Value |
The value at which to start assigning to the map objects’ simple property. The starting value can be a number, a letter, or a combination of letters. |
Increment Value |
The value to increment the next simple property’s value. |
Specify Number of Digits |
Appears if a numeric value is entered in the ‘Starting Value’ field. Whether to specify a number of digits to be displayed in the simple property’s value. See also: ‘Number of Digits’ in this table’s next row. |
Number of Digits |
The number of digits to be displayed in the simple property’s value. In the example above, 3 is the number of digits. Therefore, the simple properties’ values would be 001, 002, 003, 004, etc. |
Increment Condition |
One or more of the following options to indicate when the value increments: Column–The value increments on the next column (left-to-right direction). Row–The value increments on the next row (up and down direction). Any–The value increments on any of the three options. |
Reset Condition |
One or more of the following options to indicate when the value resets to the starting value: Column Row Reset at Value |
Value that indicates when the labeling pattern resets to the starting value. |
For alphabetical values with an increment of 1 for example, the increment will look like this: A, B, C, […], Z, AA, AB, […], AZ, BA, BB… Specify Number of Digits Appears if a numeric value is entered in the ‘Starting Value’ field.
Whether to specify a number of digits to be displayed in the simple property’s value. See also: ‘Number of Digits’ in this table’s next row. Number of Digits The number of digits to be displayed in the simple property’s value. In the example above, 3 is the number of digits. Therefore, the simple properties’ values would be 001, 002, 003, 004, etc. Increment Condition One or more of the following options to indicate when the value increments: • Column–The value increments on the next column (left-to-right direction). • Row–The value increments on the next row (up and down direction). • Any–The value increments on any of the three options. Reset Condition One or more of the following options to indicate when the value resets to the starting value: • Column • Row Reset at Value Value that indicates when the labeling pattern resets to the starting value.
Click ‘Done’. You’ve assigned values to simple properties in bulk.
Click ‘Save’ to save this change on the map.
Assigning Values to Simple Properties Manually#
Go to the layer in which you want to assign values to the map objects.
From the map’s interaction tools, hover over the layers icon.
Under Active Layers, select the desired layer.
On the map, select the object to enter or edit its value. The Map Object Properties form appears.
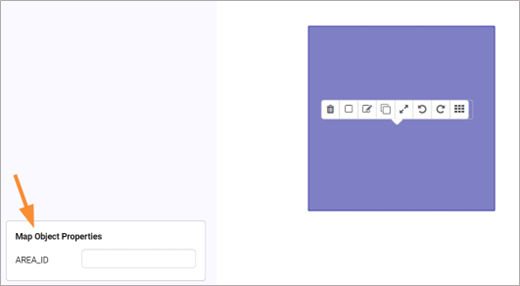
Enter the new value for the simple property.

Click ‘Save’ to save this change on the map.
Assigning Values to Composite Properties Manually#
Go to the layer in which you want to assign values to the map objects.
From the map’s interaction tools, hover over the layers icon.
Under Active Layers, select the desired layer.
On the map, select the object to enter or edit its composite property’s value. The Map Object Properties form appears.
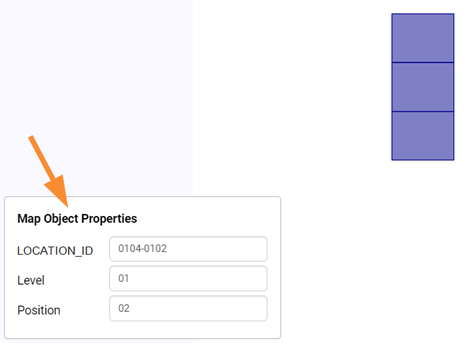
Enter the composite property’s values in the textbox. You can check the ‘Override’ checkbox if you do not want the value to be populated automatically.
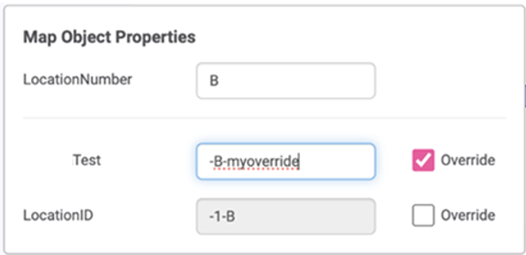
Click ‘Save’ to save this change on the map.
Designing Warehouse Maps—Top-Down Method#
This procedure covers the following steps for the top-down design method:
Drawing parent objects
Creating child objects from parent objects
Assigning values to simple properties
Step 1: Drawing Parent Objects#
Tip
 For efficiency, draw one of the highest parent objects that you want to subdivide into children and sub-children. After creating its children and sub-children, repeatedly duplicate this parent object as many times as needed. You can duplicate an object from the map object’s editing toolbar.
From the created map, click ‘Edit’ to access the Property Configuration screen.
Go to the ‘Map Editor’ tab.
Draw the parent object using the Map Editing Toolbar.
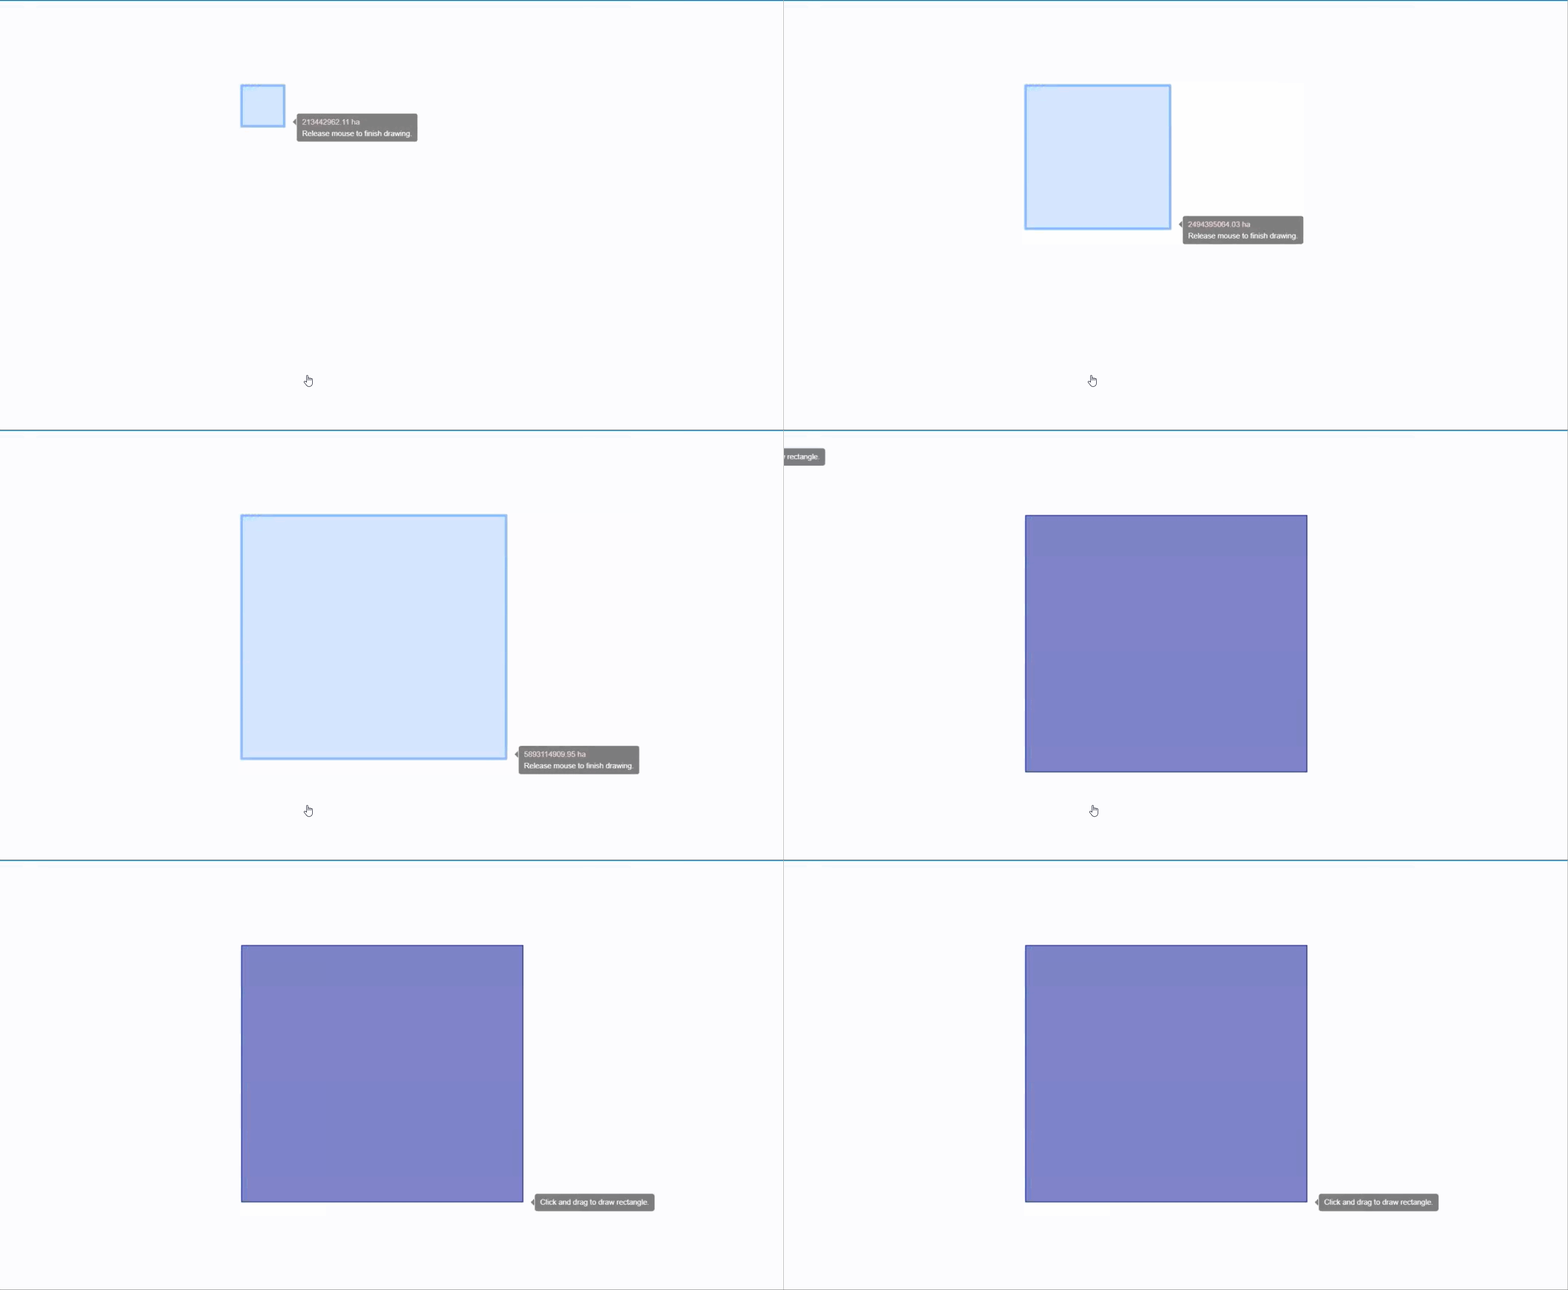
Step 2: Creating Child Objects from Parent Objects#
Make sure you’re in the right parent layer: hover over the layers
 icon and see which layer is currently selected.
Select the parent object and click the ‘Subdivide object’
 button. The Subdivide Object form appears.
Fill in the fields (Columns, Rows, Levels, and more).
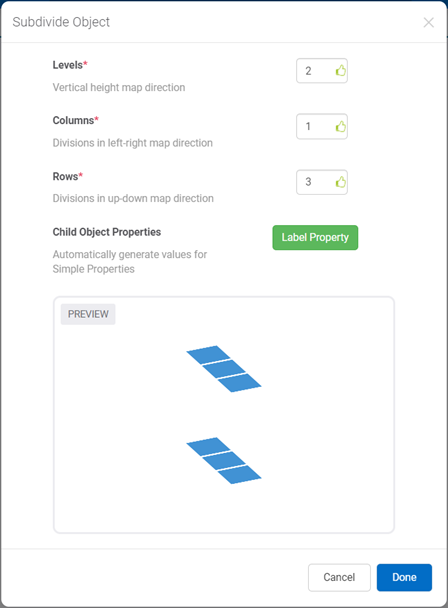
Field |
What You Enter…” |
|---|---|
Columns |
The number of columns by which you want to divide the parent object. |
Rows |
The number of rows by which you want to divide the parent object. |
Levels |
The number of levels for stacking your locations. Note: The ‘Level’ field is available only when the child objects you want to create belong to the layer set as Location. For more information, see Creating Layers. |
Child Object Properties |
See Assigning Values to Simple Properties in Bulk. |
Click ‘Done’, and the map goes to the child layer, displaying the created child objects. In turn, you can create the next child objects of the ones just created until you’ve completed creating the map objects of the lowest layer (i.e., the locations).
Example: Subdividing an aisle into racks separated by an empty space
This example goes over subdividing an ‘aisle’ object into ‘rack’ objects to get this result:

Here are the steps for this example: 1. First, subdivide the parent object in a manner such as this one: * Columns: 3 * Rows: 4
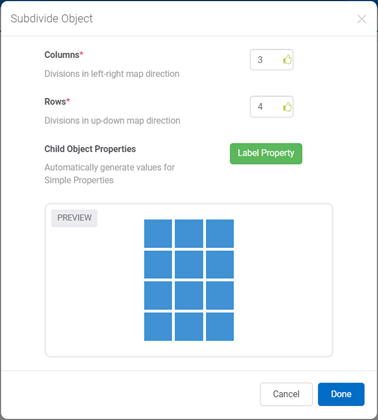
Click ‘Done’. You’re led to the child layer in which the racks have been created.
Delete the map objects forming the column in the middle. In this example, we have four map objects forming the column, therefore we need to delete these four.
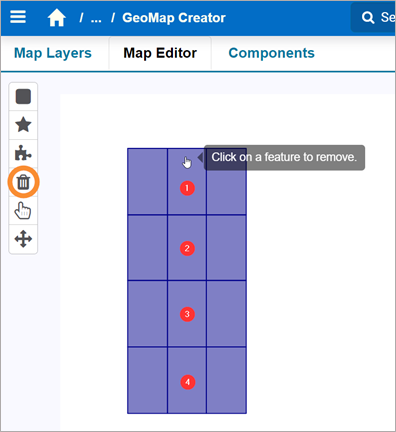
Click ‘Save’. You’ve finished the steps for creating rows of racks that are separated by an empty space.
Step 3: Assigning Values to Properties#
This step goes over assigning values to properties, allowing you to assign ID values to map objects. You can assign values to simple properties in two primary ways:
Assigning Values to Simple Properties in Bulk
Assigning Values to Simple Properties Manually
Note
 A composite property’s value is automatically populated by its simple properties, but you can override it with a value that deviates from the usual naming convention.
Assigning Values to Simple Properties in Bulk#
Follow the steps according to what you want to do:
Assign values to the child objects that you’re creating from subdividing the parent object.
In the Subdivide Object form, next to ‘Child Object Properties’, click the ‘Label Property’ button. The ‘Step 1: Choose a Labeling Pattern’ form appears.
Go to Step 3.
Click the desired labeling pattern A labeling pattern is the direction in which to systematically assign a value to each map object’s simple property. Follow the steps according to whether you’re assigning values for:
Non-location map objects: Click the desired labeling pattern’s icon.
Location map objects: Before going through the steps, learn more about how the Labeling Pattern form works for assigning values to simple properties of location objects
Configure the desired arrow combination.

Select the desired labeling pattern icon.
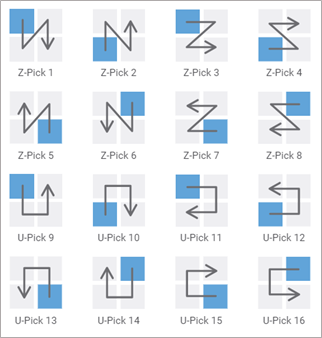
Click ‘Next’, and the ‘Step 2: Configure Labeling Attributes’ form appears.
Fill in the fields needed to configure the labeling pattern’s attributes. You can click the eyeball icon
 to preview where values are assigned to each map object.
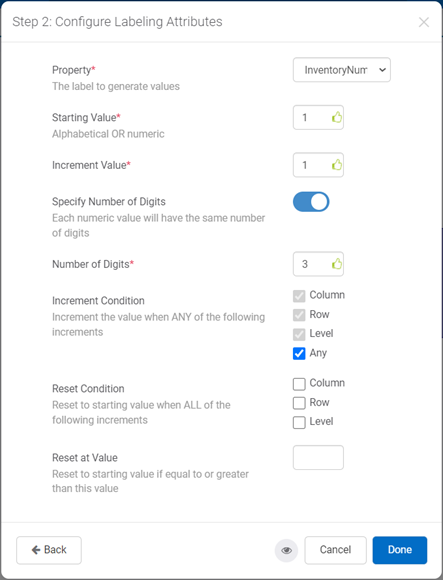
Field |
What You Enter… |
|---|---|
Property |
The simple property to which you’re assigning values in bulk. |
Starting Value |
The value at which to start assigning to the map objects’ simple property. The starting value can be a number, a letter, or a combination of letters. |
Increment Value |
The value to increment the next simple property’s value. |
Specify Number of Digits |
Appears if a numeric value is entered in the ‘Starting Value’ field. Whether to specify a number of digits to be displayed in the simple property’s value. See also: ‘Number of Digits’ in this table’s next row. |
Number of Digits |
The number of digits to be displayed in the simple property’s value. In the example above, 3 is the number of digits. Therefore, the simple properties’ values would be 001, 002, 003, 004, etc. |
Increment Condition |
One or more of the following options to indicate when the value increments: Column–The value increments on the next column (left-to-right direction). Row–The value increments on the next row (up and down direction). Level–The value increments on the next level (the locations’ vertical levels). |
Any–The value increments on any of the three options. |
|
Reset Condition |
One or more of the following options to indicate when the value resets to the starting value: Column Row Level Reset at Value |
Value that indicates when the labeling pattern resets to the starting value. |
|
Labeling Pattern |
The direction in which to systematically assign a value to each component’s simple property. |
Click ‘Done’. You’ve assigned values to simple properties in bulk.
Click ‘Save’. You’ve saved this change on the map.
Assigning Values to Simple Properties Manually#
Follow these steps:
Go to the layer in which you want to assign values to the map objects. a. From the map’s interaction tools, hover over the layers icon. b. Under Active Layers, select the desired layer.
On the map, select the object to enter or edit its value. The Map Object Properties form appears.

Enter the new value for the simple property.

Click ‘Save’ to save this change on the map.
Assigning Values to Composite Properties Manually#
Follow these steps:
Go to the layer in which you want to assign values to the map objects.
From the map’s interaction tools, hover over the layers icon.
Under Active Layers, select the desired layer.
On the map, select the object to enter or edit its composite property’s value. The Map Object Properties form appears.

From the composite property’s textbox, enter its value. The ‘Override?’ toggle appears. You can turn it off if you want the value to be populated automatically.
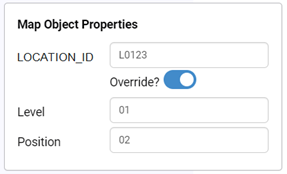
Click ‘Save’ to save this change on the map.
Importing Warehouse Maps With a .csv File#
To import the map, first, you must create a .csv file to import the warehouse map and assign the values to its map objects.
Column Name |
Mandatory |
Description |
|---|---|---|
ID |
Yes |
The ID values of the map objects that need to appear on the warehouse map. |
Type |
Yes |
The automated property’s name previously entered during the property’s configuration in Rebus. |
ParentID |
No |
The parent object ID in which the current map object is going to be in. |
X, Y, and Z |
Yes–only for location objects |
The cartesian coordinates of the location’s center on the map when looking from above. |
XLength |
No |
The location map object’s length in the x-direction (i.e., left-right direction). Note: This value is applicable only for square and rectangular location map objects, and that are parallel and perpendicular to the warehouse walls. |
YLength |
No |
The location map object’s length in the y-direction (i.e., up-down direction). Note: This value is applicable only for square and rectangular location map objects, and that are parallel and perpendicular to the warehouse walls. |
Level |
Yes |
The location’s storing level. |
Corners |
No |
The coordinates of the object’s corners; the rest of the columns onward can be used for specifying a corner’s coordinates. This is applicable for non-location map objects and location map objects that are not parallel nor perpendicular to the warehouse walls. |
To upload the .csv file, follow these steps:
From the ‘Edit’ tab, on the upper-right corner, click ‘+Import’. The Import Map Objects form appears.
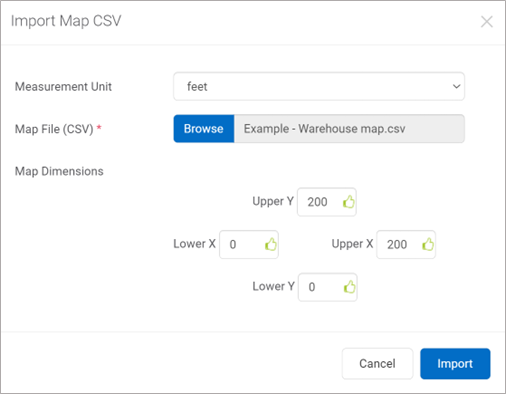
Fill in the fields, including Measurement Unit, Map File (CSV), and Map Dimensions.
Field |
What You Enter… |
|---|---|
Measurement Unit |
The measurement unit used to define the real-world dimensions of the warehouse. |
Map File (CSV) |
The CSV file. |
Map Dimensions |
The X and Y coordinates of the ‘Bottom Left Corner’ and the ‘Top Right Corner’. |
Click ‘Import’.
Tip
To make any changes to the map and or to the automated properties’ values, you can export your map, make the desired changes, and then re-import it. To do so, click ‘Export’, make the changes, and redo the steps of importing the file.
Optional: Designing and Overlaying the Warehouse Layout#
You can follow this procedure if you want to overlay the map with the warehouse’s layout. You can design the layout with elements like doors, supporting poles, rooms (e.g., break room, office), areas (e.g., staging, packaging, loading, unloading, etc.). By overlaying the map with the warehouse layout, you can see where map objects are in relation to these elements.
Designing the Warehouse Layout#
From the map’s interaction tools, hover over the layers icon.
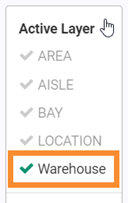
Under Active Layers, select ‘Warehouse’.
Design the layout using the map editing toolbar of the Map Editor.
Overlaying the Warehouse Layout#
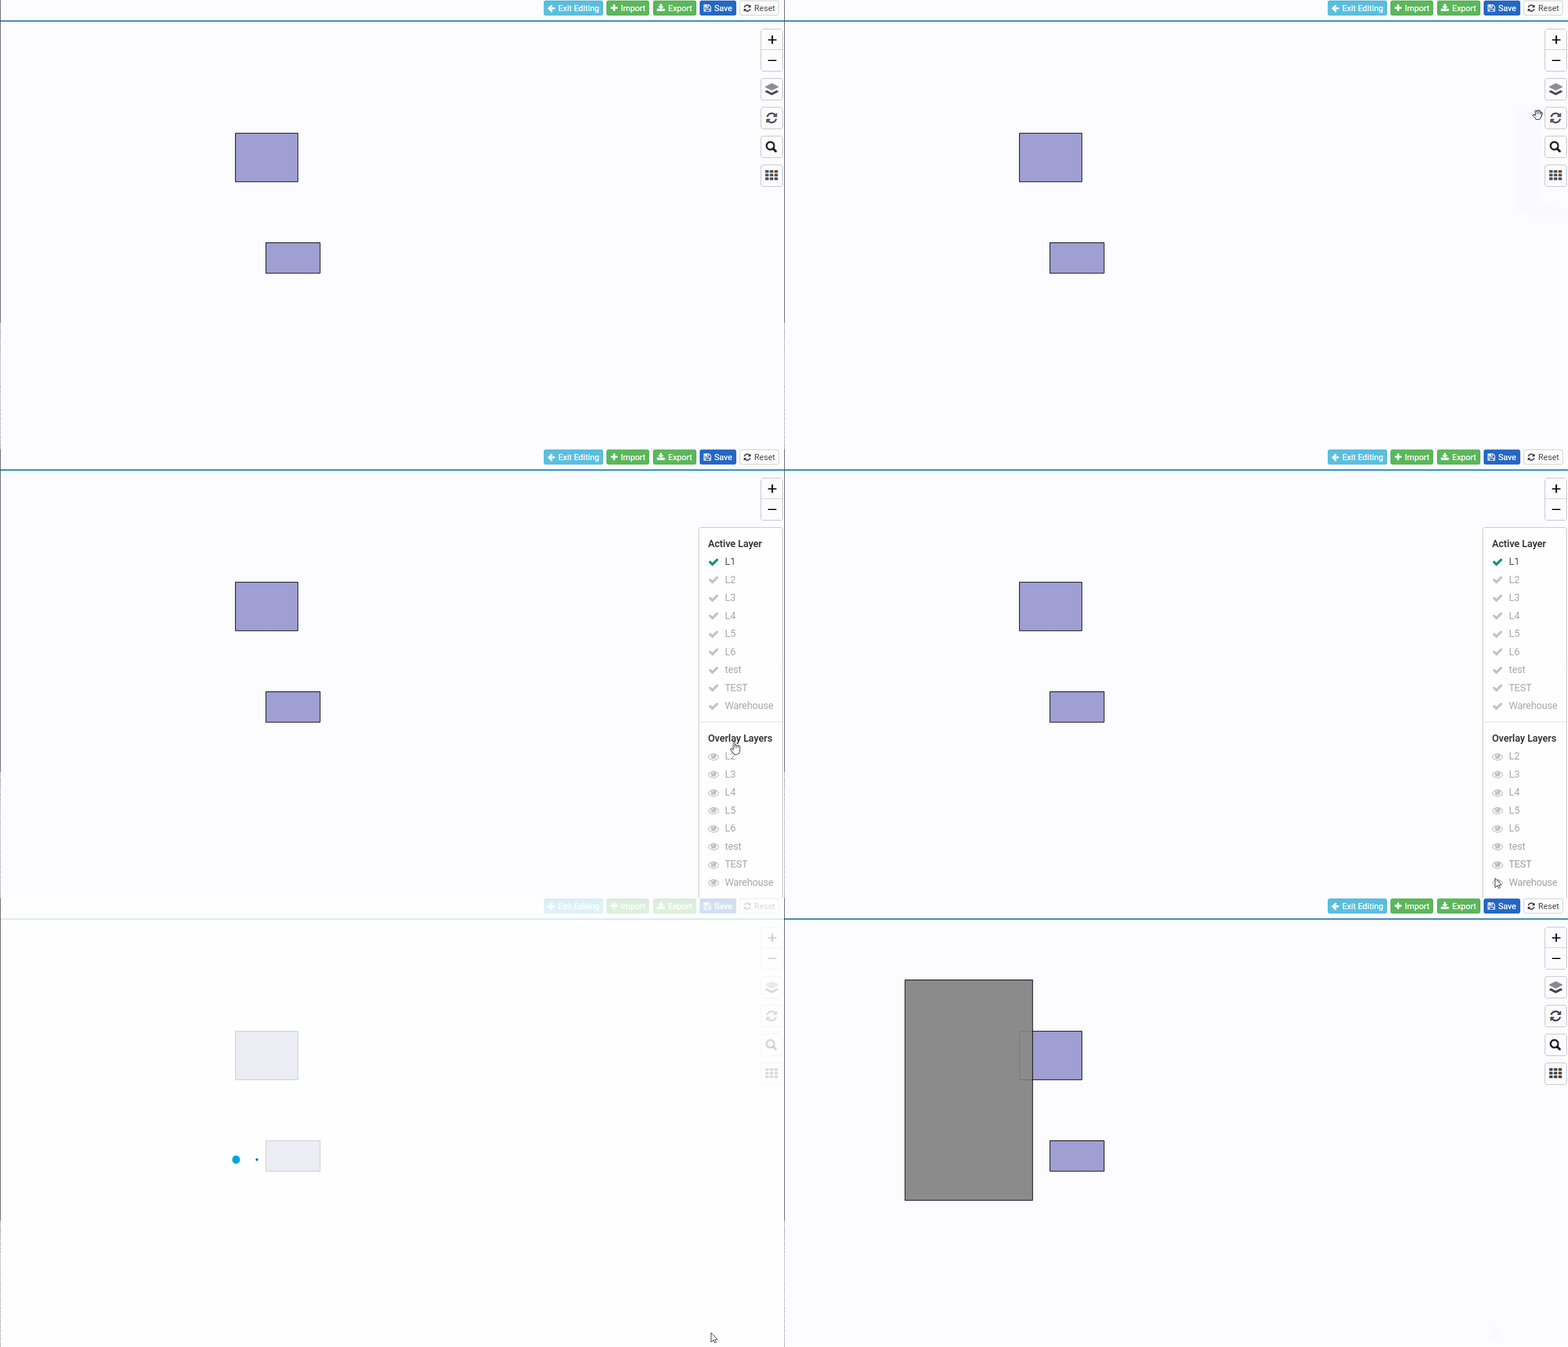
When you’re in another layer, you can overlay the map with the Warehouse layer. To do so, hover over the layers icon and then, under Overlay Layers, select ‘Warehouse’.
Copying Warehouse Maps#
If you need to create a new warehouse map that is similar to an existing one, you can copy the original map and modify it to save time.
Steps:
From the Rebus menu, go to Admin Tools > Widgets > Warehouse Maps Creator.
From the Maps panel on the left, select the map that you want to copy.
If it’s an active map (indicated by a green circle), in the upper right, click ‘Deactivate’.
In the upper right, click ‘Copy’. The Duplicate Map form appears.
Enter the Map Name.
Click ‘Save’.
Result:
The new warehouse map is created based on the existing map. All configurations, map drawings, and property values from the original map are copied to the new map, except for the name.
Modifying Map Information#
You can modify your map’s basic information like map name, background image, and preview settings.
Steps:
From the Rebus menu, go to Admin Tools > Widgets > Warehouse Maps Creator.
From the Maps panel on the left, select the map that you want to modify.
To change the map name, type directly in the ‘Map Name’ field.
To upload a new background image, click Browse in the ‘Map Image’ field and select the image you want to use.
To view the map preview, click ‘Preview Map’.
Click ‘Save’.
Building Maps Using Images#
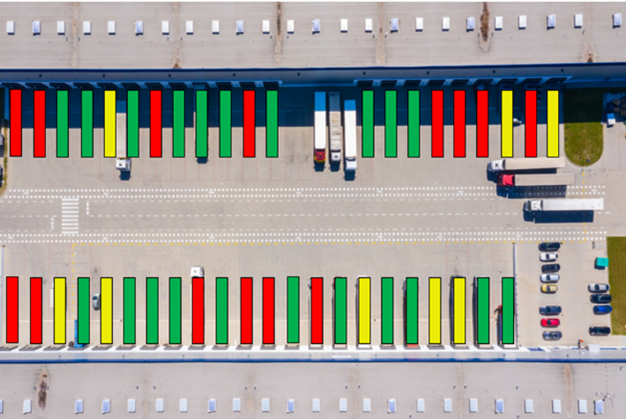
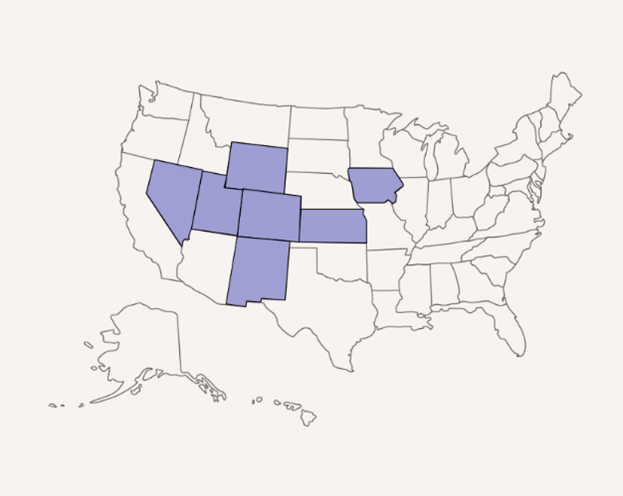
You can see your data overlayed on a visual representation of your warehouse or geographical location by building a Warehouse Map on top of an uploaded image. This technique can be applied in various situations, such as:
Overlaying a map onto an image of your loading docks to visualize average load times.
Overlaying a map onto an image of the U.S.A. to track how often shipments arrive on time across different states.
Prerequisites#
Before you start, you should be familiar with creating and editing Warehouse Maps and Warehouse Maps widgets using the Top-Down Method.
Steps#
From the Rebus menu, go to Admin Tools > Widgets > Warehouse Maps Creator.
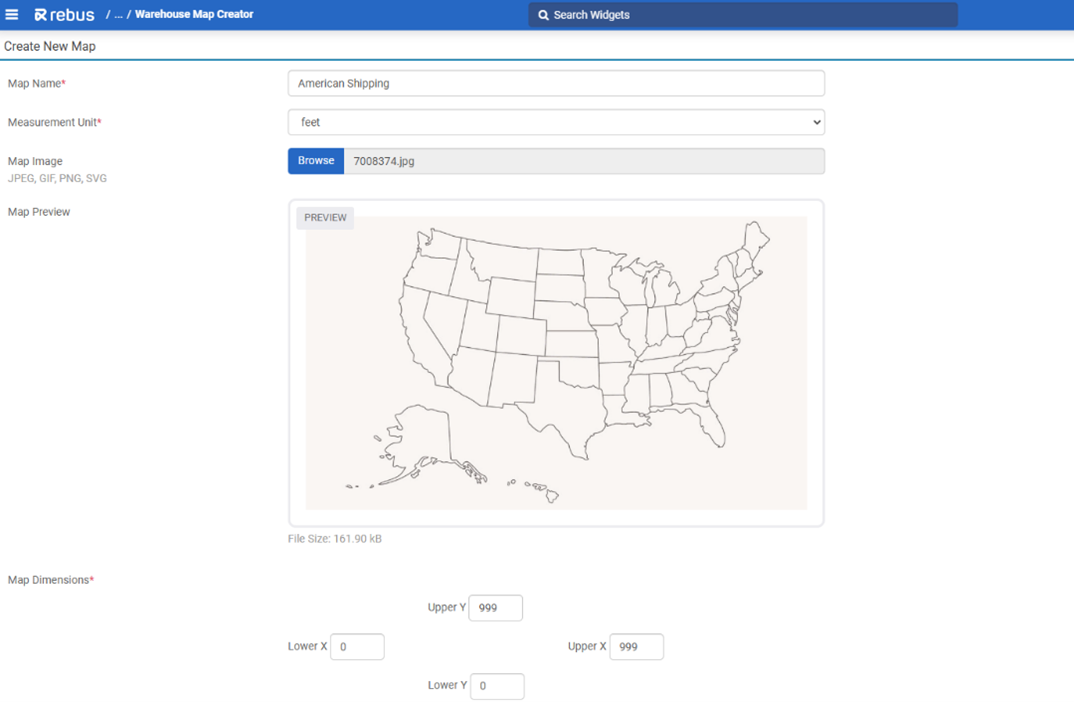
Click ‘New’ to access the Create New Map screen. Fill in the required fields: Map Name, Measurement Unit, and Map Dimensions.
In the Map Image field, upload the image you want to overlay your warehouse map on (e.g., a photo of your warehouse floor, loading docks, or a geographic image like a map of North America).
Click ‘Save’ to add the new warehouse map.
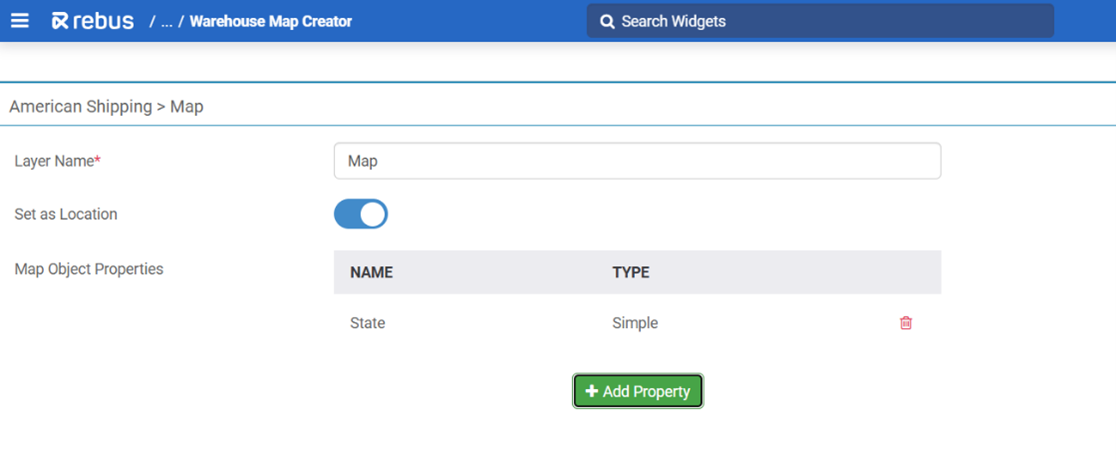
Create and name a new layer. For example, name it “Map” or “Loading Area”.
Add properties to your map layer such as “State” or “Dock” to represent the different locations or zones you want to track.
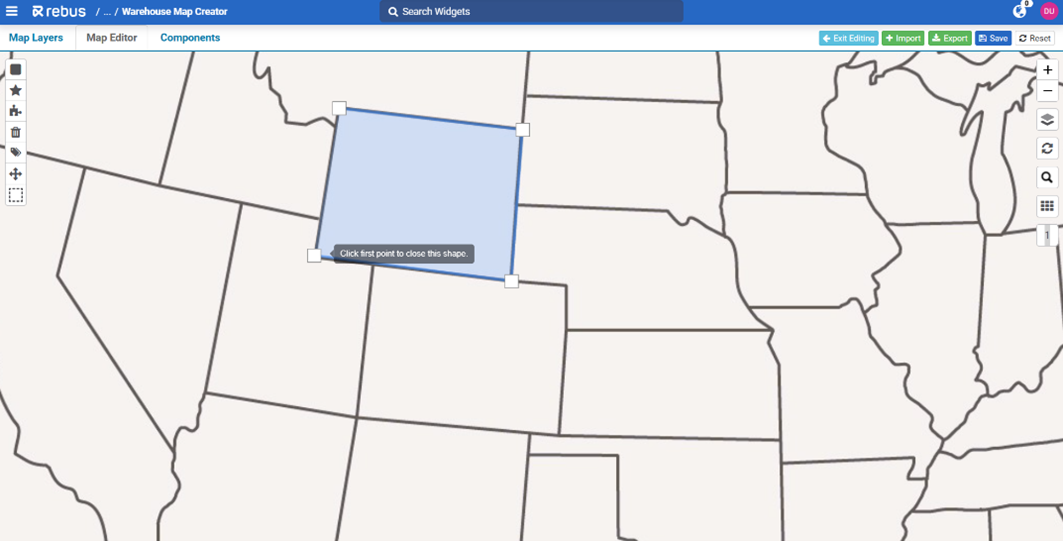
Open Map Editor and select the Draw Rectangle or Draw Polygon tool. Draw the locations or areas that correspond to your warehouse zones (e.g., loading docks, states, or other key areas) by following the outlines of your uploaded image.
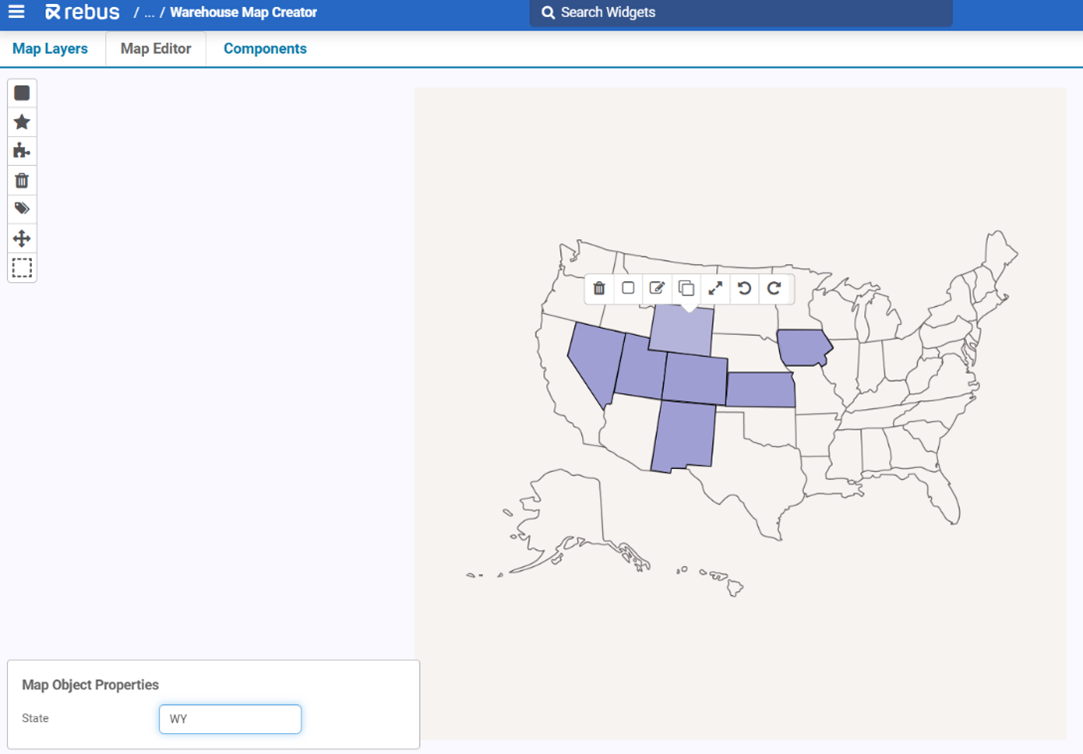
Assign values to properties manually in the Map Object Properties bar; for example, the state or province abbreviation or the ID of specific loading docks. This will let you link the map layer to a widget that uses the defined locations (e.g., states, docks) to visualize relevant data, such as load times or shipment statuses.
Once the map and overlays are configured, save your changes.
Create your Warehouse Maps widget. When adding layers to your widget and selecting a widget data source, ensure that your selected ID Property and Matching Widget Field correspond with the visual element of your image and overlayed map (for example, if your ID property is State, your matching widget field should also be State).
Complete the steps to setting up your widget.
