Managing Profiles and Groups#
Setting Up Profiles#
This procedure goes over how to set up a profile in Rebus.
Pre-requisites#
To access the Profile Administration screens, your My Account screen needs to be set up with access.
- Know the following:
Which widgets you want to make available to users in this profile.
Which screens and what types of permission on each screen you want to grant to users in this profile.
Steps#
Setting up Name and Description#
In the Menu, select Admin Tools -> Users -> Profile Admin. You are at the Profile Admin screen.
Click ‘+New’. You are at the Profile Information screen. The profile’s details are distributed over three tabs: Widget Management, Maintenance Screen Management, Basic Information.
Fill in the profile’s Name and the Description.
Assigning Widgets to a Profile#
Click the Widget Management tab.
Find the widgets that you want assign to the profile. The Unassigned Widgets panel lists widgets that you can assign to the profile. The widgets are organized into groups. Each group heading displays the number of widgets within the group. To see which widgets are in a group, click the group label. The search box at the top of the panel lets you filter the list by Search Term.
Assign widgets to the profile.
I want to assign an entire group of widgets… |
I want to assign widgets individually… |
|---|---|
Click the group header cell’s ‘< Add All’ button. The entire group of widgets moves to the Assigned Widgets panel. |
Open the group to display its widgets and click the widget cell’s ‘<’ button. The widget moves over to the Assigned Widgets panel. |
Assigning Screens to a Profile#
Click the Maintenance Screen Management tab.
Find the screens that you want to assign to the profile.
The Unassigned Maintenance Screens panel lists all Rebus screens in alphabetical order. To see a quick description of the screen, click the screen title.
Assign screens to the profile. To assign a screen, do the following:
Click the screen cell’s ‘<’ button. The screen cell moves to the Assigned Maintenance screen.
Specify the profile’s permissions (Create, Delete, Modify, View) regarding records on this screen.
I want to give this profile full permissions to the records on this screen… |
I want to restrict this profile’s permissions to this screen… |
|---|---|
Proceed to the next step. |
Click the screen title. Four buttons appear, each representing a permission regarding records on the screen. Green = Permission granted and Red = Permission Denied. To change a permission’s color, click its button. |

When you are finished assigning screens and specifying permissions, click ‘Save’.
Result#
You created a profile.
Editing/Deleting Profiles#
To make changes to a profile, do the following:
Pre-requisites#
To access the Profile Administration screens, your My Account screen needs to be set up with access.
Steps#
In the Menu, select Admin Tools -> Users -> Profile Admin. You are at the Profile Admin screen.
Find the profile in the Existing Profiles list. You can filter the list by entering the name into the ‘Search’ box.
Select the profile and make your desired change. The profile’s details are distributed over three tabs: Widget Management, Maintenance Screen Management, Basic Information.

Type of Change |
What You Do… |
|---|---|
Change Description. |
Click ‘Basic Information’ tab and change the value in the Description field. You can’t change a profile’s name. |
Assign Widgets. |
Click ‘Widget Management’ tab and follow the steps in Assigning Widgets to a Profile. |
Remove a Widget. |
Click ‘Widget Management’ and in the Assigned list find the widget group that has the widget that you want to remove. To filter the list, enter a term in the Search box. Click the group name to open the widget list and click the widget’s ‘>’ button to move it to the Unassigned list. When you’re done, click ‘Save’. Users who have a dashboard with a widget that’s been removed from their profile get a ‘400 - Not found’ error for that widget. |
Remove a Widget Group |
Click ‘Widget Management’ and in the Assigned list find the widget group that you want to remove. To filter the list, enter a term in the Search box. Click the widget group’s ‘Remove All>’ button to move all widgets in the group to the Unassigned list. When you’re done, click ‘Save’. Users who have a dashboard with a widget that’s been removed from their profile get a ‘400 - Not found’ error for that widget. |
Assign Screens. |
Click ‘Maintenance Screen Management’ tab and follow the steps in Assigning Screens to a Profile. |
Remove Screens. |
Click ‘Maintenance Screen Management’ and in the Assigned list find the screens that you want to remove. To filter the list, enter a term in the Search box. Click the ‘>’ button to move screens to the Unassigned list. When you’re finished, click ‘Save’. |
Delete the Profile. |
Click ‘Delete’ and confirm the deletion. |
Finding out Your My Account screen#
To see which profile your were assigned to:
Click on your name in the right upper corner of your application to make the drop down menu appear.
Click on profile.
You are now at the Personal Information screen. The Profile field indicates which profile your user name belongs to.
To change the profile a user is assigned to, see Editing/Deleting/Disabling Users
Data Isolation - Showing Data based on Group Membership#
You can have Rebus show to users only data that the user’s isolation group authorizes them to see regardless of how the widget or screen itself is set up to show data. This functionality lets you ensure that users can see only the data that they’re explicitly authorized to see.
Isolation groups are configured through the Isolation Group Information screen, which lets you put users in an isolation group whose isolation rule specifies which records its members are allowed to see. An isolation group’s restrictions determine what you can see in the Widget Builder when creating widgets and widgets that have been added to dashboards. You can access the Isolation Group Information screen through the User Maintenance menu option.
You can also create labor maintenance isolation groups , which restrict what a user can see in dropdowns and lists on Labor Maintenance screens. If not in such an isolation group, a user who has access to any Labor Maintenance screen can view through its dropdowns and lists all facilities and systems. Members of Labor Maintenance Screen Isolation groups can see only those systems and facilities that they are authorized to see when they are using Labor Maintenance screens. The following screens are considered ‘Labor Maintenance screens’:
User Preferences
Activity Adjustment Admin
Activity Configuration Admin
Activity Group Configuration Admin
Activity Log in
Labor User Group Admin
Matrix Configuration
Shift Admin
Transaction Error Review
Isolation Rules#
An isolation rule is made up of conditions, which are expressions that are evaluated to see if they’re true. Each record that’s retrieved to populate a widget is evaluated against all the conditions in the isolation rule. Those records that evaluate as ‘true’ are what the user can see.
An isolation group condition relates a field to particular values. This relation is done through an operator:
Isolation Rule Operators# Operator
What Members of the Group can See…
IN
Only records where the field has any of the listed (comma-separated) values.
NOT IN
Only records where the field has none of the listed (comma-separated) values.
You can also connect conditions to each other using ‘OR’ and ‘AND’ logical operators. ‘Groups’ let you set the order in which conditions are evaluated. Conditions in groups are enclosed in brackets, which means they are evaluated before conditions outside the brackets.
If the widget’s data collection doesn’t have the field used in the isolation rule configuration, all the records will be visible:
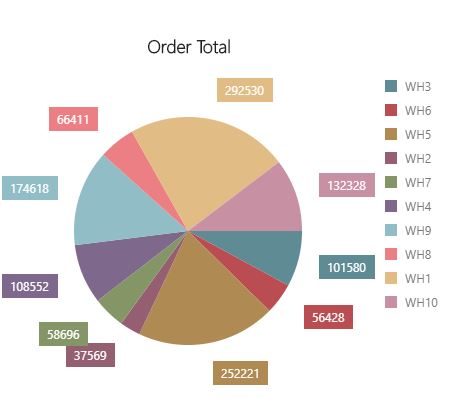
Records Example Group Members can See..# If the Widget’s Data Collection…
Members of the Group can See…
Has the WAREHOUSE_CODE field.
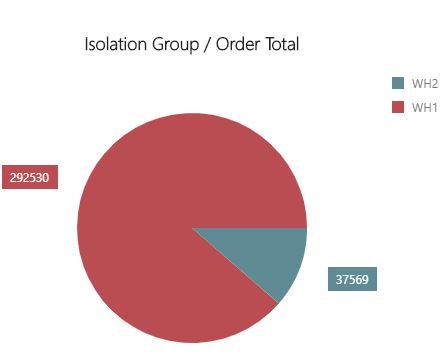
Only records that have a WAREHOUSE_CODE value of either ‘WH1’ or ‘WH2’.
Does NOT have the WAREHOUSE_CODE field.
Any record.
The restrictions configured for the isolation groups are cummulative. If a user is a member of multiple groups, the different restrictions will apply to all the data visible by that user.
Isolation Groups - Examples#
Isolation Group: WH1WH2GROUP
Isolation Rule: WAREHOUSE_CODE IN WH1, WH2
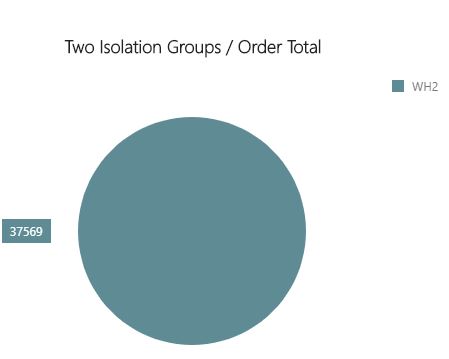
Isolation Group: WH1WH2GROUP
Isolation Rule: WAREHOUSE_CODE IN WH1, WH2
and
Isolation Group: SECONDGROUP
Isolation Rule: WAREHOUSE_CODE NOT IN WH1
Setting Up Isolation Groups#
This procedure goes over how to set up an isolation group in Rebus. For more background information on isolation groups, see Data Isolation - Showing Data based on Group Membership. Setting up an isolation group involves setting up an isolation rule and adding members to the group.
Note
 If a user is a member of more than one isolation group, each group’s restrictions are cumulatively applied. This could result in a user not being able to see any data on dashboard widgets. The isolation groups that a user is a member of are listed on that user’s User Information screen.
Pre-requisites#
To access the Isolation Group Maintenance screens, your My Account screen needs to be set up with access.
- Know the following:
Which users are going to be members of the isolation group. When adding users, consider how the isolation rule will affect the user’s ability to see data on drill downs and cascading dashboard groups as well as what other isolation groups the user is a member of.
The criteria you’re going to use to set up the rule that determines what members will be able to see.
Steps#
In the Menu, select Admin Tools -> Users -> Isolation Group Maintenance. You are at the Isolation Group Information screen.
Click ‘+New’. You are at the Profile Information screen.
Fill in the profile’s Name and the Description.
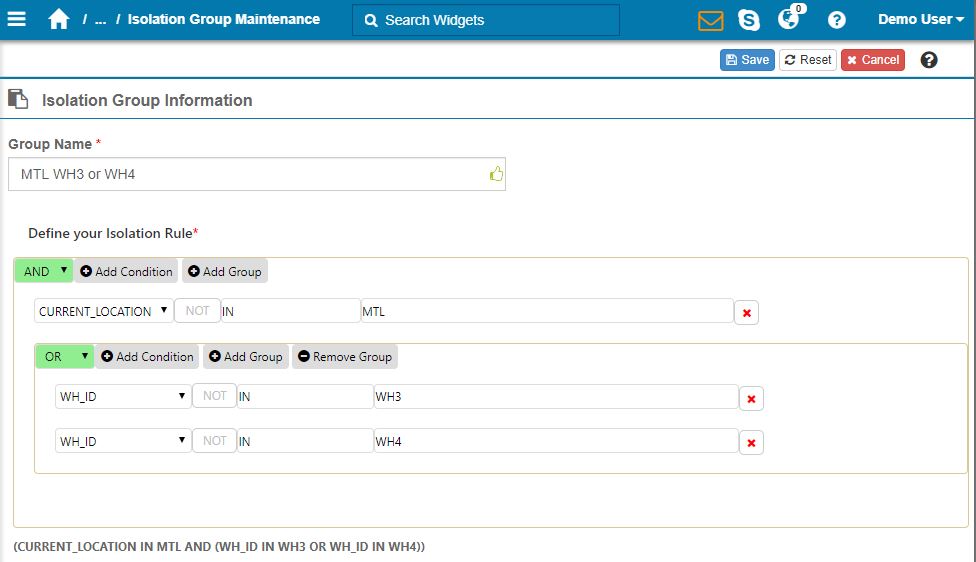
Add the conditions for the isolation group’s isolation rule. For more background information on isolation groups and conditions, see Data Isolation - Showing Data based on Group Membership.
Task |
What You Do… |
|---|---|
Adding a Condition |
If you’re appending this condition to a previously created condition or group, select either the ‘AND’ or the ‘OR’ logical operator from the dropdown in the upper left. Then click ‘Add Condition’. In the new dropdown, select a field, then specify the field values and decide whether they’re to be connected by an IN or a NOT IN operator. |
Adding a Group of Conditions |
If you’re appending this group to a previously created condition or group, select either the ‘AND’ or the ‘OR’ logical operator from the dropdown in the group’s upper left. Then click ‘Add Group’. Another line of ‘Add’ and ‘Remove’ buttons appears. You can now add conditions or groups to the new group. |
Click ‘Save’. The isolation group is created with an isolation rule. You can now add members to the group.
Click the Group Members tab.
Add users to the group. Select a user from the Available Users list and click ‘<<’ to add him or her to the Group Users list. To add multiple users at once, hold down the CTRL button, click the users you want to add, and then click ‘<<’.

Click ‘Save’.
Result#
The isolation group is saved with an isolation rule and a list of members. When looking at dashboard widgets, the members can see only the records that the isolation group authorizes them to see regardless of how the widget is set up to display data.
Setting up Labor Maintenance Isolation Groups#
This procedure goes over how to set up a labor maintenance isolation group in Rebus. Labor maintenance isolation groups let you restrict what a user can see in dropdowns and lists on Labor Maintenance screens. For more background information on labor maintenance isolation groups, see Data Isolation - Showing Data based on Group Membership.
Pre-requisites#
To access the Isolation Group Maintenance screens, your My Account screen needs to be set up with access.
- Know the following:
Which users are going to be members of the isolation group.
Which systems and facilities you want the members of this isolation group to be able to see through the Labor Maintenance screens.
Steps#
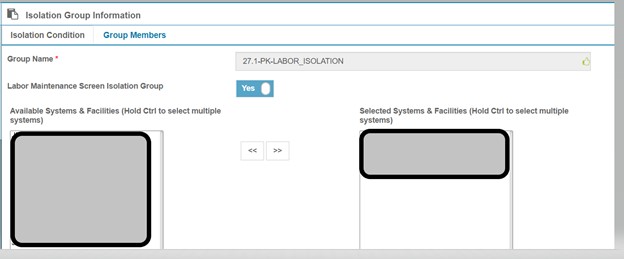
Go to Users> Isolation Group Maintenance. You are at the Isolation Group Information Screen.
Click +New.
Enter the group name.
Toggle the Labor Maintenance Screen Isolation Group radio button to yes.
Note
If you have already added an isolation rule to an isolation group, you cannot toggle the Labor Maintenance Screen Isolation Group button, and vice versa.
From the ‘Available Systems and Facilities’ section on the left, select the systems and facilities that should be visible to members of that isolation group and click on ‘>>’ to move them to the ‘Selected Systems & Facilities’ section on the right.
Note
To remove access to certain facilities and systems, select them from the ‘Selected Systems & Facilities’ section on the right and click on ‘<<’ to move them to the ‘Available Systems and Facilities’ section on the left.
Click ‘Save’. The isolation group is created for the specific systems and facilities.
Add users to the group. Select a user from the Available Users list and click ‘<<’ to add them to the Group Users list. To add multiple users at once, hold down the CTRL button, click the users you want to add, and then click ‘<<’.
Result#
The isolation group is saved with a list of systems and facilities and a list of members. Members of this isolation group can view only the selected systems and facilities when using the Labor Maintenance Screens.
Editing/Deleting Isolation Groups#
Note
Making changes to isolation groups affect what types of records members can see on widgets.
To make changes to an isolation group, do the following:
Pre-requisites#
To access the Isolation Group Maintenance screens, your My Account screen needs to be set up with access.
Steps#
In the Menu, select Admin Tools -> Users -> Isolation Group Maintenance. You are at the Isolation Group Information screen.
Find the group in the Existing Groups list. You can filter the list by entering the name into the ‘Search’ box.
Select the group and make your desired change. The group’s details are distributed over two tabs: Isolation Condition, and Group Members.
Type of Change |
What You Do… |
|---|---|
Deleting a Group |
Click Delete and then confirm the deletion. |
Removing Members |
Open the Group Members tab. Select a user from the Group Users list and click ‘>>’ to remove him or her from the Group Users list. |
Adding Members |
Open the Group Members tab. Select a user from the Available Users list and click ‘<<’ to add him or her to the Group Users list. |
Adding a Condition |
Open the Isolation Condition tab. If you’re appending this condition to a previously created condition or group, select either the ‘AND’ or the ‘OR’ logical operator from the dropdown in the upper left. Then click ‘Add Condition’. In the new dropdown, select a field, then specify the field values and decide whether they’re to be connected by an IN or a NOT IN operator. |
Removing a Condition |
Open the Isolation Condition tab. Click the ‘x’ |
Adding a Group of Conditions |
Open the Isolation Condition tab. If you’re appending this group to a previously created condition or group, select either the ‘AND’ or the ‘OR’ logical operator from the dropdown in the group’s upper left. Then click ‘Add Group’. Another line of ‘Add’ and ‘Remove’ buttons appears. You can now add conditions or groups to the new group. |
Removing a Group of Conditions |
Open the Isolation Condition tab. Click the ‘Remove Group’ button of the group that you want to remove. |

Click ‘Save’.