Release 46.0 Notes 06 July 2025#
Summary#
In this release, we’ve developed the following improvements:
In the Labor Module:
A new Labor Associates screen lets you more easily copy associates, assign supervisors, and export details to CSV.
In the Chart Designer, you can now do the following:
Choose the positioning, font color, and font size of your Series Point Labels.
More easily display a properly formatted date in a card.
In Warehouse Maps, you can now do the following:
Continue using the Rebus application while you import maps via CSV in Warehouse Maps Creator.
On Warehouse Maps widgets, get a better look at smaller map objects on large maps without needing to zoom in.
Other Improvements:
When you rename a dashboard, it will now be updated globally.
Improvements - Labor Module#
New and Improved Labor Associates screen#
Watch Video demonstration of Labor Associates Screen
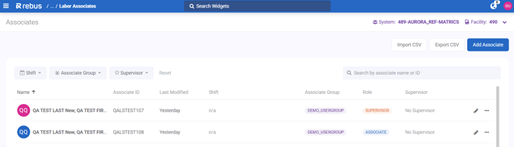
The Labor Associates page, previously known as the Labor User Admin, has undergone several updates that make the screen more user-friendly and easier for you to navigate, including a brand-new user interface.
BEFORE:
AFTER:
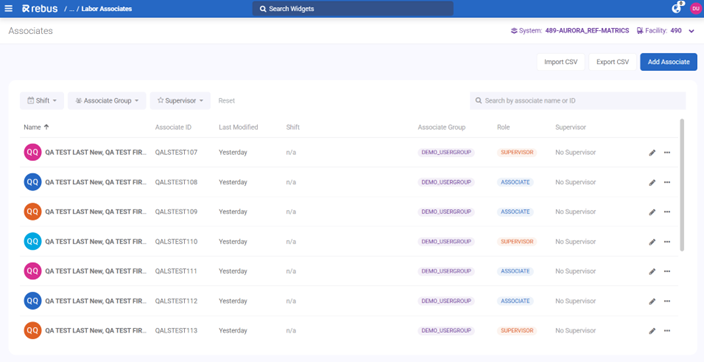
New User Interface#
The page features a System & Facility picker in the right corner of the screen. Associates and their details are listed below, with possible actions on the right of each row.
You can easily view all the details of each associate including:
Name
Associate ID
Last Modified Date: You can now view the last date each associate was modified. Previously, you couldn’t see when an associate was last changed. This will allow you to keep track of changes easier.
Shift
Associate Group
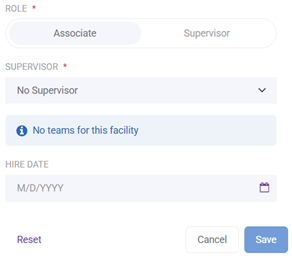
Profile: You can now add a label to an associate to indicate their role: either Associate or Supervisor.
Supervisor: You can now assign an associate to a specific Supervisor.
You can edit each user from the Edit icon and expand the options tab, where you can clone and delete an associate.
Exporting to CSV#
You can now export a list of associates to a .CSV file. Previously, you could only import a list of associates via a CSV file directly from the Associates screen.
Click the new Export to CSV button at the top of the screen. A CSV file will download.
Assigning Supervisors#
You can now designate a user as either a Supervisor or an Associate. Associates can be linked directly to a specific Supervisor. This removes the need for workarounds involving isolation groups or custom profiles.
All existing users will be automatically labeled as Associates and by default will have ‘No Supervisor’ assigned. To assign a Supervisor:
Click the Edit icon next to the associate to whom you want to assign the Supervisor role.
In the Role section, click the ‘Supervisor’ toggle, and select ‘Supervisor’ from the dropdown. Select the team to which you want to assign the Supervisor and click save.
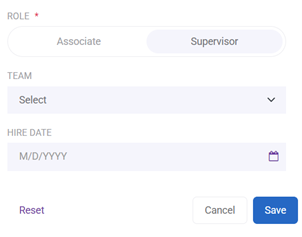
To assign a Supervisor to a specific Associate, open the Edit panel for the Associate. In the Role section, click the ‘Supervisor’ toggle, select a Supervisor from the dropdown, and save your changes.
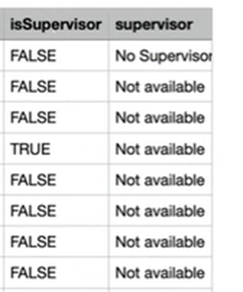
To assign Supervisors in bulk:
Export the current associate list to CSV. Supervisors will be marked as “No Supervisor” in the Supervisor column.
Set the isSupervisor column to TRUE for actual supervisors and fill in their names under the Supervisor column. Then re-import the updated file.
Cloning Associates#
You can now clone an existing associate to create a new associate with similar characteristics. Cloning an associate will copy their Associate Group, Team, and Shift. To copy an Associate, click the ‘More’ icon in their row, and select ‘Clone’.
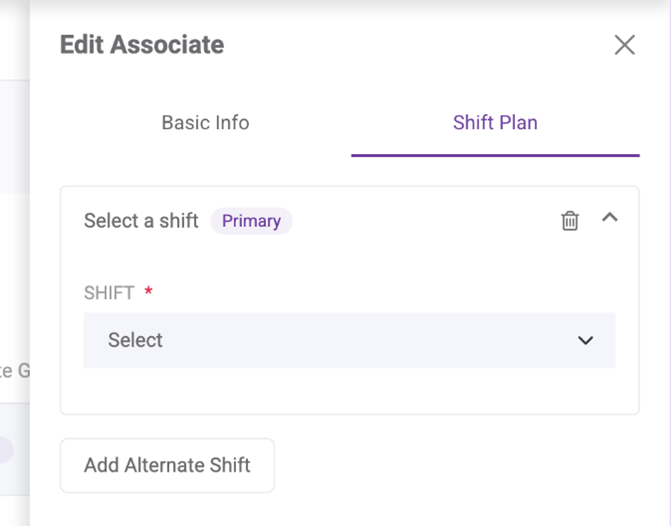
Shift Plan Tab#
The Shift Plan tab now has a simpler layout. The standard Shift Plan is now open by default and can be added with one click. Previously, you had to first add and select a shift type before adding an actual shift.
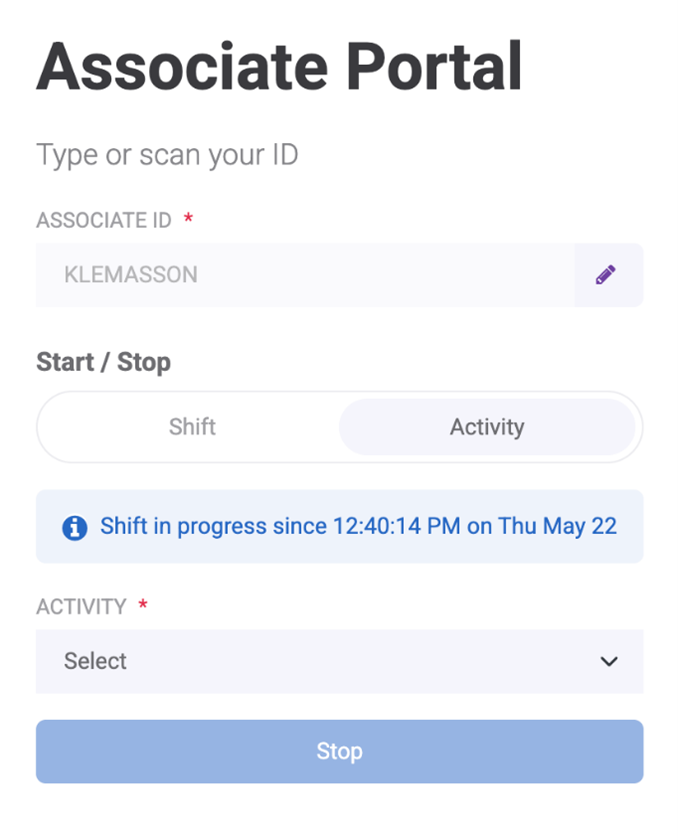
Associate Portal: Pre-selected Activity Button after Shift Start#
In the new Associate Portal, the Activity toggle is now preselected if a user has a shift in progress. Previously, the Shift toggle was preselected. This means that you have less clicks to log your activities during a shift.
Improvements - Chart Designer#
Easier to Display Date in Card Widgets#
It is now easier to display a properly formatted date in a card in the new Chart Designer. When you select a DATE value, the Number Format section is now automatically set to DATE.
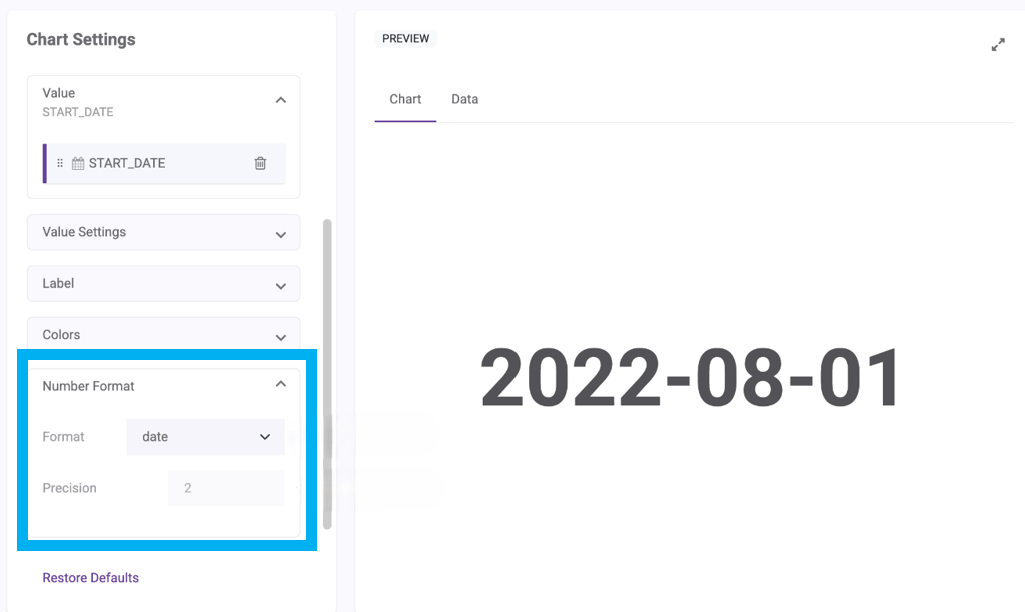
Previously, the default number format was FIXED, meaning the card would appear as a fixed number even with a Date value until you changed the Number Format section manually.
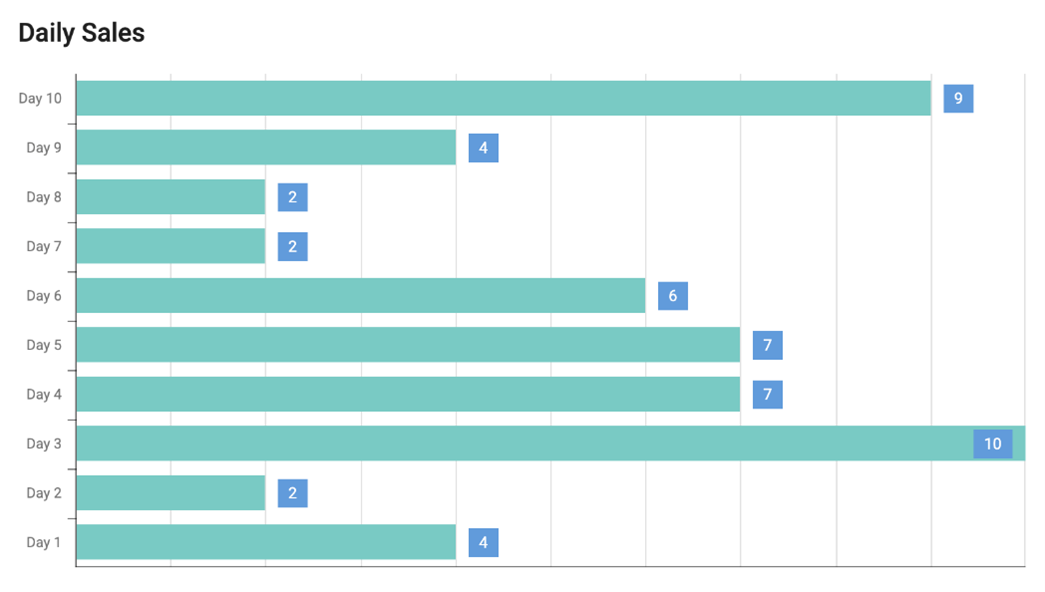
Easier to Place Series Point Labels#
In the new Chart Designer, you can now choose the positioning of your Series Point Labels. You can choose to have them inside or outside a bar, range, or bubble chart type.

You can change the position of the labels in the new Position dropdown in the Chart Settings tab.
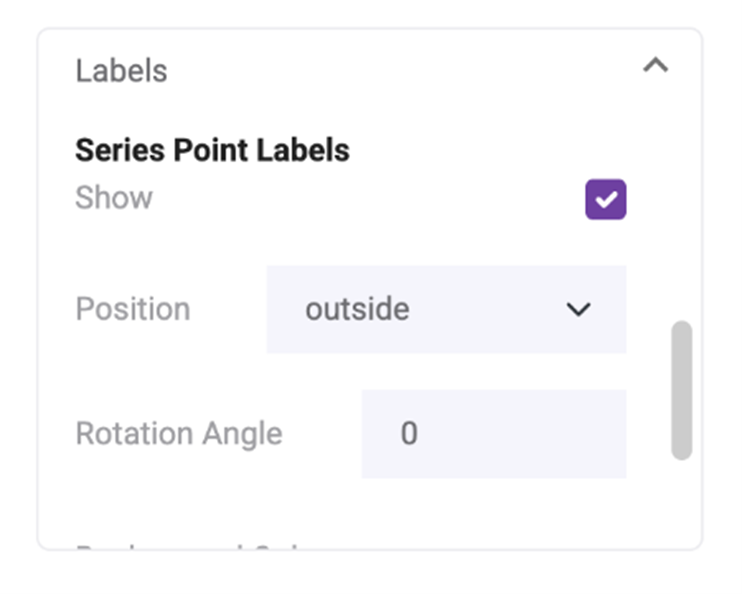
Previously, you could not change the position of your labels, and they would only be either outside or above your chart by default.
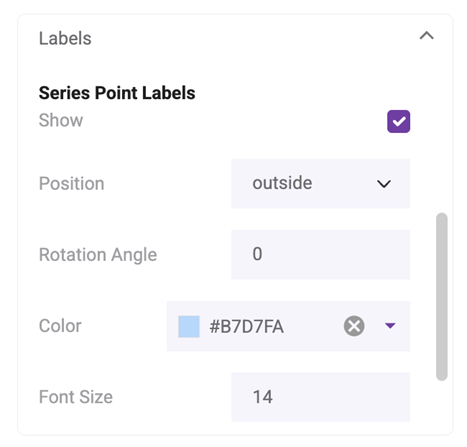
Setting Color and Size of Series Point Label#
In the new Chart Designer, you can now customize the font color and font size of your Series Point Labels. This change applies to the following chart types:
Bar
Line
Area
Spline
Range
Bubble
You can change the color and font size of your labels in the new color picker and number fields in the Chart Settings panel.
Improvements - Warehouse Maps#
Warehouse Maps Creator – Can Use Rebus while CSV being Imported#
You can now continue using the Rebus application while you import maps via CSV in Warehouse Maps Creator. When you import a map, an information dialog will pop up letting you know that your map is being imported and that a status update will be sent to you by email. Map editing will be disabled while the import is in progress.
Previously, you did not receive an email notifying you of your import status, and you weren’t able to continue using the app until the import process was finished.
Warehouse Maps – Viewing Smaller Details without Zooming#
There is a new Magnify tool in the toolbar for Warehouse Maps widgets on the dashboard. This tool lets you view smaller map objects on large maps without zooming in. When you hover over top of a map object, a magnifying circle will appear and automatically follow your mouse movement.
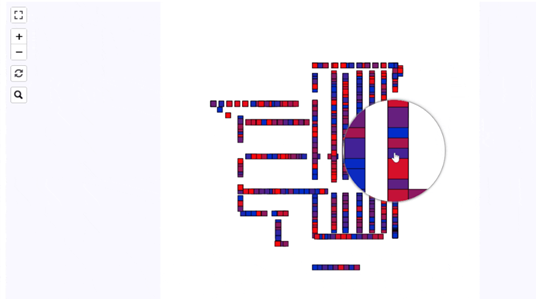
Click the magnifying glass on the left toolbar to turn the Magnify tool on or off.
Improvements - Other#
New Email field validation – No Blank Spaces#
Email fields in Rebus no longer accept blank spaces. Spaces will not appear if you attempt to type them into the email field. This does not include the field in the login screen, as this field can also accept a User ID, which does allow blank spaces.
Dashboard Publisher – Globally Publishing Renamed Dashboards#
When a dashboard owner renames a published dashboard, a modal window appears with two options:
Rename and Publish
Cancel
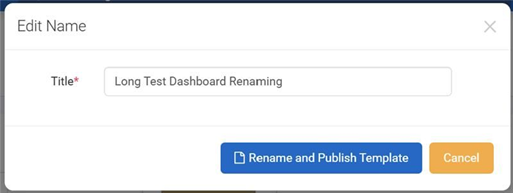
This update ensures that the renamed dashboard will be updated globally.
Previously, when you renamed a published dashboard, the new title would not immediately be reflected in the Dashboard Publisher Reassignment screen. The new name would update only after the dashboard was manually republished.
Bug Fixes#
User Admin#
Last Login relative dates are not accurately reflecting the user’s local time.
SAML - Unable to login with SAML user.
Warehouse Maps#
Warehouse Map Widgets - Dragging on map also drags widget container.
Favourites Dashboard – Warehouse Map Widget loads continuously and gets a syntax error on console.
Other#
EBOL - Bad error handling crashes the process.
Graphs unable to export to PDF, PNG, and JPEG.