Release 44.1 Notes 02 February 2025#
Summary#
In this release, we’ve developed the following improvements:
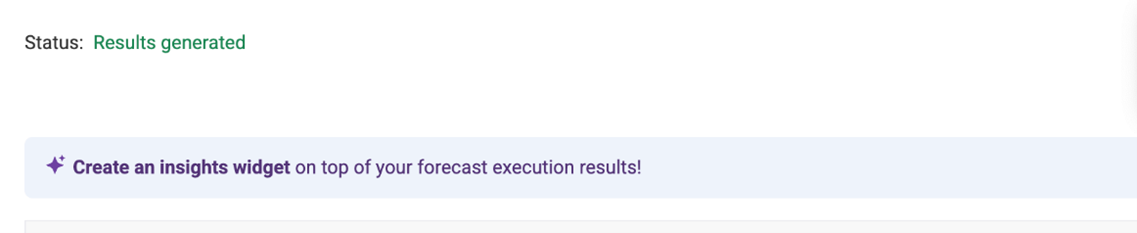
You can now have Rebus automatically generate a widget directly from the Trend Forecasting screen.
You can now track users who have not logged in for a specified number of days.
When you export data from widgets with pivot tables, the grouped column headings are kept in the exported file.
In the Travel Distance functionality, a new validation ensures that aisles remain within a reasonable spatial boundary and prevents excessively large areas from being added or modified.
And in the 3PL billing module:
You can now label clients as either Active or Inactive.
Invoices on the Invoice Configuration screen are now sorted with Active invoices first.
Improvements - Miscellaneous#
Creating Trend Forecasting Widget#
You can now have Rebus automatically generate a widget directly from the Trend Forecasting screen. This makes it easier and faster to use the forecast results generated. Previously, after you created a forecast, you would have to build a widget from scratch in Widget Builder using the forecast results. After you view the results of running your forecast, click on the new Create an Insights Widget button.
Wait until the widget creation process is complete, then deploy the widget on a dashboard. Your widget will look something like this:
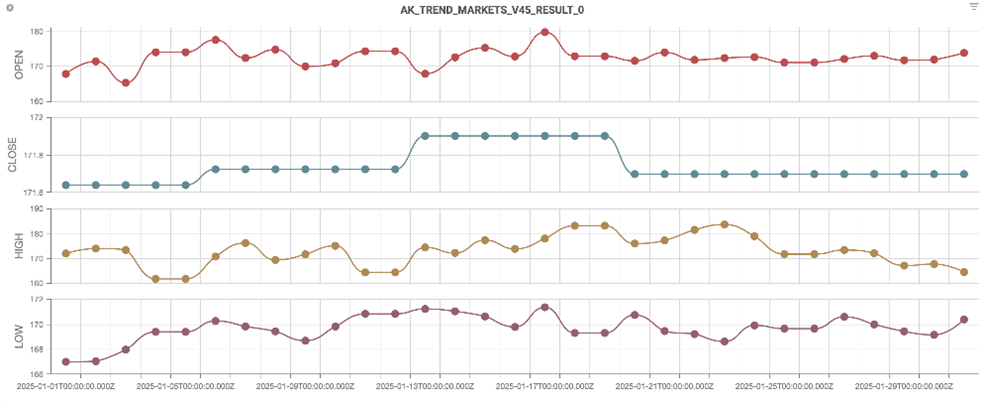
You can edit this widget in Chart Designer to change and customize settings. Once you create a widget with a forecast execution, you can sync older executions from that forecast with your widget. Go back to the forecast screen and select the Sync button that appears.

Once sync is complete, go back to your dashboard, delete the widget, and deploy it again. Your widget’s visualization should be updated according to the older results.
Exporting Last Login Date of Rebus Users#
You can now track users who have not logged in for a specified number of days. This is useful for identifying inactive users and managing user accounts. Users’ last login dates are updated and saved in the system upon each successful login. You can export this data into Excel and filter the Excel document based on login activity to easily identify users who have not logged in within a specified timeframe (e.g., past x days). Previously, login information was not included in exported user info.
To export user info:
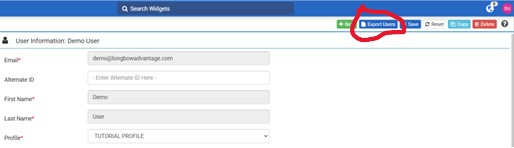
Go to the Rebus menu and go to Admin Tools>Users>User Admin.
On the top right navigation bar, select Export Users. An Excel sheet with user info is downloaded.
Exporting Grid with column headings#
Now when you export data from widgets with pivot tables, the grouped column headings are now kept in the exported file. Previously when exporting grids with pivot functionality, grouped column headings did not appear in the exported file.
Travel Distance – New Upper Bound for Configurable coordinates#
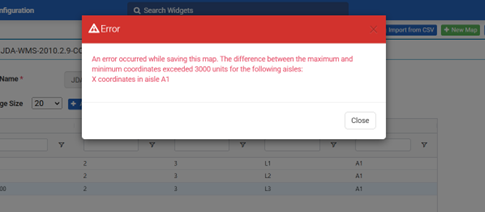
When you add, import or modify locations and aisles in the Travel Distance functionality, the difference between the minimum and maximum values for the x and y coordinates can no longer exceed 3000 units. This update ensures that aisles remain within a reasonable spatial boundary and prevents excessively large areas from being added or modified. Previously, assigning too large a value would cause processing issues with the travel map. If you enter a set of coordinates that don’t meet the criteria, you get an error message.
For example, the following sets of coordinates are acceptable:
Aisle 1
min (x, y) = (0,0)
max (x, y) = (3000,3000)
Aisle 2
min (x, y) = (3000,3000)
max (x, y) = (6000,6000)
The following set of coordinates would NOT be acceptable:
Aisle 3
min (x, y) = (3000,3000)
max (x, y) = (6000,7000)
3PL billing Improvements#
Active Invoices Listed at the Top#
Invoices on the Invoice Configuration screen are now sorted with Active invoices first. This will make it easier to access your Active invoices without having to scroll to the last section of the navigation panel. Previously, invoices were sorted in the order of Waiting for Approval, Closed, and Active. To access the Active invoices, you first had to scroll through many Closed invoices.
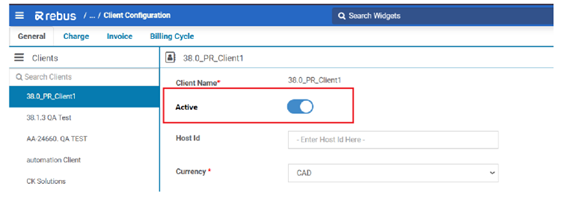
Setting Clients to Active/Inactive#
You can now set clients as either Active or Inactive in the 3PL Billing module.
The client selection dropdowns in the Billing Invoice Configuration, Future Transactions, and Error Bullpen screens are now divided into two sections—Active and Inactive—with Active clients listed first,. This sorting makes it easier to find and select clients without having to scroll through a long list of inactive clients.
You can change a client’s Active status on the Client Configuration page by toggling the new Active button.
When you switch a client to Inactive status, you get a warning listing any incomplete client-related tasks (active invoices, unassigned transactions, etc.). You can make a client inactive without affecting any incomplete tasks. You can also re-activate inactive clients. No data or transactions will be lost when a client is de-activated.
Bug Fixes#
Trend Forecasting#
Unable to scroll left and right on forecast results grid.
3PL Billing#
Changing invoice name on the invoice configuration does not update the invoice name of the active invoices.
Invoice Configuration - Unable to delete the closed invoice with line items.
Client Configuration - Invoice Config Tab - There is no scroll bar on the form.
Creating a Future Transactions Charge Identifier is invalid.
Invoice Quarantine - Resubmit for processing is not resetting Email Attempts.
Other#
Favorites - Unable to add 6th tab when it is showing a maximum tab limit of 7.
Left Nav: Duplicated sub menus.