Release 40.0 Notes 31 March 2024#
Summary#
In this release, we’ve developed the following improvements:
In the Labor module, you can now do the following:
Configure shift schedules more easily from the Shift Admin screen.
In the Warehouse Mapping module, you can now do the following:
Import maps using a csv file without having to worry about Rebus validating the case of the column headers. Case sensitivity has been removed.
Overlay the values of a numeric field on top of each map object.
Dashboard Warehouse Maps Widgets - reset your Warehouse Maps widgets to their default state.
Modify basic map information in the Warehouse Maps creator.
Select a color for components in the component config page.
In the Widget Builder, get warned if your changes to a widget affects Warehouse Maps widgets.
See the relationship between layers.
Use Global Filters Functionality on Warehouse Maps Widgets on dashboards.
More easily use the Map Objects Properties panel.
Multi-select Objects in the Warehouse Maps creator.
General UX Improvements:
You can now continue to use the application immediately after publishing a dashboard. An email notification will be sent out once the dashboard has completed publishing.
On the user admin screen, “+1” added automatically to user phone numbers.
Labor Module Improvements#
Configuring Shift Schedules from Shift Admin screen#
Through a new tab on the shift admin screen, you can now:
View shift schedules assigned to each user.
Modify and delete shift schedules.
Add shift schedules for multiple users at once.
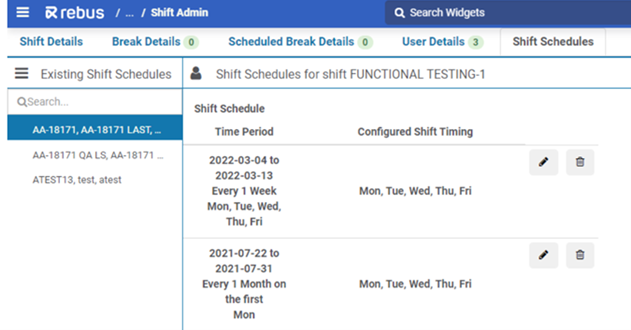
The shift admin screen now has a “Shift Schedules” tab that has all the schedules for a selected shift and shows the shift schedules assigned to each user.

You can modify and delete shift schedules from the same tab and add multiple users to a new scheduled shift at one time.
Previously, you could only add one user at a time to the shift schedule.
Modifying Shift Schedules#
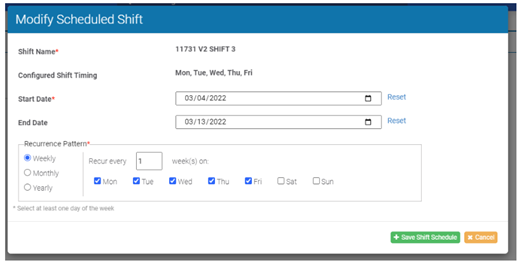
To modify a shift schedule, go to Shift Admin>Shift Schedules, and on the lefthand side of the tab select an existing shift schedule user. Click the pencil icon next to the shift schedule you want to change.
A modal window appears with the selected schedule’s details already populated. Modify the details you want and click save at the bottom of the window.
Adding Shift Schedules#
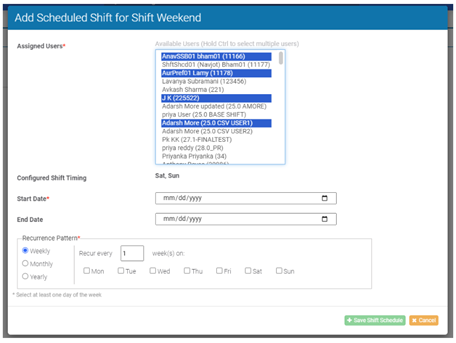
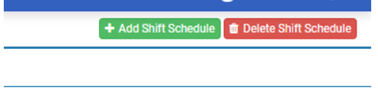
To add a shift schedule, go to Shift Admin>Shift Schedules and click the new “Add shift schedule” button at the top right of the screen.
A modal window will open with controls to modify shift users, shift timing, the start and end date, and the recurrence pattern. The users displayed in the Assigned Users field are the users that are already assigned to the shift. To add multiple users to the shift schedule, hold Ctrl and select the desired users.
Deleting Shift Schedules#
To delete a shift schedule, go to Shift Admin>Shift Schedules and click the new “Delete Shift Schedule” button at the top right of the screen.
It opens a modal window with grid of all shift schedules for the selected shift grouped by user Id, with checkbox to select multiple shift schedules.
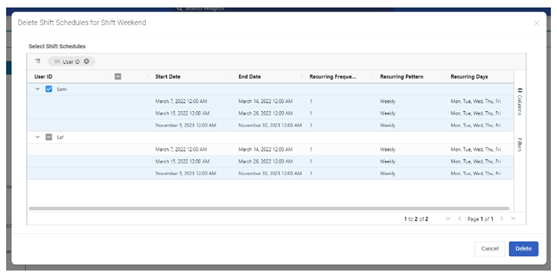
Select the shifts you want to delete and click the Delete button at the bottom of the window. A message asks you to confirm your selection.
After clicking yes, the selected shift schedules are deleted, and this is reflected in both the Shift Admin and Labor User Admin screens.
Warehouse Mapping Improvements#
Removing case sensitivity from Warehouse Maps Imports#
When you import a map to the Warehouse Maps Creator with a CSV file, the import process no longer validates the case sensitivity of the column headers.
Now your map will import successfully regardless of upper- or lower-case letters in the column headers. The spelling of each column header (ID, Type, ParentID, X, Y, Z, Level, XLength, YLength, Corners) must still match those of the example file for a successful import.
Previously when importing a map to the Warehouse Maps Creator with a CSV file, the import would fail if the column headers contained any upper- or lower-case letters that differed from the required headers example (ID, Type, ParentID, X, Y, Z, Level, XLength, YLength, Corners).
If a header read “Xlength” instead of “XLength”, you would receive an error message and the map import would fail.
Overlaying Map Objects with Numeric Data#
Through Warehouse Maps Creator, you can now overlay the values of a numeric field on top of each map object.
Numeric Data Overlay#
When modifying your warehouse maps, you can now overlay the values of a numeric field on top of each map object. This will give you the option to display exact values instead of only using colours to visualize data.
This is done through a new column in the layers panel on the right of the Warehouse Maps Creator screen. You have the option to display data or not.
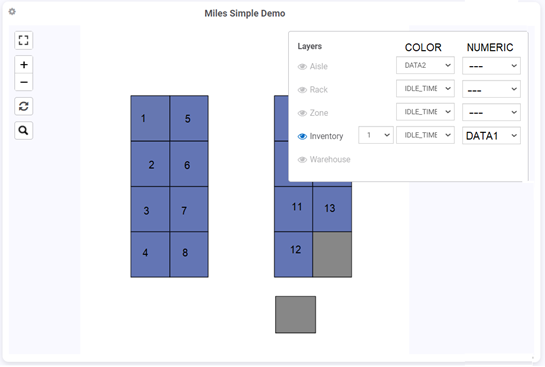
Previously, you couldn’t overlay numeric data on your warehouse map.
Resetting Warehouse Maps widgets to Default State#
Through your dashboard, you can now reset your Warehouse Maps widgets to their default state. To do this, click the blue ‘Reset to Default’ button on the bottom right of the Widget Properties modal.
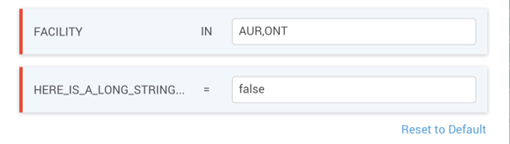
Previously, Warehouse Maps widgets were missing the ‘reset to default’ functionality.
Modifying Basic Map Information#
Through Warehouse Maps creator, you can now:
Modify the names of your maps.
Upload new background images for your maps.
Choose whether to preview your map on the Warehouse Maps Creator landing page.
Modifying Warehouse Map Details#
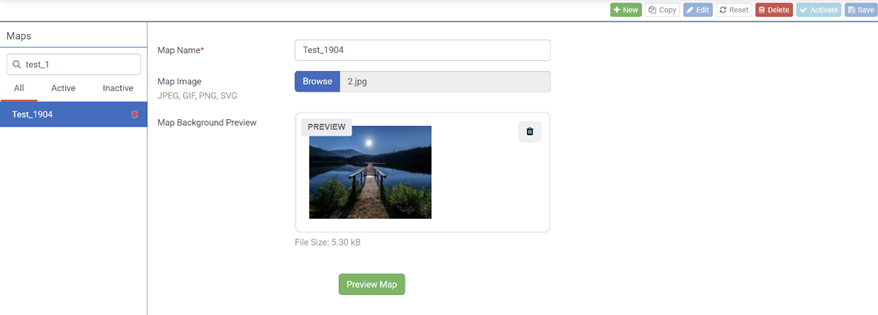
Through the Warehouse Maps Creator, you can now rename your warehouse map and upload a new background image using the new ‘Map Name’ and ‘Map Image’ fields.
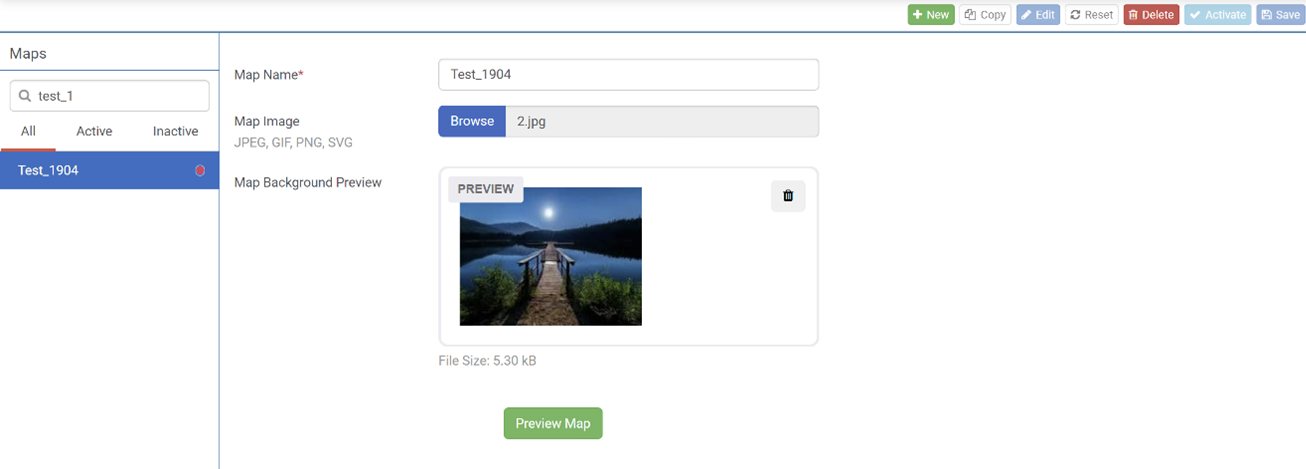
To change the map name, type directly in the ‘Map Name’ field. To upload a new background image, click Browse in the ‘Map Image’ field and select the image you want to use. Save your changes using the new Save button at the top right of the screen.
Previously, you could not change your map name, and you could add an image only when creating your map.
Previewing Maps#
There is also a new field in the Warehouse Maps Creator called ‘Map Background Preview’. This field shows you a preview of your warehouse map after clicking the Preview Map button.
This new function makes the page easier to navigate and allows space for the Map Name and Map Image fields.
Previously, the map would automatically preview on the Warehouse Maps Creator screen after selecting a map from the left sidebar.
Color Coding Components#
Through the Warehouse Maps Creator, you can now color-code map components.
When creating a new map component in the Warehouse Maps Creator tool, you can assign it a color on the component configuration page. This function makes it easier to distinguish different components when building and previewing your map.
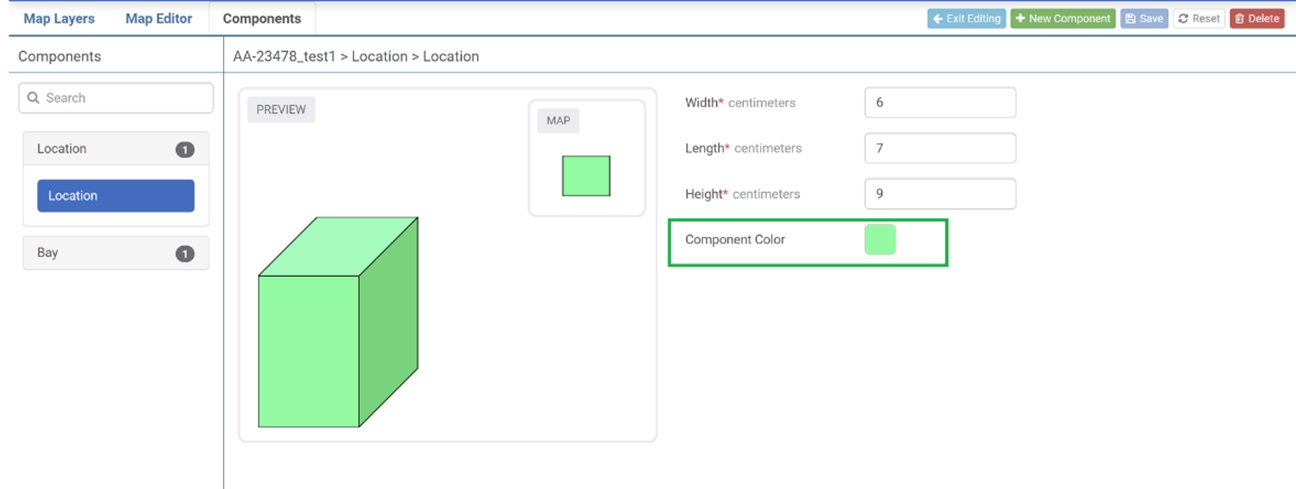
When you are building a component out of subcomponents, the preview displays the selected color for each of the subcomponents. When you place components in the map via the map editor, the components and their subcomponents on the child layers will be the configured color(s). Previously, you could not color-code the components of your map. You build and use components to design the warehouse map with the bottom-up method. They are like LEGOs: building blocks that you interlock to make up a whole.
Validating Widget Changes to Warehouse Maps Widgets#
When activating a widget in Widget Builder, you get an error if you deleted any fields currently being used in a Warehouse Maps widget.
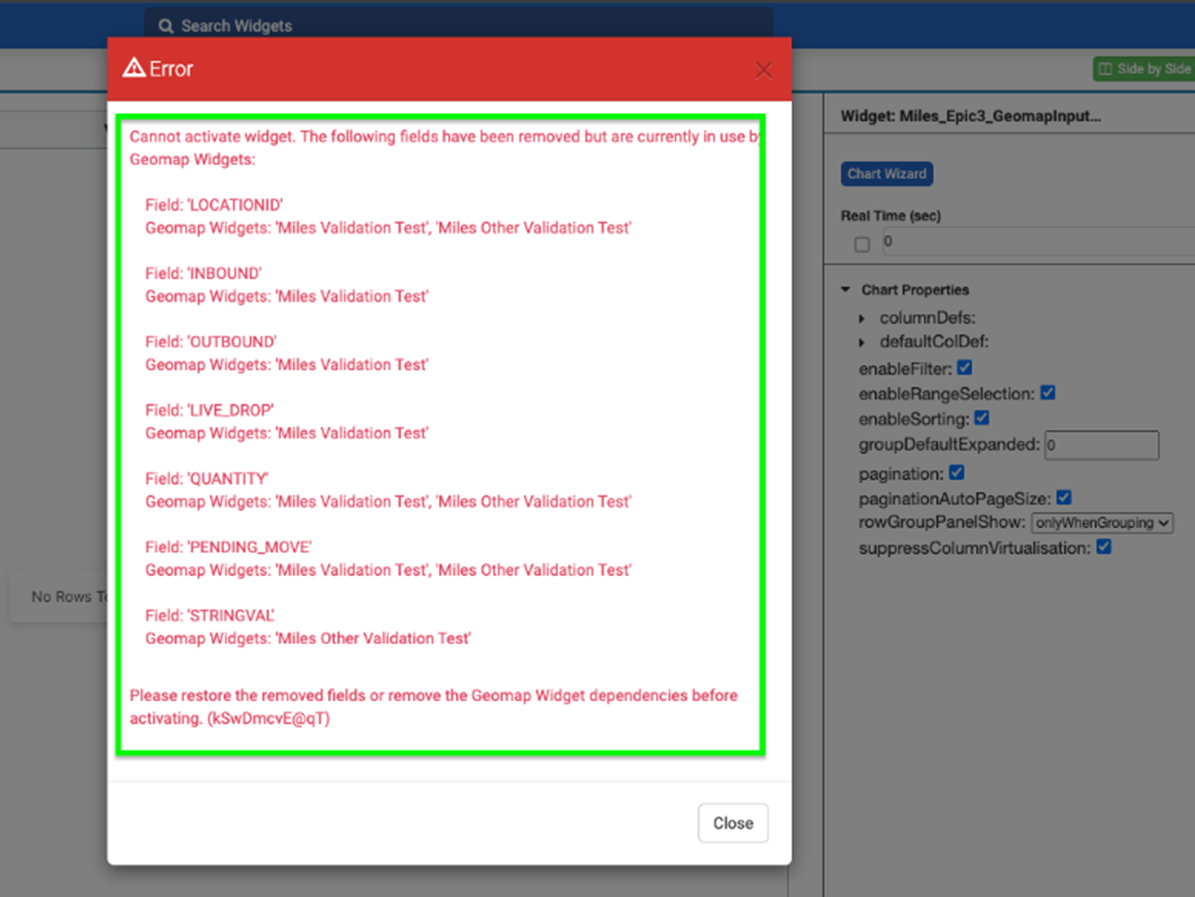
If you deleted fields that are related to a Warehouse Maps widget, the current widget is not activated and you get a popup that lists the deleted fields related to a Warehouse Maps widget.
Previously, the system did not validate if a widget’s data fields were being used for Warehouse Maps widgets. You could easily delete a field without knowing if it was related to a Warehouse Maps widget, which would then affect related widgets.
Seeing the Relationship Between Layers#
Through the Warehouse Maps Creator > Map Layers Tab, you can now easily see the hierarchy of your map layers through a new diagram.
Displaying Layer Hierarchy#
A new preview box on the right of the Warehouse Maps Creator screen, shows the Map Layers hierarchy. This lets you see the relationship between the different layers of your mapandhelps with planning and editing your Warehouse Map layers.
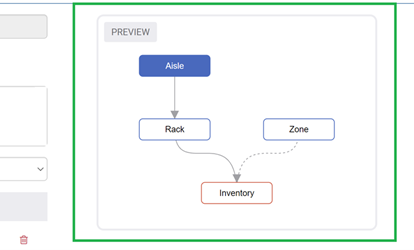
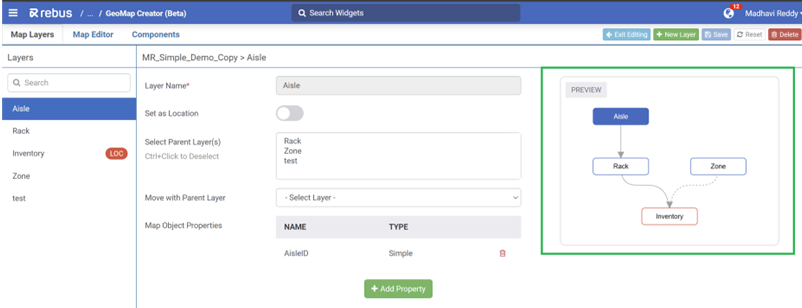
Previously, when in the Map Layers Tab, you could not see the hierarchy of the different layers of the menu.
Using Global Filters Functionality with Warehouse Maps Widgets#
You now have Global Filters, Date Picker, and Quick View applied to Warehouse Maps widgets on your dashboard. Previously, these functionalities were not available for Warehouse Maps widgets.
If you have a Global Filter set up for your dashboard, it will be applied to your Warehouse Maps widgets just as it would for other widgets. You no longer need to set up separate filters for your Warehouse Maps widgets.
To view your Warehouse Maps widgets’ refresh rate, description, parameters, and their values, you can now use the Quick View button to view this data, just as you do with other widgets.
Finally, you can now access your Warehouse Maps widgets’ date dropdown form by clicking the Date Picker button to specify the widget’s date filter.
Improving Map Objects Properties panel#
In the Warehouse Maps Creator, several changes have been implemented to make the Map Object Properties panel easier to navigate:
The composite property fields automatically fill with text values when the simple property field is updated.
Composite property fields now appear below simple property fields.
The Override toggle is now a checkbox.
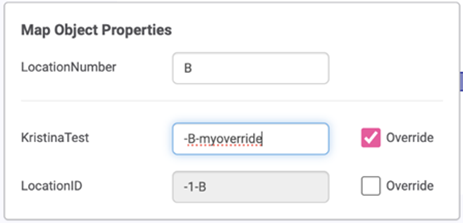
Simple & Composite Properties#
Now through the Map Object Properties panel, text values show by default in the composite property text fields. This means that when entering text in the simple property text field, you can preview what the composite ID will look like.
The composite property fields also now appear below the simple property field.

Previously, in the Map Objects Properties panel, the Composite properties fields did not automatically update with text when entering Simple properties. Composite properties were also not grouped together.
Override Checkbox#
Previously, the Override option in the Map Object Properties panel was a toggle. Now it appears as a checkbox and has the following features:
It is always visible for composite properties.
It is unchecked by default.
When UNCHECKED, the Composite property text field is disabled.
When CHECKED, the Composite property text field is editable.
To get to the Warehouse Maps Creator screen, from the Rebus menu go to Admin Tools > Widgets > Warehouse Maps Creator.
Selecting Multiple Objects in Warehouse Maps Editor page#
When editing Map Objects on the Warehouse Maps Editor page, you can now select multiple objects and move them together as a group. This new function makes moving more than one object quicker and easier.
Moving Multiple Map Objects#
Through the Warehouse Maps Editor Toolbar, you now have a new button that allows you to select and move multiple objects at once.
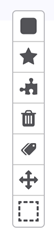
To use this feature, click the new button on the Warehouse Maps Editor Toolbar. Draw a rectangular selection around a group of objects to select them. After the rectangle is drawn, click to drag the rectangle and its selected objects. To deselect the objects, click anywhere outside the rectangle. Note that on the Inventory layer, only the selected objects on the current level can be moved (instead of all levels). To move objects on all the levels, you must move the geometrically linked parent object. Previously when creating or editing a map on the Warehouse Maps Editor page, you could only select individual objects and move them one at a time.
User Experience Improvements#
Email Notifications after Publishing Dashboards#
You can now continue using the Rebus application while your dashboard is publishing in the background. When you publish a dashboard, an information dialog will pop up letting you know that your dashboard is being published and that a status update will be sent to you by email.
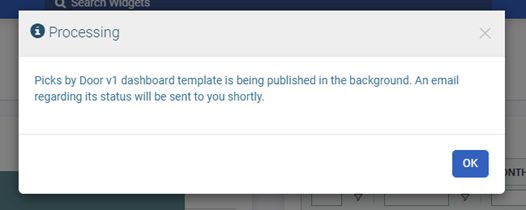
When the process finishes, you receive an email that tells you whether your dashboard published successfully, or if it failed to publish. Previously, you did not receive an email notifying you of your dashboard status, and you weren’t able to continue using the app until the dashboard publishing process was finished.
“+1” added automatically to Phone Numbers#
When setting up a new user, the field for the user’s phone number now automatically saves with a +1 for Canadian or US numbers, and the appropriate international code for other countries. Previously, the system only filled in a phone number’s international code when editing a pre-existing user.