Release 37.0 Notes 07 May 2023#
Summary#
In this release, we’ve developed the following improvements:
Dashboard and Widget Builder Improvements
Filtering Widgets by Fiscal Date Ranges
Global Filters improvements
Easier to share dashboards
Widget Builder Improvements
Parameter Values are Now a List in the Filter Stage
New stage lets you assign widgets to profiles
Labor Module Improvements
Importing Activities Through the Activity Adjustment Admin Screen
Standardized Activity Adjustment Notes that can be selected from a Dropdown List
Dashboard and Widget Builder Improvements#
Filtering Widgets by Fiscal Date Ranges#
You can now filter your widgets with relative fiscal date ranges based on your organization’s fiscal calendar (e.g., This Fiscal Week, This Fiscal Month, This Fiscal Quarter, This Fiscal Year, etc.).
As an organization’s objectives are usually set within its fiscal year (e.g., quarterly objectives), filtering data based on your organization’s fiscal calendar can provide more accurate results and a more relevant view of its performance for achieving these objectives.
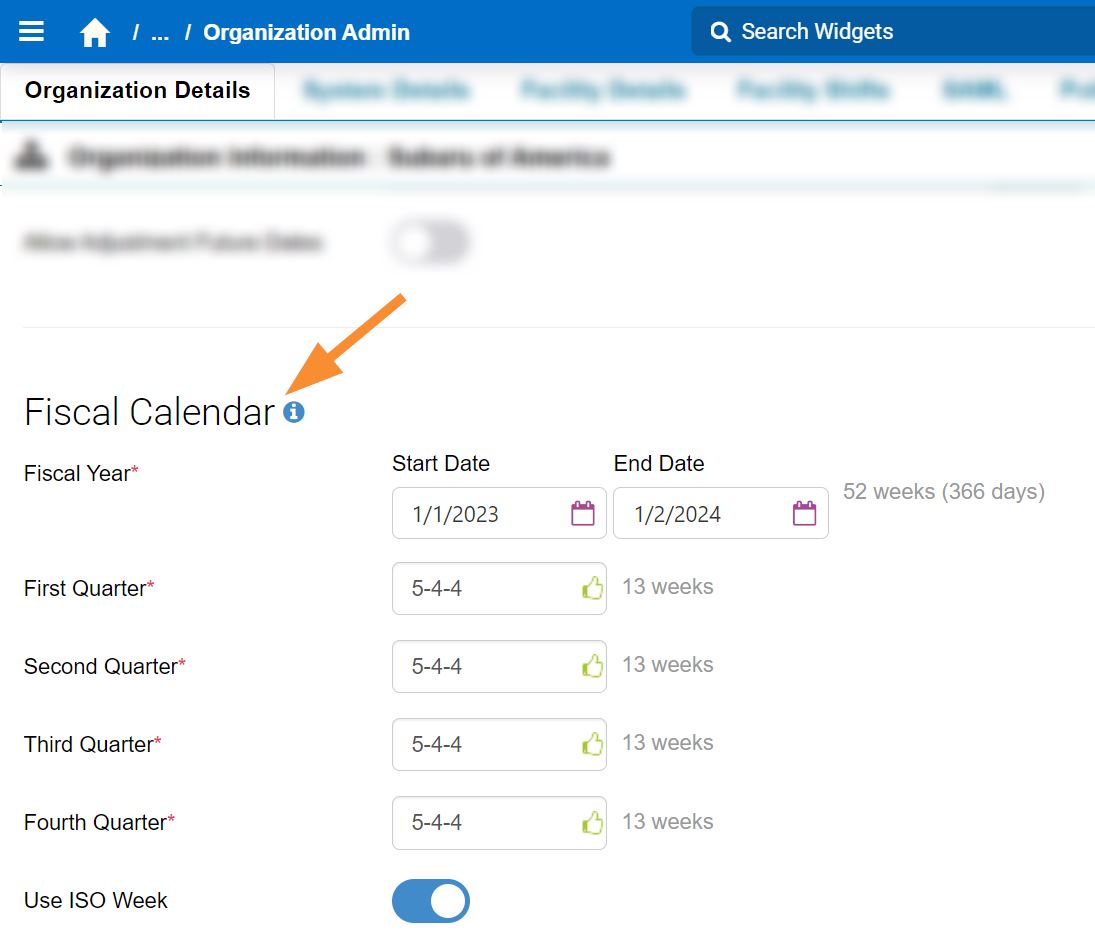
To enable this feature, we’ve added the Fiscal Calendar configuration in the Organization Admin screen, under the Organization Details tab:
Setting Up the Fiscal Calendar#
This procedure goes over setting your organization’s fiscal calendar properly to define the relative range options of fiscal dates that you can then use to filter your widgets.
Steps#
From the Rebus menu, go to Admin Tools > System > Organization Admin
Under the Organization Details tab, move down the page until you see Fiscal Calendar.
Fill in the fields.
Field |
What You Enter… |
|---|---|
Fiscal Year |
The organization’s fiscal year’s start and end dates. The total number of days and weeks display next to the end date. |
First, Second, Third, Fourth Quarter |
The fiscal quarters date filters for widgets. In a #-#-# format, enter the number of weeks that make up each month in each quarter of the fiscal year. For example, entering ‘4-4-5’ divides a quarter into 3 ‘months’ each comprising 4, 4, and 5 weeks respectively. After entering the number of weeks for a quarter, the total number of weeks appears next to them. |
Use ISO Week |
Whether week-based date filters (e.g., Last Fiscal Week or This Fiscal Week) start on a Monday and end on a Sunday. ISO weeks are defined by the International Organization for Standardization (ISO).Keeping the toggle off results in Rebus reading week-based date filters as starting on Sunday and ending on Saturday. |
Click ‘Save’.
Result#
You’ve set up your organization’s Fiscal Calendar, and the relative fiscal date ranges accord with your organization’s fiscal calendar. You can now set up your widgets across Rebus to filter them with relative fiscal date ranges.
Setting up Widgets to be Filtered with Fiscal Date Ranges#
This procedure goes over how to set up widgets to filter them with relative fiscal date ranges relative fiscal date ranges.
The following table outlines the scenarios in which you can set widgets with relative fiscal date ranges and the corresponding results:
Scenario |
Result |
|---|---|
Creating or editing widgets in the Widget Builder. |
The relative fiscal date range becomes the widget’s default date filter setting. |
Filtering widgets on a dashboard. |
You can turn on fiscal dates for individual widgets on your own dashboards, which only affects those widgets. |
Applying the date global filter to widgets on dashboard. |
All widgets on the dashboard are filtered with the selected relative fiscal date range. |
Fiscal date ranges are applied through the Relative Range date filter.
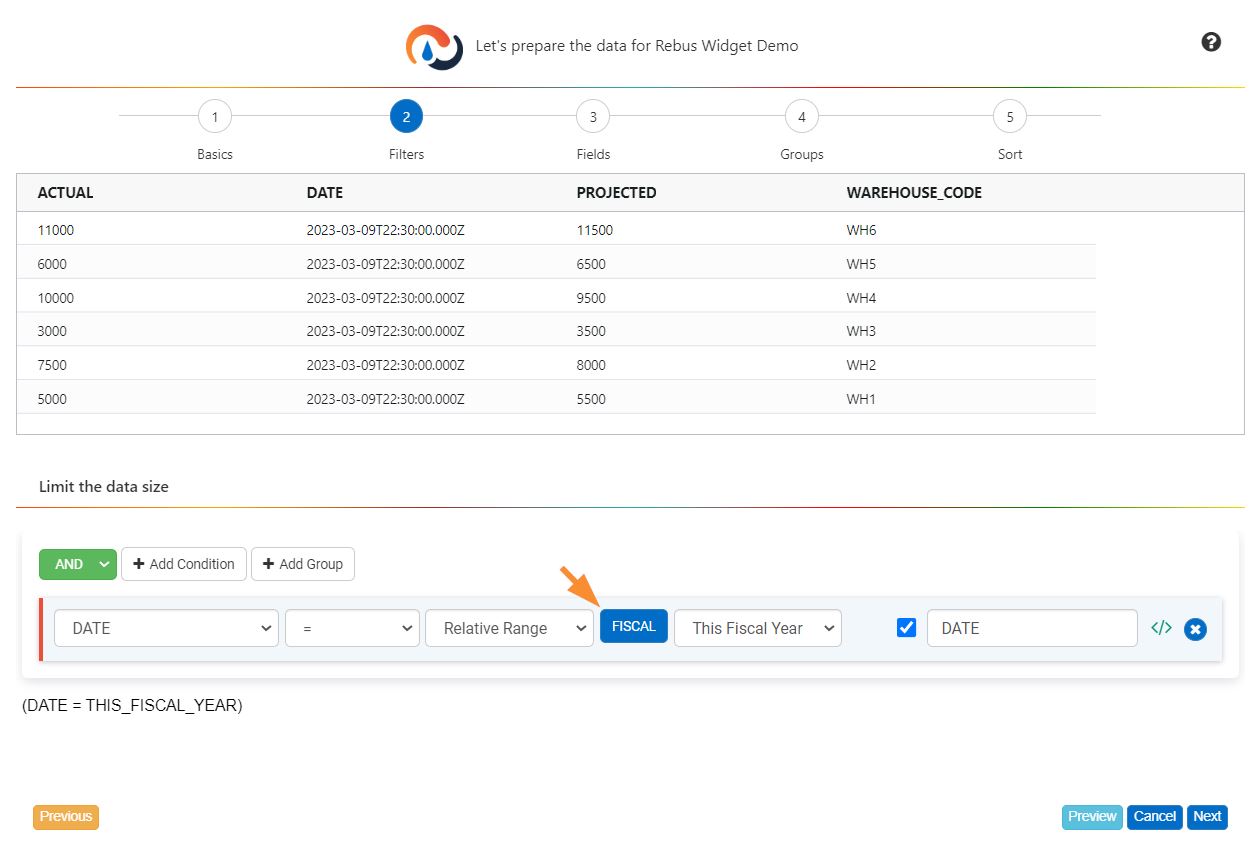
Setting Up Fiscal dates as the default in the Widget Builder#
At the filter stage, click the ‘Fiscal’ button. The relative range options list changes to the list of relative fiscal date ranges, from which you can select any of the available options.
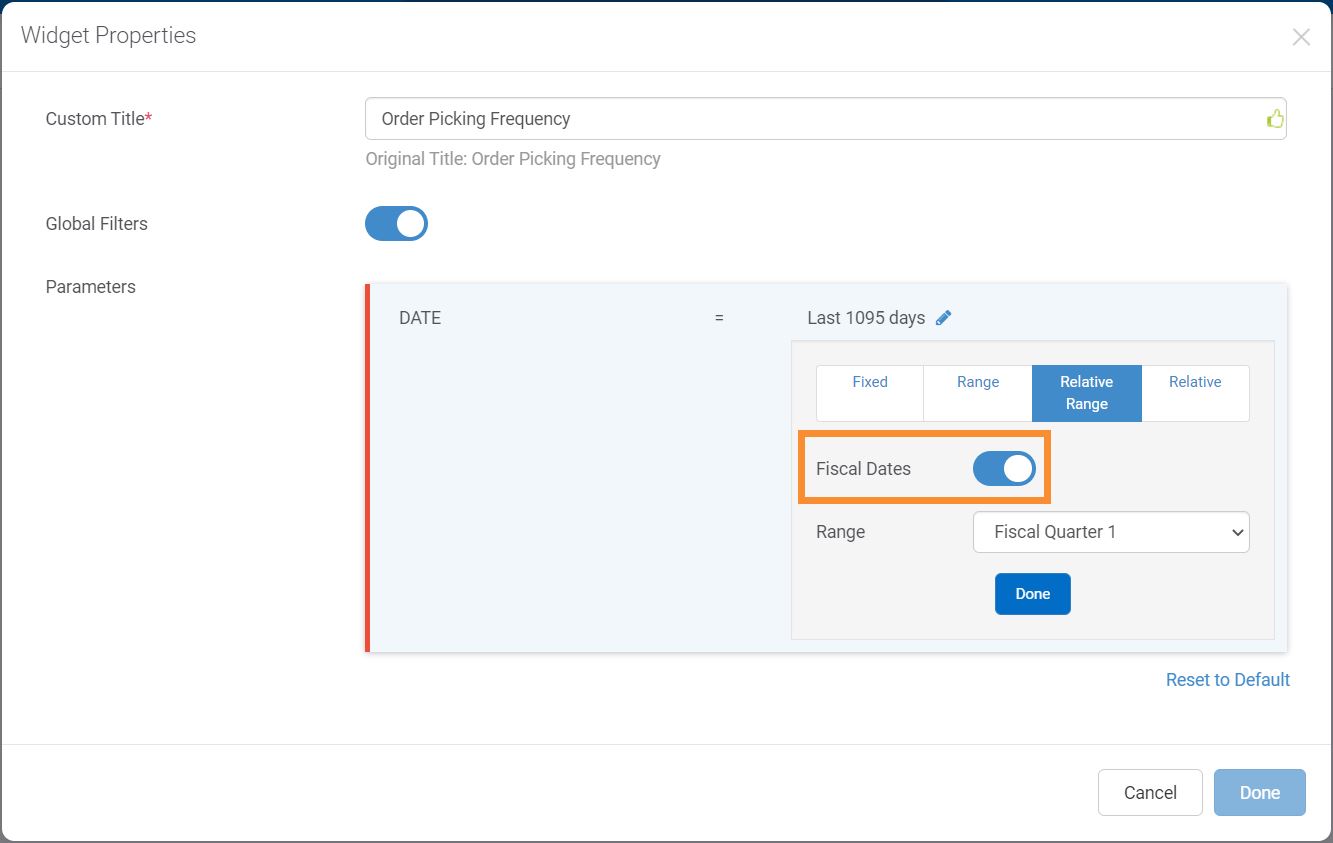
Widgets on a Dashboard#
From the Widget Properties form, just turn on the ‘Fiscal Date’ toggle. The relative range options list changes to the list of relative fiscal date ranges, from which you can select any of the available options.
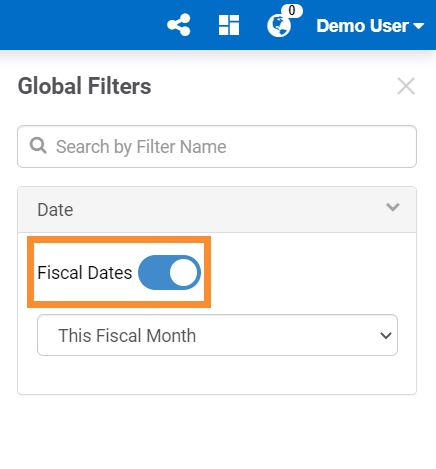
Date Global Filter#
From the Global Filters panel, turn on the ‘Fiscal Date’ toggle. The relative range options list changes to the list of relative fiscal date ranges, from which you can select any of the available options.
Options for Relative Fiscal Date Ranges#
Option |
Start of Range |
End of Range |
|---|---|---|
This Fiscal Week |
Start of the first day of the fiscal week. |
End of the last day of the fiscal week. |
This Fiscal Month |
Start of the first day of the fiscal month. |
End of the last day of the fiscal month. |
This Fiscal Quarter |
Start of the first day of the fiscal quarter. |
End of the last day of the fiscal quarter. |
This Fiscal Year |
Start of current fiscal year’s start date selected in the Fiscal Calendar |
End of the last day of the fiscal year. |
Fiscal Quarter 1 |
Start of first day of first fiscal quarter. |
End of last day of first fiscal quarter. |
Fiscal Quarter 2 |
Start of first day of second fiscal quarter. |
End of last day of second fiscal quarter. |
Fiscal Quarter 3 |
Start of first day of third fiscal quarter. |
End of last day of third fiscal quarter. |
Fiscal Quarter 4 |
Start of first day of fourth fiscal quarter. |
End of last day of fourth fiscal quarter. |
Start of Fiscal Week |
Start of first day of the current fiscal week. |
|
Start of Fiscal Month |
Start of the first day of the current fiscal month. |
|
Start of Fiscal Quarter |
Start of the first day of the current fiscal quarter. |
|
Last Fiscal Week |
Start of the first day of the previous fiscal week. |
|
Last Fiscal Month |
Start of the first day of the previous fiscal month. |
End of the last day of the previous fiscal month. |
Last Fiscal Quarter |
Start of the first day of the previous fiscal quarter. |
End of the last day of the previous fiscal quarter. |
Last Fiscal Year |
Start of the first day of the previous fiscal year. |
End of the last day of the previous fiscal year. |
Global Filters Improvements#
We’ve made the following improvements to the Global Filters functionality:
You can now Select Your Global Filter Operators and Values from a List#
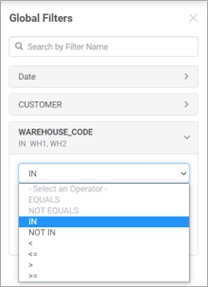
In the Global Filters panel, you can now do the following to parameters with which you want to filter your widgets:
Select the desired operator for string, numeric and calculated field parameters. When you select an operator for a parameter, the widgets will be filtered according to that operator; however, each widget’s operator for that parameter in their Properties form stays the same.
Select a value from a checkbox list for string parameters.
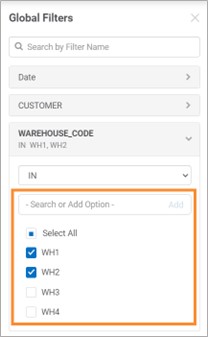
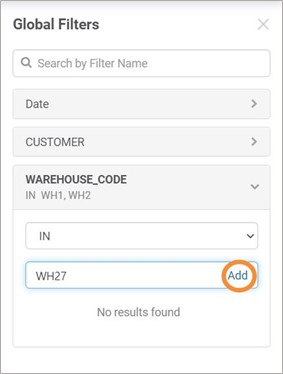
The parameter values checkbox shows the 50 most recently used values.. You can also use the ‘Search or Add Option’ to search for a parameter value; if the entered value is not found in the list (see example below), just click ‘Add’ to add it as a parameter value.
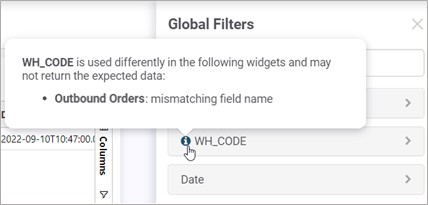
An information icon  displayed next to a parameter means that the parameter is used in two or more widgets and may hold different values in at least one of them. For more details, hover over the information icon. You can go to each designated widget’s Field Stage in the Widget Builder and ensure the parameter is used the same way across all of them.
Global Filters Panel Now Shows Applied Global Filters in Bold and the Selected Operator and Value#
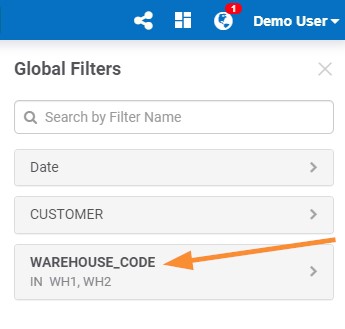
Applied Global Filters Now Include their Selected Operator on the Dashboard’s Title Bar#

Dashboard: Improve Sharing Functionality#
We’ve made the following improvements to make dashboard sharing easier:
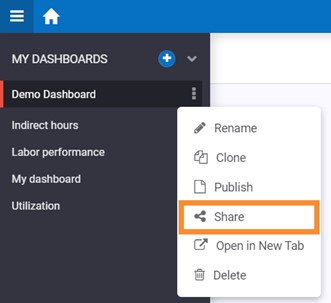
Share Dashboards from Anywhere in Rebus#
From wherever you are in the application, you can share a dashboard directly from the Rebus menu. Previously, the only way to share a dashboard was to open the latter and click the ‘Share’ button from the top right action bar.
To share a dashboard this way, it must meet the following conditions: * Has no sub-menus,
Has widgets,
Is one of the following:
Regular—a dashboard you’ve created for yourself,
Published with the version number 0—the publisher and subscribers can share this dashboard,
Published with a version number equal to or greater than 1—only the publisher can share this dashboard.
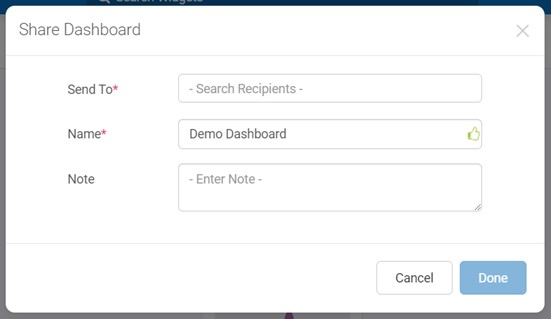
Improvements to the Dashboard Sharer’s Form#
We’ve made the following changes to the form sharers fill out before sharing the dashboard:
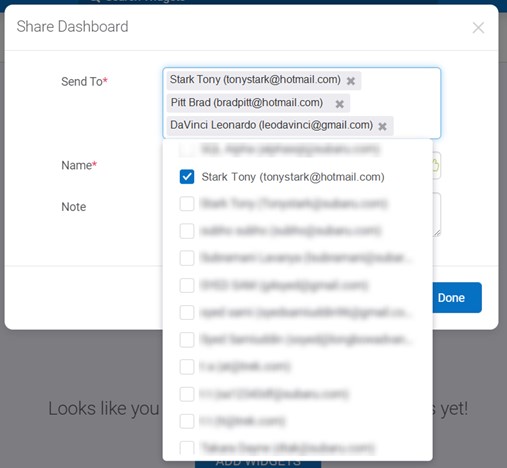
Select Multiple Recipients#
You can now select multiple recipients from a dropdown list. The list is ordered alphabetically by last name. Previously, you could only manually enter each recipient’s email.
The Dashboard’s Name in the Form is Now Automatically Populated#
You can always replace the name with another if desired. Previously, one had to enter the name manually.
User Interface (UI) Changes#
We’ve made the following changes to the form’s appearance:
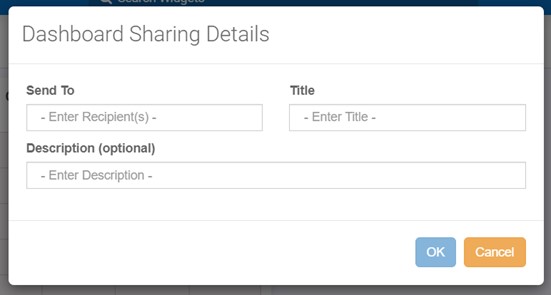
The form’s title has been changed from ‘Dashboard Sharing Details’ to ‘Share Dashboard’.
‘Title’ has been replaced with ‘Name’.
‘Description’ as been replaced with ‘Note’.
Before:
After:
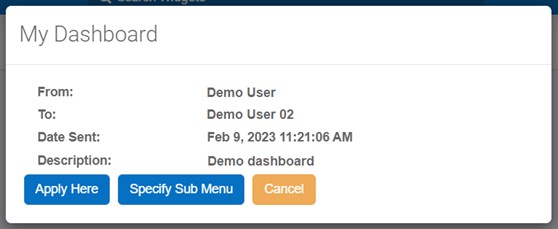
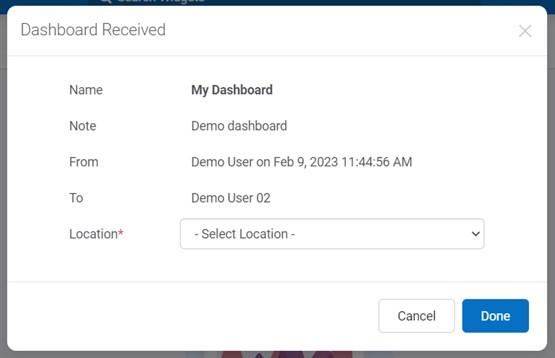
Improvements to the Dashboard Recipients Form#
We’ve made the following changes to the form recipients receive for a shared dashboard:
The form’s title has been changed from the dashboard’s name to ‘Dashboard Received’.
The ‘Name’ label has been added, indicating the dashboard’s name.
‘Description’ as been replaced with ‘Note’ and shows only if the sharer has entered one.
The ‘Apply Here’ and ‘Specify Sub Manu’ buttons have been replaced with the ‘Location’ label.
Before:
After:
Implement Save State for Pivots on Dashboards#
If you enable pivot mode for a widget on a dashboard, Rebus will now automatically save that change. Previously, pivot mode would turn off every time you navigated away from the dashboard, or the widget refreshed.
Allowed Maximum of 4 Sub-Menu Levels per Menu for an Improved Dashboard Structure#
You can now add up to 4 levels of sub-menus under a top menu, which ensures a consistent and organized dashboard structure. This new limit makes the menu navigation more manageable. If your menu currently has more than four levels, all levels will be retained.
Example: Total of 4 levels of sub-menus under Top Menu

Widget Builder Improvements#
Widget Builder: Parameter Values are Now a List in the Filter Stage#
In the Filter stage of the Widget Builder, you can now select string parameter values from a checkbox list to filter your widget. Previously, one had enter them manually.
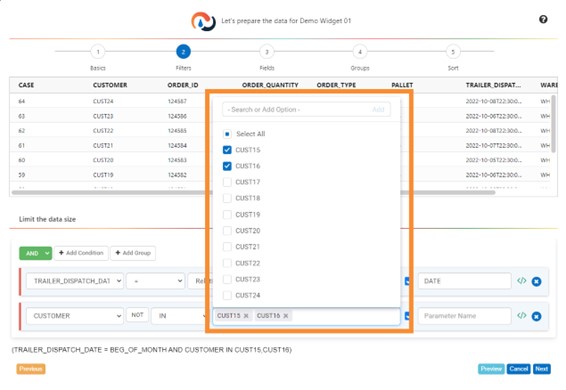
The checkbox list displays the 50 latest and most used values in alphabetical order. You can also use the ‘Search or Add Option’ to search for a parameter value; if the entered value is not found in the list (see example below), click ‘Add’ to add it as a parameter value.

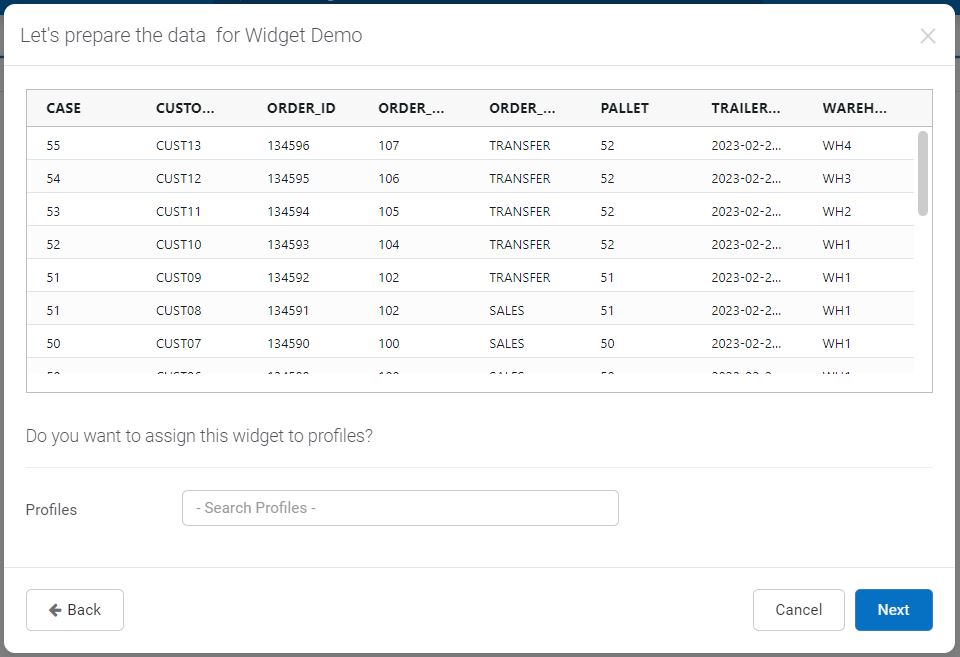
Assign Widgets to Profiles#
A new ‘Profile’ stage has been added to the Widget Builder. This new last lets you assign profiles to a widget when you’re creating and editing it without requiring Profile Admin access.
Assigning Profiles when Creating a Widget#
When creating a widget, you get to the ‘Profile’ stage after having passed through the first five ones. Next to ‘Profiles’, you can select the profile(s) you want to assign to the widget. You can also select ‘Select All’.
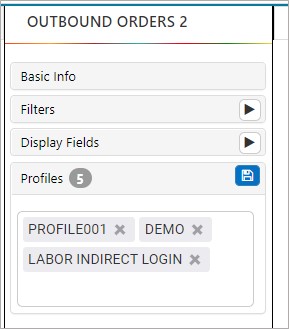
Assigning Profiles when Editing a Widget#
When editing a widget, under the ‘Profile’ stage, you can remove and add profiles to it; the widget can be active or inactive while doing so. When you’re done making changes to the ‘Profile’ Stage, click the ‘Save’  button.
Note
You can assign profiles to an inactive widget; however, the widget will not appear on dashboards or in Profile Admin screen until it is activated.
A profile determines what screens and widgets a user can access. Each user must be assigned to a user profile.
Labor Module Improvements#
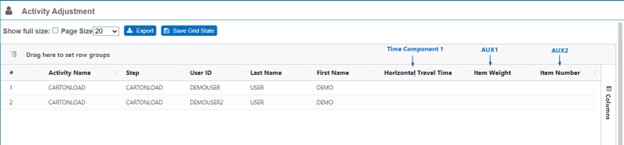
Creating Aliases for Auxiliary Fields and Time Components#
You can now create aliases for auxiliary (AUX) fields and time components to make it easier for you to identify what information AUX fields hold, and what time components calculate.
Steps#
From the Rebus menu, go to Admin Tools > Labor > Dynamic Field Configuration.
From the Search Fields panel, select the System and Facility ID.
Do one of the following depending on the alias you’re creating:
AUX Alias |
Time Component Alias |
|---|---|
|
1.Go to the Time Component Number Alias tab. 2.Click ‘+ Add Time Component Alias’. A blank row appears. 3.In the Time Component dropdown, select the desired time component number to map an alias to. |
Click the checkmark . You’ve created an alias for an AUX field or a time component.
Result#
Alias |
Screen where Alias is shown |
|---|---|
AUX |
Activity Adjustment Admin, Transaction Error Review |
Time Component Number |
Activity Adjustment Admin, Transaction Error Review, Time Component tab, in Activity Configuration Admin |
Importing Activities Through the Activity Adjustment Admin Screen#
Through the Activity Adjustment Admin screen, you can now insert various activities for one or many labor users with a single CSV file import.
Constraints#
You can import activities of only one system and facility at a time.
The CSV file import only inserts activities: it does not update them.
Steps#
Create a CSV file that contains the indirect activities’ information. See the table below for a description of each column name.
Note
The downloadable CSV example file contains all AUX field columns (i.e., from AUX1 to AUX25). You can remove the AUX columns that you won’t use in this import.
Column Name |
Required |
Description |
Accepted Value Format |
|---|---|---|---|
userID |
Yes |
The Labor User ID entered in Rebus. |
Any characters or spaces. |
activity |
Yes |
The Activity Name entered in the corresponding Activity Type’s configuration screen. |
Any characters or spaces. |
stepsequence |
Yes |
The activity’s step number. Enter 0 to indicate its first step, and 1 to indicate its second step. |
0 = first step 1 = second step |
step |
Yes |
The Step Name entered in the Step Details tab of the corresponding Activity Type. |
Any character and/or spaces. |
quantity |
Yes |
The quantity processed during the activity. |
Greater than or equal to 1. Note: If the activity is non-essential, enter 1. |
uom |
Yes if the activity is essential (i.e., essentialFlg = 1). No if the activity is non-essential (i.e., essentialFlg = 0 |
The unit of measurement (e.g., CASE, EACH, LINE, PALLET). |
Any characters or spaces. |
activityDate |
Yes |
Date and time of the activity. |
YYYY-MM-DD HH:MM:SS |
essentialFlag |
Yes |
Whether the activity is essential. |
0 = non-essential. 1 = essential |
grouping |
No |
For an essential activity: the transaction ID number assigned to the WMS transaction that’s associated with the activity you want to insert. For a non-essential activity: it’s recommended to leave it blank. Note: If ‘grouping’ is left blank, Rebus will populate a value for you, with the prefix ‘TRAN-CSV’. |
Any characters or spaces. |
activityGroup |
No |
The Activity Group Name selected in the corresponding Activity Type’s configuration screen. |
Any characters or spaces. |
sourceLocation |
No |
The location from which the labor user travelled to complete the activity. Enter the location’s identifiable attribute value. |
Any characters or spaces. |
destinationLocation |
No |
The location to which the labor user travelled to complete the activity. Enter the location’s identifiable attribute value. |
Any characters or spaces. |
AUX fields (AUX1 to AUX25) |
No |
AUX field’s value. |
Any characters or spaces. |
From the Rebus menu, go to Amin Tools > Labor > Activity Adjustment Admin.
From the Search Field Panel, select the System and Facility ID.
Click ‘Import From CSV’.
Upload the CSV file that contains the activities’ information.
Result#
After a moment, you will be able to see these activities in the Activity Adjustment Admin screen. Make sure that no labor activity from the CSV import has been quarantined. For more information on how to resolve quarantined transactions, see Resolving Quarantined Transactions.
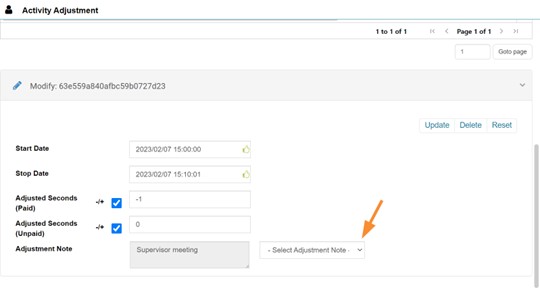
Standardized Activity Adjustment Notes: You Now Select Them from a Dropdown List#
When Creating New Activities or Editing Time of Activities, you now select activity adjustment notes from a dropdown list of pre-defined notes, which you set up on the Dynamic Field Configuration screen for the Labor Module. The list of pre-defined notes reduces the ambiguity that can result from manually written notes.
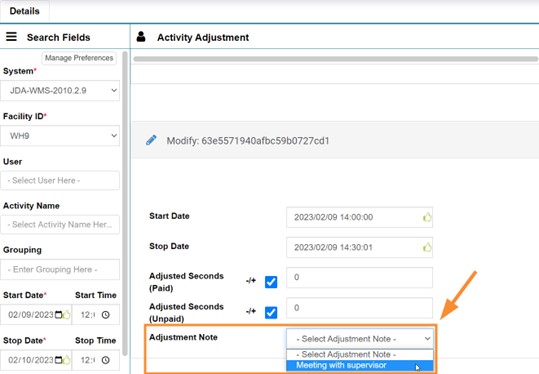
Adjustment notes written before this improvement are not affected, but you can edit them only by selecting a note from the dropdown list next to it:
Creating List of Pre-Defined Activity Adjustment Notes#
This procedure goes over creating adjustment note values that you can then select when adjusting activities.
Note
You need permissions to this screen to do this task. If you need access to this screen, contact your Rebus Administrator.
Steps#
From the Rebus menu, go to Admin Tools > Labor > Dynamic Field Configuration.
Select the System and Facility ID. You’re at the Adjustment Notes tab.
Click ‘Add Adjustment Note’. A blank row appears.
In the ‘Adjustment Note’ text box, enter the adjustment note.
Click the checkmark
 . You’ve created an adjustment note.
Result#
The created activity adjustment note is now available to select from the Adjustment Note dropdown list.
Other Labor Module Improvements#
When searching through activities in the Activity Adjustment screen or the Transaction Error Review screen, you can now select multiple activities and users from their respective checkbox list. You can also enter a search term to find the desired activity or user in the list. Previously, it was possible to only select one activity or user from their dropdown list by moving through it to find the desired one.
When searching through activities in the Activity Adjustment Admin screen, if you select a user, an activity name, or enter a grouping, you can specify a maximum time frame of 15 days between the Start Date and the Stop Date. Previously, the maximum number of days that you could specify were different according to the specified search field values of User, Activity Name, and Grouping.
After a labor user logs an activity in the Activity Log In screen, the Activity Log displays all activities’ time in the facility’s time zone. Previously, the log showed imported activities’ time in Coordinated Universal Time (UTC), and the manually logged activities in the facility’s time zone.
Bug Fixes#
Dashboards and Widgets#
Dashboard: In the dashboard after applying drill down and cascading widget then data is not loading in cascading widget and user getting console error
Dashboard : In the widget properties no value is displayed in the drop down menu
Widget Properties - Fix “# of days ago / from now” Date Options
Widget Builder#
WB - Wrong operator displaying when using param() within Display Stage
Flow Designer - Trigger and Step tabs bugs
Unable to scroll through Widgets > MetaData Builder grid
Labor#
Shift Admin - New shift information form is opened with validation errors
Copy Labor - Aisle map table does not get copied over for Travel Maps
Org Admin and User Preferences#
Organization Admin - Copy Labor Configuration - After copying the matric and Travel distance map then user able to see the duplicate API Users tab
Organization Admin- Existing system information is not displayed in System Details Tab
User Preferences :- After assigning and un-assigning the one system to another system then user getting error validation