Release 35 Notes 08 January 2023#
Summary#
In this release, we’ve developed the following new features and improvements:
User Interface (UI) improvements that let you do the following:
Clone Dashboards and Sub-Menus.
Labor Module new features and improvements that let you do the following:
Change the activity type of activity records through the Activity Adjustment Admin Screen.
More easily identify activities that have Unrealistically High Performance
Calculate the shortest path needed to complete an activity.
User Interface Improvements#
Cloning Dashboards#
You can now clone a dashboard or sub-menu to create a new one and make the desired adjustments to it. For example, you might want to do this if the same dashboard is needed, but with different parameter values. You can clone sub-menus and dashboards that contain widgets if they meet at least one of the following criteria:
Shared to yourself,
Published and restricted, and you’re its publisher,
Published and public, and you’re its publisher or a subscriber.
Steps#
From the Rebus menu, hover over the dashboard or sub-menu that you want to clone.
Click the dashboard or sub-menu’s menu, and then click ‘Clone’. The Clone Dashboard or Sub-Menu form appears.
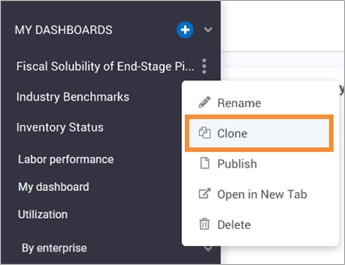
Fill in the fields for the cloned dashboard or sub-menu:
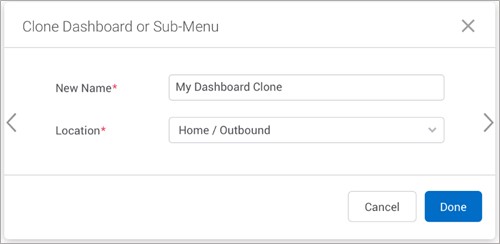
Field |
What You Enter |
|---|---|
New Name |
The name of the cloned dashboard or sub-menu. |
Location |
The menu under which the cloned dashboard or sub-menu will be located. If Home is selected, the dashboard or sub-menu will be located under MY DASHBOARDS as a main dashboard. |
Click ‘Done’. You’ve cloned a dashboard and can now modify it according to your needs.
Other Miscellaneous UI Changes#
The Grid widget properties ‘groupMultiAutoColumn’, ‘groupUseEntireRow’, and ‘groupSuppressAutoColumn’ are now under a new property called ‘groupDisplayType’ and have new names listed below in respective order. Their functionality is the same, and this change is already applied to your widgets using these properties.
multipleColumns
groupRows
custom
The Show/Hide Skype button has been removed from the Rebus toolbar. Rebus will no longer be integrated with Skype for Business because it is no longer supported by Microsoft. Rebus’s integration with Office 365 is unaffected by this change.
Labor Module Improvements#
Calculating an Activity’s Shortest Path#
Rebus’s Travel Distance Functionality can find the shortest path that a labor user can take to complete an activity. The Travel Distance functionality works with the Matrix Configuration (Travel Time) functionality. For more information about matrix configuration and how it works, see Labor Admin - Travel Time.
Term |
Definition |
Example |
|---|---|---|
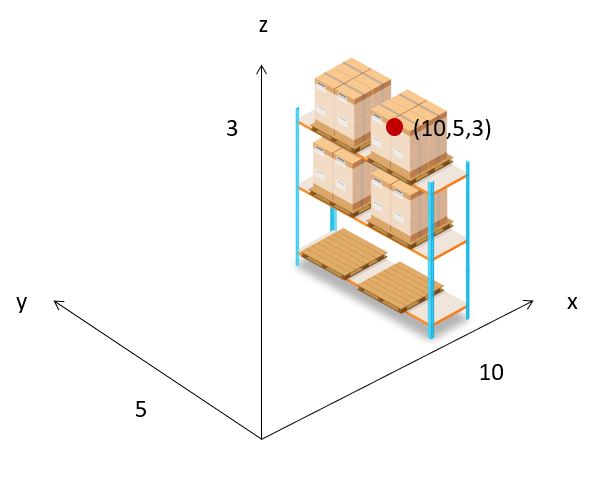
Location X, Y, Z coordinates |
Cartesian coordinates that locate a warehouse location by its distance from an origin (0,0,0) where three orthogonal axes cross. The x-coordinate is measured along the east-west axis, the y-coordinate is measured along the north-south axis, and the z-coordinate measures height or elevation. In this example, a location’s X,Y,Z coordinates are (10,5,3). |
|
Horizontal travel distance |
The distance travelled on a ground level from one location to another; it’s calculated along the X and Y axis of a warehouse’s cartesian map. It partly makes up the travel distance. |
– |
Vertical travel distance |
The distance travelled to pick or deposit inventory on a given level; it’s calculated along the Z axis of a warehouse’s cartesian map and counted twice for a given location. It partly makes up the travel distance. |
– |
Travel Distance |
The distance travelled from one location to another location to complete an activity. Rebus always calculates the shortest travel distance. It can comprise the horizontal distance, the vertical distances, or both. |
– |
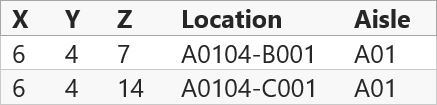
Travel Distance Map |
A configured table that Rebus uses to determine the shortest travel distance; it contains the following information about all the warehouse’s locations: 1) The location’s identifiable attribute value: taken from transactions pulled from your WMS and stored in Rebus. 2) The location’s X,Y,Z coordinates |
|
How Travel Distance Works#
In each transaction that’s converted into an activity, Rebus looks for the starting and destination location values and tries to match them to the right ones in the Travel Distance Map. The Travel Distance Map is set up in the activity type’s time component and is what Rebus uses to determine the shortest travel distance; it contains the following information about all the warehouse’s locations:
The location’s identifiable attribute value: taken from transactions pulled from your WMS and stored in Rebus.
The location’s X,Y,Z coordinates
Next, if the transactions’ starting and destination location values match what’s set up in the Travel Distance Map, Rebus calculates the shortest possible travel distance. Finally, Rebus calculates the expected travel time by multiplying the horizontal and the vertical distances by the right lookup values in the vertical and horizontal speed matrices also set up in the activity type’s time components.
Important:
Ensure the Travel Distance Map includes the X,Y,Z coordinates of all locations present in the warehouse. Otherwise, Rebus will not correctly calculate the travel distance.
Ensure the per unit used for the vehicle speed is the same as the unit used to measure the travel distance. For example, if you’re measuring the travel distance in feet, the vehicle speed would be seconds per foot (s/ft).
Note
 If your WMS already captures the X-Y-Z coordinates of all locations, and you wish to have the Travel Distance Map automatically populated with the data, please contact Rebus Customer Support to turn on Polls and Flows.
Setting Up Matrices of Vehicles’ Horizontal and Vertical Speed#
Configure matrices that let Rebus look up the horizontal and vertical speeds of vehicles (e.g., forklifts) and multiply the right vehicle speed value by the travel distance. You choose which type of distance (i.e., horizontal versus vertical) you want Rebus to calculate and multiply by the respective vehicle speed matrix.
To configure these matrices, you should:
Have your WMS transactions store an AUX field that captures the value of a vehicle’s identifiable attribute (e.g., the type of forklift or the vehicle’s name).
Configure two matrices that associate the vehicle’s horizontal and vertical speeds to the vehicle’s attribute value.
Consider what’s below—the WMS transaction, Matrix_Vehicle_Speed_Horizontal, and Matrix_Vehicle_Speed_Vertical—and that seconds per foot (s/ft) is the speed unit.
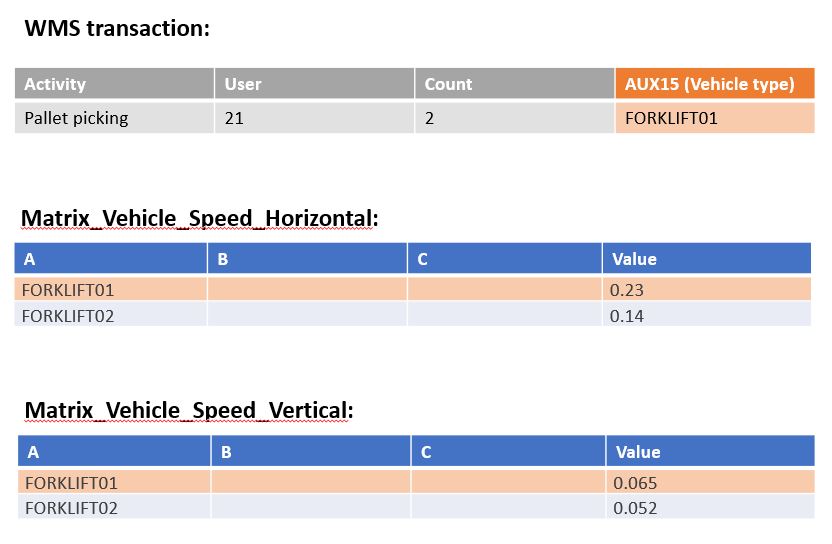
The horizontal and vertical speed matrices tell you the following:
Vector A is assigned to different vehicle names that Rebus uses to look up the corresponding lookup value (i.e., the vehicle speed in s/ft).
For FORKLIFT01, the vehicle’s horizontal and vertical speeds are 0.23 s/ft and 0.065 s/ft.
For FORKLIFT02, the vehicle’s horizontal and vertical speeds are 0.14 s/ft and 0.052 s/ft.
Given that AUX15 in the WMS transaction is FORKLIFT01, Rebus will multiply the horizontal travel distance by the horizontal speed of 0.23 s/ft and the vertical travel distances and by the vertical speed of 0.065 s/ft.
Note
The vehicle’s speed can be determined in the following ways:
Perform a stopwatch time study with the help of industrial engineers.
Use a forklift monitoring system.
Consult the vehicle’s specifications sheet provided by its supplier. Caution: Vehicle specifications usually provide the maximum speed rather than the average. Therefore, maximum vehicle speeds may not help in finding the most accurate travel time.
Using Either the Horizontal, the Vertical, or Both#
You can have Rebus calculate the horizontal distance, the vertical distance, or both. If you choose only one type of distance to be calculated, you can replace the horizontal or vertical distance with respectively the following numeric matrices:
A matrix that looks up the time to travel between zones
A matrix that looks up the time to travel up and down a bay’s levels
For more information about a numeric matrices’ setup, see Time Components and Activities.
Setting up Time Components to Calculate Travel Distance#
This procedure goes over setting up a time component for an activity type so that Rebus calculates the travel distance and expected travel time.
Prerequisites#
The transactions imported from your WMS must include the Location values of the starting and destination locations.
You’ve determined all locations present in your warehouse and their corresponding X-Y-Z coordinates.
Your matrices for vehicle’s horizontal and/or vertical speeds are set up are set up.
Constraints#
Only positive numbers can be entered for X, Y, and Z coordinates.
Each Location value must be unique in the Travel Distance Map.
Each time component can be mapped to only one Travel Distance map at a time.
Step |
Why do this? |
|---|---|
Step 1: Creating a Travel Distance Map |
The Travel Distance Map is what Rebus uses to determine the shortest possible travel distance of activities for a given activity type. If you have polls and flows turned on to automatically populate the map with data from your WMS, skip this step. |
Step 2: Setting Up the Time Component with the Travel Distance Map |
So that Rebus can calculate the travel distance and the travel time of an activity. |
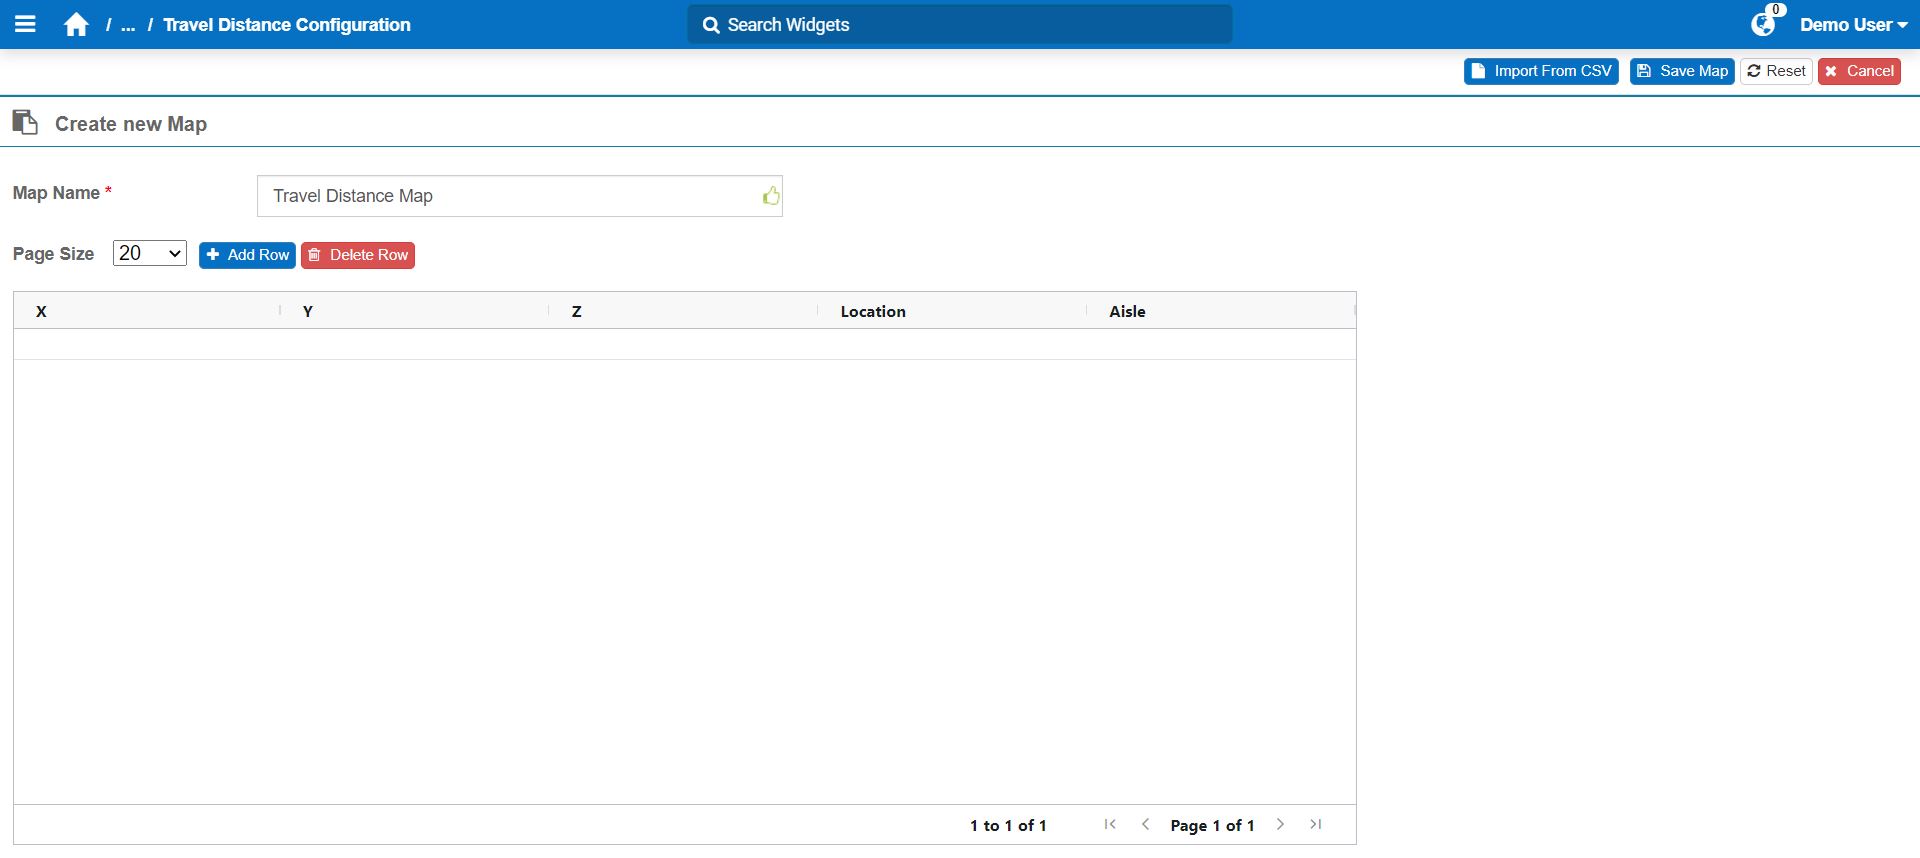
Step 1: Creating a Travel Distance Map#
From the Rebus menu, go to Admin Tools > Labor > Travel Distance Configuration.
From the Available Travel Maps panel on the left, select the System and Facility ID.
Click ‘+ New Map’.
Enter a ‘Map Name’.
Enter the location’s X, Y, Z coordinates and the location values. To do so, two options are available:
Manual Input |
CSV File Import |
|---|---|
|
|
Click ‘Save Map’. You’ve created the Travel Distance Map.
Step 2: Setting Up the Time Component with the Travel Distance Map#
From the Rebus menu, go to Admin Tools > Labor > Activity Configuration Admin.
From the Existing Activities panel on the left, select the System and Facility, and find the activity type. You’re at the activity type’s configuration screen.
Go to the ‘Time Components’ tab.
Click the ‘+’ button. The ‘Add Time Component’ form appears.

Input the time component number (1-3). You can have up to three per activity.
To add the desired map to the time component, click ‘Add Travel Distance Map’.
Configure the time component with the Travel Distance Map according to your needs. In this example, the time component is configured to multiply the horizontal distance by the right vehicle speed value in matrix HORIZONTAL_VEHICLE_SPEED.
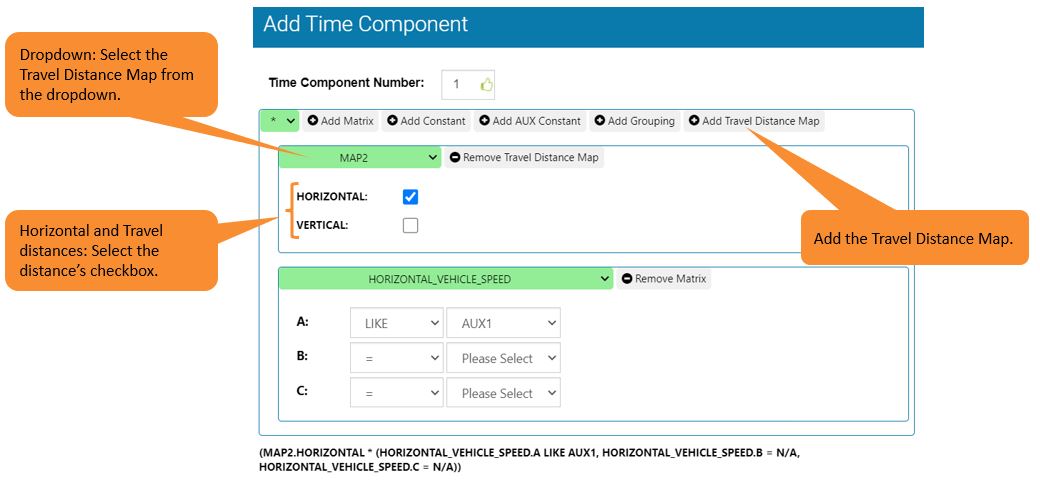
Note
When a labor user must travel across physical obstacles (e.g., doors) to travel a distance, you can add a matrix that adds time to account for such obstacles.
Click ‘+ Save Time Component’.
Result#
You have set up a time component for an activity type so that Rebus calculates the travel time based on the horizontal and vertical distances. You now have the following new fields that you can display in labor activity widgets:
Distance Traveled Horizontal
Distance Traveled Vertical
These fields are also available in the Activity Adjustment Admin screen.
Changing Activity Type of Activity Adjustment#
You can correct activities created through the Activity Log In screen and the Activity Adjustment Admin screen with the wrong activity type. The total goal time will be updated based on the correct activity.
Note
An activity cannot be changed to a Sign-On or Sign-Off activity.
Data Updates#
This section goes over background information about what and how data is updated in the Activity Adjustment Admin screen after changing an activity. When an activity is changed to another activity type, the following data is updated or recalculated:
Activity ID
Activity Name
Description
Step
UOM
Fatigue Seconds
Standard Goal Seconds
Standard Seconds
The table below shows the result of changing a one-step activity to a two-step activity and vice-versa:
Type of Change |
Result |
|---|---|
One-step activity changed to a two-step activity |
A second activity record will be added with the same grouping as the initial activity, and a quantity of 0. |
Two-step activity changed to a one-step activity |
One activity record from the same grouping is deleted. |
Steps#
From the Rebus menu, go to Admin Tools > Labor > Activity Adjustment Admin.
Run a search for the activity type whose activity records you want to change the activity.
Do one of the following:
Select an activity and click ‘Change Activity’. The Change Activity form appears and displays only the selected activity grouped by Grouping.
Click ‘Change Activity’. The Change Activity form appears with the complete list of activities grouped by Grouping.
Select the activity record(s) whose activity you want to change.
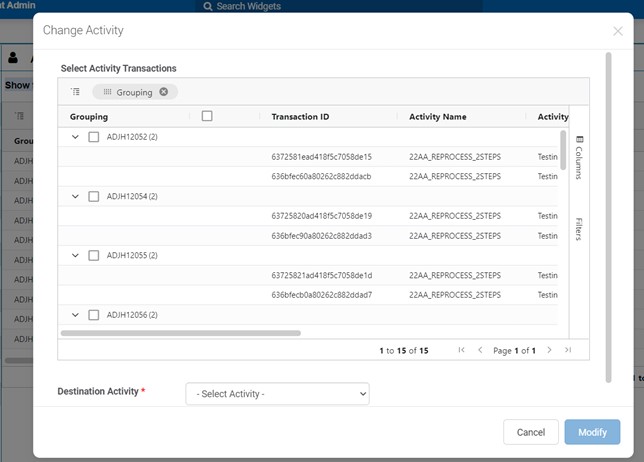
Next to ‘Destination Activity’, select the correct activity that you want to change the records to.
Click ‘Done’.
Result#
The selected activity records now have the new and correct activity recorded with the respective updated data.
Better Visibility on Activities’ Unrealistically High Performance#
For activities whose Measured Time Seconds is 0 (i.e., the actual time spent on an activity), and Standard Seconds is greater than 0 (i.e., the goal time to spend on an activity), the Activity Adjustment Admin screen’s ‘Performance’ column now shows 9999% to indicate unrealistically high performances. Normally, the performance percentage’s calculation is [Measured Time Seconds/Standard Seconds] * 100. You can now use the 9999% value when filtering or sorting the activities by Performance to have better visibility on this type of outlier and make decisions accordingly.
Activity Adjustment Improvements#
You can now edit and delete activities in Full screen mode.
When creating a mass adjustment, you can now filter and select labor users by User Group and/or Assigned Shift.
The Start Date, Stop Date, and Min Stop Date columns now show seconds in their timestamp. This lets you see where the measured and unmeasured seconds come from based on the timestamps for activities that lasted less than a minute.
Filters for numeric columns (e.g., Standard seconds, Measured Time Seconds, etc.) are now numeric (i.e., Equals, Not equals, Less than, Less than or equals, Greater than, Greater than or equals, In range).
After you make an activity adjustment (i.e., creating a new activity, a mass adjustment, or updating an existing activity record) and are brought back to the main screen, Rebus automatically displays the grid with the new and/or updated activities, and brings you back at the page of the grid you were in before making the activity adjustment. Previously, one had to update the grid manually by clicking ‘Search’ again.
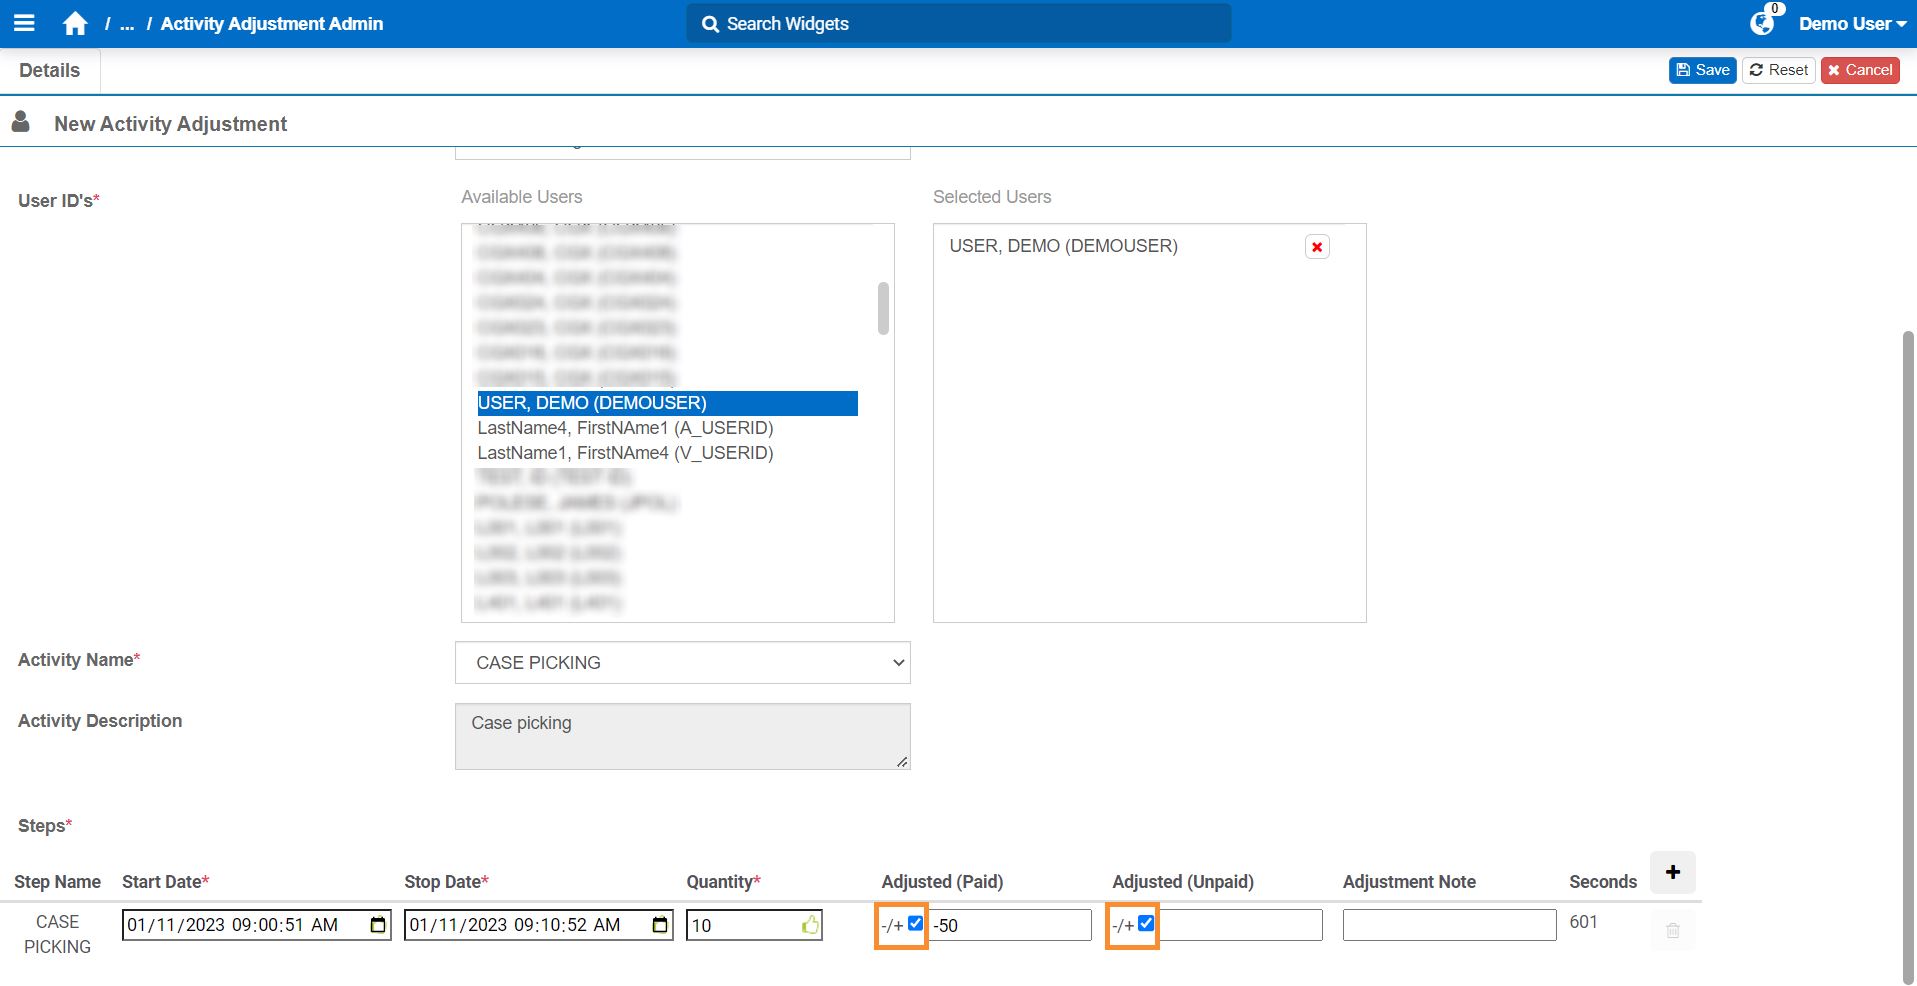
To improve visibility on adjustment justifications, the ‘Adjustment Note’ field is now required only if ‘Adjusted (Paid)’ or ‘Adjusted (Unpaid)’ are populated with a number other than 0.
When creating an activity, the ‘Quantity’ field is automatically set to 1 to eliminate one step for non-essential activities.
When creating or editing an activity, a ‘-/+’ checkbox is now displayed and selected by default next to ‘Adjusted Seconds (Paid)’ and ‘Adjusted Seconds (Unpaid)’ so that numbers entered in these fields are automatically converted to negative numbers. That way, the most common use case, where time is subtracted, is the default. To enter positive numbers, simply clear the ‘-/+’ checkbox.
Bug Fixes#
Chart Properties - Invalid properties were added after copying circular or linear widgets
Config_Group_Admin- An improper error message on updating a group name with a duplicate name
Widget Builder: Fix Missing Scrollbars in Display Fields