Release 34.2 Notes 04 December 2022#
Summary#
In this release, we’ve developed improvements that let you do the following:
Rename widgets through the Widget Builder screen.
Reset a published dashboard’s parameters to the latest published version.
When building a widget, preview its data set using the filter stage.
Log essential activities in the Labor Module’s Activity Login page.
Widget Improvements#
Renaming Widgets through Widget Builder screen#
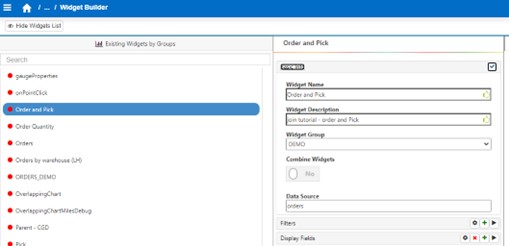
You can now rename an existing widget from the Widget Builder screen. To change a widget’s name, it must be inactive.
Go to Administration -> Widget Administration -> Widget Builder.
From the Existing Widgets by Groups accordion menu, select the widget that you want to edit. A widget builder stages panel opens.
Click ‘Basic Info’. A dropdown form appears that has the values of the widget’s Basic Info stage.

In the Basic Info form, click the Widget Name field. The field opens for editing.
Change the Widget Name value to the value you want. Click the checkmark.
You have renamed the widget.
Previously, you had to copy the widget, give it a new name, and then delete the old widget.
Resetting Values to Latest Published Version#
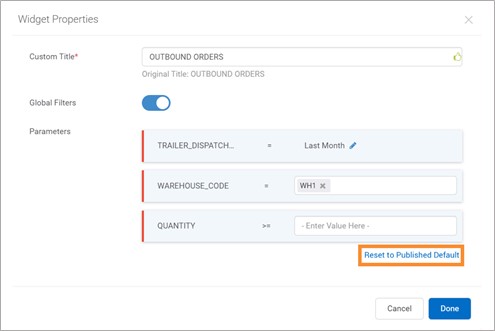
As a dashboard publisher or subscriber, you can now reset a widget’s parameters on a published dashboard to the latest published version. A new Reset to Published Default button has been added to the Widget Properties form of published dashboards with enforced versioning and filter changes allowed.

Miscellaneous Widget Improvements#
Exported chart, pie, circular gauge, and linear gauge widgets now display the widget’s title and the date to provide context for the data.
In the Widget Builder’s Filter stage, you can now build a condition that uses an IN or NOT IN operator and that has a blank value. The preview then shows you a sample of data, which gives you an overview of the values available in the data set. With this knowledge, you can then create a condition using IN or NOT IN operators to get the widget output you want. Previously, you were prevented from leaving blank the values of IN and NOT IN operators.
Labor Module Improvements#
Hiding systems and facilities on Labor Module Admin screens#
It’s now possible to hide a system or a facility so that it doesn’t appear in dropdowns on the User Preferences and all Labor administration screens. You might want to do this if a given system or facility is decommissioned. To stop particular systems or facilities from appearing on Labor Module administration screens, please contact Rebus Customer Support.
Logging Essential Activities in the Activity Login Screen#
You can now log essential activities in the Activity Login screen. This functionality is useful for logging essential activities that are not logged directly into your WMS (e.g., via an RF machine) and for which you want to measure labor users’ performance.
Note
 In the Activity Log In screen, the Password and Scan User Validation Methods have been removed. The functionality remains the same and does not affect your Rebus environment.
Prerequisites#
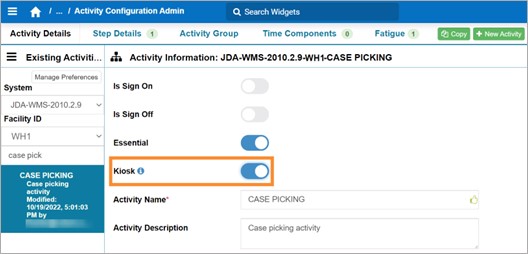
To allow labor users to log essential activities into the Activity Log In screen, ensure that the ‘Kiosk’ toggle is turned on in the respective Activity Type:
Open the Rebus menu, and go to Admin Tools > Labor > Activity Configuration Admin.
From the Existing Activity tool panel, select the System, Facility ID, and find the activity type. You’re at the activity type’s configuration screen.
Click the ‘Kiosk’ toggle:

You’ve configured the activity type so that it’s available in the Activity Log In screen.
Steps#
This procedure goes over how a single labor user can log a non-essential or an essential activity through the Activity Log In screen.
Note
 The fatigue seconds are not computed for essential activities logged in the Activity Log In screen.
Open the Rebus menu, and go to Admin Tools > Labor > Activity Log In.
In the System Panel on the left, enter the details of the labor user to whose schedule the activity is to be added:
Field |
Originating system. |
|---|---|
System |
The time measurement either in seconds or TMU. |
Facility ID |
The ID of the facility of the labor user. |
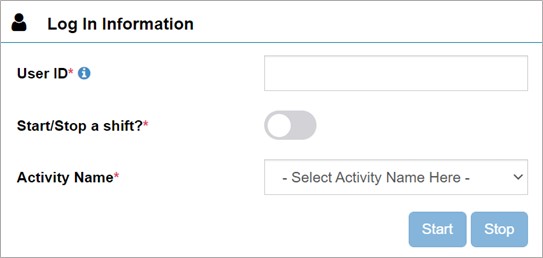
The Log In Information screen appears.

Next to ‘User ID’, enter either the Labor User ID or the Alternate User ID.
Do one the of the following depending on the activity to be logged in:
The activity is a sign-on or sign off activity |
Otherwise… |
|---|---|
Turn on the ‘Start/Stop a shift’ toggle. |
Leave the ‘Start/Stop a shift’ toggle turned off. |
Next to ‘Activity Name’, select the activity.
Do one of the following depending on the activity being logged in:
Essential one-step activity |
Essential two-step activity |
Non-essential activity |
|---|---|---|
|
|
|
Enter the quantity that was processed during the essential activity and then click ‘Done’.
The Activity Log appears confirming that the activity was added.
EBOL Improvements#
Warehouse code column on Shipment Details screen#
On the Shipment Details screen, you can now sort and filter the bill of lading (BOL) records by warehouse code. A Warehouse Code column has been added to the screen’s table. The Shipment Details screen can be used if your Rebus environment is integrated with an electronic bill of lading (eBOL) solution.