Release 33.0 Notes 07 August 2022#
-
Updating Time Measurements of Activities through Activity Configuration
Calculating Fatigue Allowance in an Activity’s Total Goal Time
Re-labeled Field in Labor User Admin Screen for Better Clarity
Easier to Resolve Quarantined Transactions with the ‘Invalid User’ Error
Labor Processing – UOM restriction doesn’t result in quarantining
Summary#
In this release, we’ve developed the following improvements:
In the Labor Module, you can now do the following:
Have Rebus update Time Measurements of Activities through Activity Configuration,
Have Rebus dynamically calculate Fatigue Allowance in an Activity’s Total Goal Time,
Create Alternate Labor User ID,
Set Up Labor Users more easily,
Resolve Quarantined Transactions with the ‘Invalid User’ Error more easily.
Other Improvements:
The Grid Tool Panel is Now a Collapsible Sidebar,
Updates to Grid Chart Properties,
Easily see how a widget’s data is filtered,
Set the Default Language to Spanish.
Labor Module Improvements#
Updating Time Measurements of Activities through Activity Configuration#
You can now retroactively update the time measurement (i.e., total goal time) for all activities of a given activity type so that you have accurate data for labor performance reporting.
Prerequisites#
You should know:
The effective date for reprocessing the activities with the new time measurement. The effective date must be within the past 30 days.
The new time measurement(s) for the targeted activities and their date ranges— this is the information you need to update the total goal time of the desired activities.
E.g., the standard should be 110 seconds for activities that occurred from July 1st 12:00:00 AM to July 15th 12:00:00 AM, and 100 seconds from July 15th 12:00:01 AM to July 31st 12:00:00 AM.
Note
 We recommend doing the procedure outside of operating hours—i.e., after the activities are recorded in Rebus’ Activity Adjustment Admin screen. Otherwise, there’s a slight chance that the labor transactions imported to Rebus from your WMS at the same time as the reprocessing will not get updated with the corresponding time measurement. If this happens, you can always reprocess the activities again a few minutes later.
Example#
To update the total goal time of activities, you need to configure an additional time measurement in their corresponding activity type, and then reprocess these activities.
An activity’s MIN_STOP_DATE_LOCAL is what determines whether an activity is eligible for a given time measurement. An activity whose MIN_STOP_DATE_LOCAL occurs on or after the effective date for standard reprocessing will be evaluated for reprocessing in one of the following ways:
If an activity’s MIN_STOP_DATE_LOCAL falls within the date range of a configured time measurement, it will get reprocessed to have the configured time measurement.
Otherwise, if an activity’s time measurement differs from its activity type’s Default Time Measurement, it will get reprocessed to have the activity type’s Default Time Measurement.
MIN_STOP_DATE_LOCAL is available in your standard labor collection.
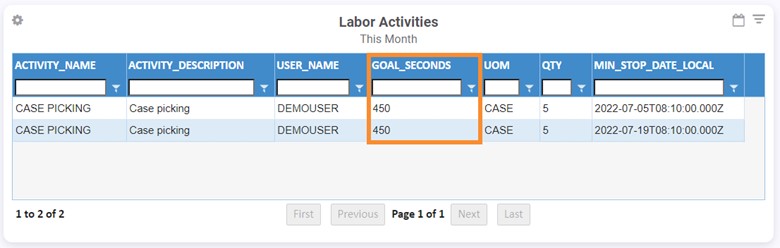
Let’s take the following example: CASE PICKING activities that occurred as of July 1st, 2022, 12:00:00 AM must be updated with a new total goal time. The time measurements for CASE PICKING should be: * 110 seconds from July 1st 12:00:00 AM to July 15th 12:00:00 AM * 100 seconds from July 15th 12:00:01 AM to July 31st 12:00:00 AM
Currently, the two CASE PICKING activities below have a total goal time of 450 seconds (GOAL SECONDS)—with a quantity of 5 cases and the default time measurement of 90 seconds.
Expected Results#
The first activity will get reprocessed with the 110-seconds standard because its MIN_STOP_DATE_LOCAL occurred within the date range of that standard. As a result, the activity’s total goal time will get updated to 550 (i.e., 5 x 110) seconds.
The second activity will get reprocessed with the 100-seconds standard because its MIN_STOP_DATE_LOCAL occurred within the date range of that standard. As a result, the activity’s total goal time will get updated to 500 (i.e., 5 x100) seconds.
Other activities whose MIN_STOP_DATE_LOCAL occurred on or after July 1st, 2022, 12:00:00 AM and whose current time measurement is different than the activity type’s default time measurement will get reprocessed with the activity type’s default time measurement.
Steps#
Open the Rebus menu, and go to Admin Tools -> Labor -> Activity Configuration Admin.
From the Existing Activity tool panel, select the System, Facility ID, and find the activity type. You’re at the activity type’s configuration screen.
Enter the Effective Date for Standard Reprocessing. This means that the activities that started on or after that date will be reprocessed with the new time measurement. In the example below, the activity records that started on or after June 27th, 2022, 12:00:00 AM will be reprocessed.
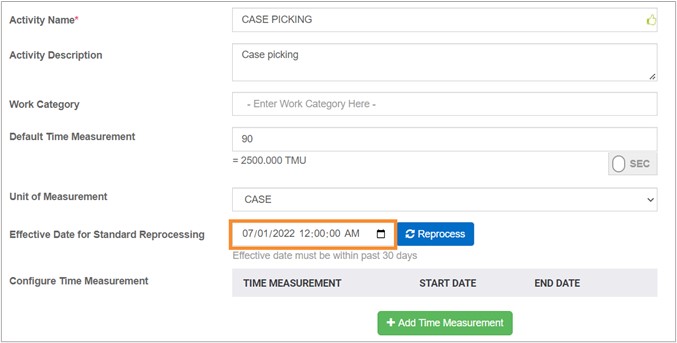
Configure an additional time measurement. To do so, follow these steps:
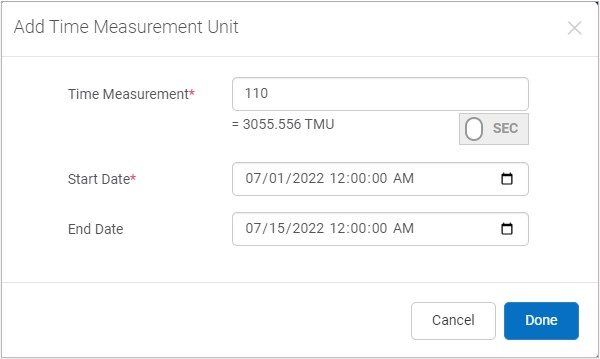
Click ‘+ Add Time Measurement’. The Add Time Measurement Unit form appears.
Fill in the fields explained in the table below.
Field |
What You Enter… |
|---|---|
Time Measurement |
The time measurement either in seconds or TMU. |
Start Date |
All activities that started on or after this date will be reprocessed. This date can be the same as the Effective Date for Standard Reprocessing. |
End Date (optional) |
The date that indicates the end of the time measurement’s timeframe. A blank end date defaults to today’s date. |
Note
An activity whose MIN_STOP_DATE_LOCAL falls between the Start Date and End Date of a corresponding time measurement will be reprocessed with that time measurement. Otherwise, it will be reprocessed with the Default Time Measurement of the Activity Type if their current time measurement is different than the activity type’s default time measurement. MIN_STOP_DATE_LOCAL is available in your standard labor collection.
You can configure a maximum of ten time measurements each with a different timeframe.
Click ‘Done’.
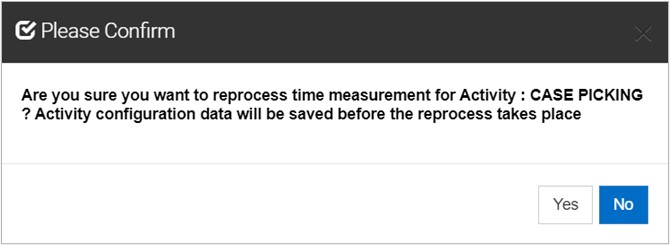
Click ‘Reprocess’.
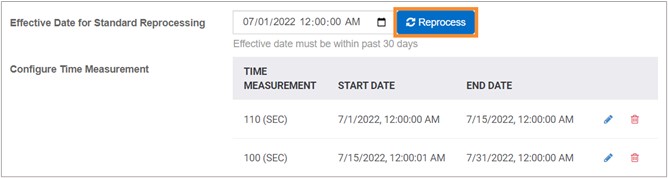
A confirm message appears. Confirm if you want to proceed with reprocessing the activities of that activity type.
The reprocessing starts, and when it’s done you can see the updated GOAL_SECONDS in your widget:

You can also see this update in the Activity Adjustment Admin screen:

Calculating Fatigue Allowance in an Activity’s Total Goal Time#
A fatigue allowance can now be dynamically calculated and added to all activities’ total goal time for a given activity type. Here’s an example of how Rebus calculates the new total goal time with the fatigue allowance:
Fatigue Allowance Example# Sequence
Rebus Processing Notes
1
The PUTAWAY activity’s goal time is 2000 seconds.
2
Fatigue Factor for the PUTAWAY activity type is added: 50%
3
The PUTAWAY activity’s total goal time is: Fatigue allowance + goal time = (Fatigue Factor * goal time) + goal time = 0.5*2000 + 2000 = 3000 seconds
To have the fatigue allowance added to an activity’s total goal time, you need to add the fatigue factor to its activity type:
Open the Rebus menu, and go to Admin Tools -> Labor -> Activity Configuration Admin.
From the Existing Activity tool panel, find the activity type for which to add the fatigue factor, and select it.
Go to the Fatigue tab.
Turn on the ‘Fatigue Enabled for Activity’ toggle and enter the Fatigue Factor’s percentage.
The percentage can range from 0.01 to 100 %.
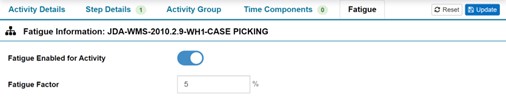
Click ‘Update’. From now on, new activities of that activity type will have the fatigue allowance added to their total goal time.
In the Activity Adjustment Admin screen, you can see an activity’s fatigue allowance under the Fatigue Seconds column, and how it’s added to the total goal time (i.e., the Standard Seconds column).

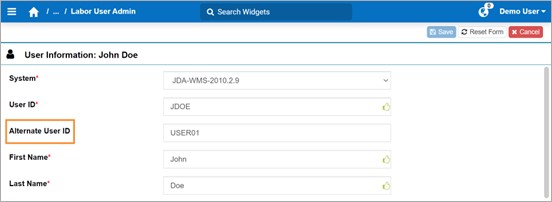
Creating Alternate Labor User ID#
In the Labor User Admin screen, a new and optional field called ‘Alternate User ID’ is now available. The Alternate User ID must be unique for each Labor User.
Note
In accordance with this new field, we’ve updated the .csv file for Labor User imports with a new column called ‘alternateUserId’.
Note
You can now sort the Labor User’s list by Alternate User ID.
Easier to Set Up Labor Users#
When you’re creating a new Labor User in the Labor User Admin screen, you can now do these following actions:
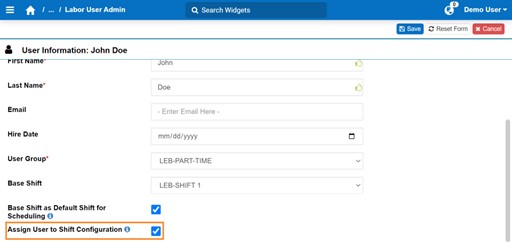
Action 1: Assign the user to their Labor User Group. Next to the new field ‘User Group’, select from the dropdown menu the corresponding Labor User Group:
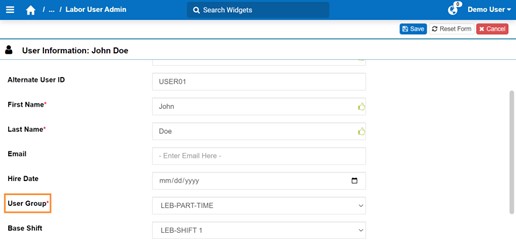
Previously, you could do this through either of the following: * The Labor User Group Admin screen. * The ‘Assign User to User Group’ button in the Labor User Admin screen, and only after having created the Labor User. This button has been removed.
Action 2: Add the user to the Base Shift’s ‘User Details’ tab in the Shift Admin screen. Simply select the new field ‘Assign User to Shift Configuration’ checkbox:
Previously, this could be done only through the Shift Admin screen.
Note
In accordance with the ‘Assign User to Shift Configuration’ field, we’ve updated the .csv file for Labor User imports with a new column called ‘userShiftFlg’. If you want to enable this option in the file, enter ‘Y’. Otherwise, leave it blank.
Re-labeled Field in Labor User Admin Screen for Better Clarity#
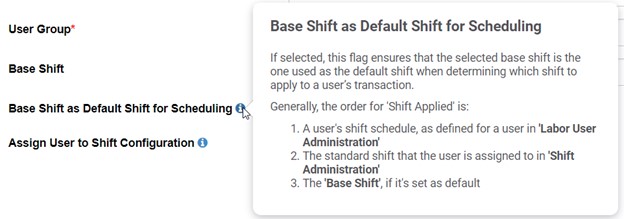
What was once called ‘Base Shift as Default’ is now re-labeled as ‘Base Shift as Default for Scheduling’ accompanied with an information icon that you can hover over for more information of how this field works:
Easier to Resolve Quarantined Transactions with the ‘Invalid User’ Error#
You can now create a Labor User directly in the Transaction Error Review screen as part of the steps to resolve Quarantined Transactions with the ‘Invalid User’ Error. To do so, follow these steps:
Click ‘+Create New User’. The ‘Add New User’ form appears.
Fill in the fields needed to create the new labor user.
Click ‘Save and Close’ or ‘Save and Add Another’ if you wish to add another labor user.
Select the corresponding transactions and click ‘Resolve Quarantined Transactions’.
Previously, the labor users could be created only in the Labor User Admin screen.
Labor Processing – UOM restriction doesn’t result in quarantining#
To eliminate quarantined transactions that don’t need troubleshooting, transactions corresponding to indirect activities and for which the UOM doesn’t match the configured activity type’s UOM in Rebus will no longer be quarantined.
Other Improvements#
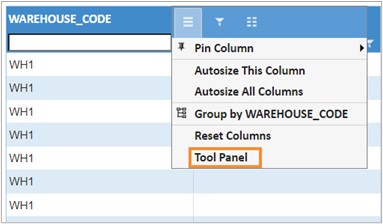
Grid Tool Panel is now a Collapsible Sidebar#
The Tool Panel has been replaced with a collapsible sidebar, which now comprises two tool panels:
The Columns tool panel:
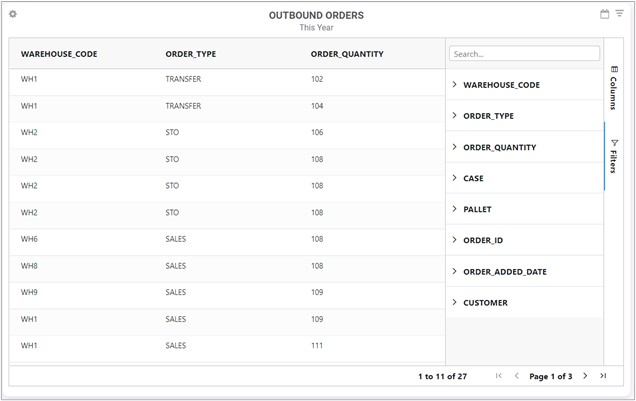
The Filters tool panel: it lets you change the grid’s filters all in one place, and without having to open a column menu:
Previously, the Tool Panel was accessible only through a column’s menu:
Dragging Column Names Across the Tool Panel is More Intuitive#
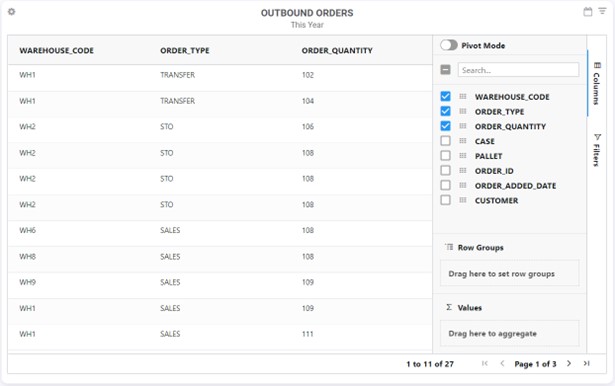
When grouping data, or creating a pivot table using Pivot Mode, you can now click a grid icon next to each column name to drag and drop that column into the Row Groups, Values, and/or Column Label sections of the Tool Panel. Here’s an example of dragging the ORDER_TYPE column name into the Row Groups section.
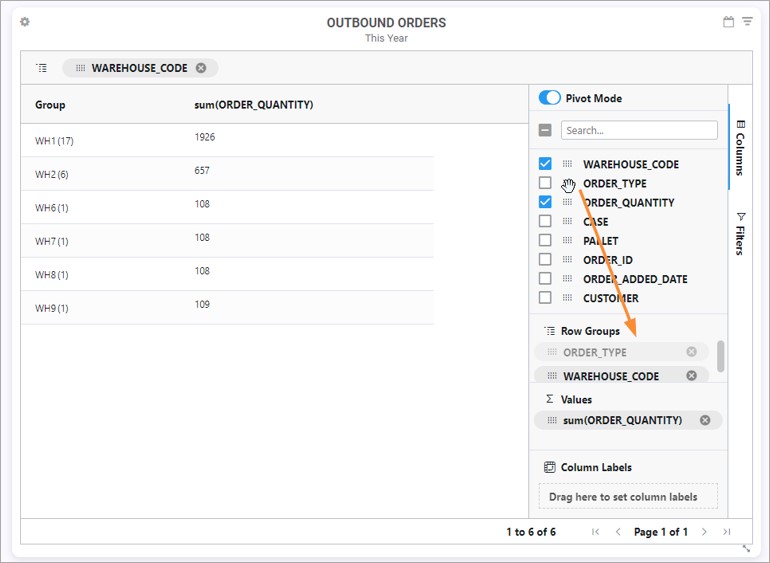
Previously, there was just a gap between the column name and the checkbox, which is what you had to click to drag a column.
Updates to Grid Chart Properties#
The below table lists the properties that have been updated with new terms, and a description of each updated property.
Previous Property Label |
Updated Property Label |
Description |
|---|---|---|
columDef▸cellStyle▸background-color |
columDef▸cellStyle▸backgroundColor |
Lets you choose a custom color using HEX and RGB codes. Previously, there was drop-down list of limited colors to choose from. |
columDef▸cellStyle▸text-align |
columDef▸cellStyle▸textAlign |
Specifies the horizontal alignment of the cell’s text of a column. |
columDef▸cellStyle▸text-family |
columDef▸cellStyle▸fontFamily |
Specifies the font family for the cell’s text of a column. |
columDef▸cellStyle▸font-size |
columDef▸cellStyle▸fontSize |
Specifies the font size for the cell of a column. |
Removed Grid Chart Properties#
The following properties have been deprecated and have now been removed and replaced with updated properties. The table also describes each updated property. The update is done seamlessly to all your Grid widgets.
a_release_notes_33_sidebar
Deprecated Property Label |
Updated Property Label |
Description |
|---|---|---|
showToolPanel |
sideBar |
|
columnDef▸suppressResize, enableColResize, defaultColDef▸suppressResize |
defaultColDef▸resizable |
Indicates if the columns should be resizable. |
enableSorting, defaultColDef▸suppressSorting, columnDef▸suppressSorting |
defaultColDef▸sortable |
Indicates if the columns should be sortable |
floatingFilter |
defaultColDef▸ floatingFilter |
Whether floating filters should be displayed and enabled for the columns. |
enableFilter |
defaultColDef▸filter |
Whether filters should be enabled. |
columnDef▸suppressToolPanel |
columnDef▸ suppressColumnsToolPanel |
If selected, disables the ability to move columns in the grid to change their order. |
groupRowInnerRenderer |
groupRowRendererParam▸ innerRendererParamsWidgetFunction |
Specifies a function that overrides the rendering of groups but does not affect the outside properties of the renderer (expand, collapse, etc.). |
Seeing how a widget’s data is filtered#
On a Dashboard, from the Widget Properties form, you can now see the filter operators for all parameters. This lets you see how your data is currently filtered:

Previously, you had to navigate to the Widget Builder and to the widget’s Filter stage to find out how its data are filtered.
Setting the Default Language to Spanish#
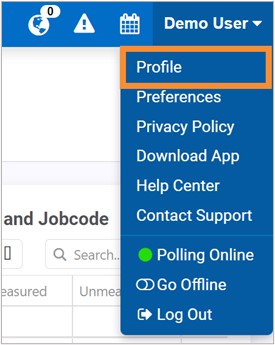
You can now switch the Rebus user interface to Spanish for your user account. If you change your account profile’s language to Spanish, the user interface will be updated so that labels are displayed in Spanish. 1. Select your profile name at the top-right corner of your screen, and then select ‘Profile’.
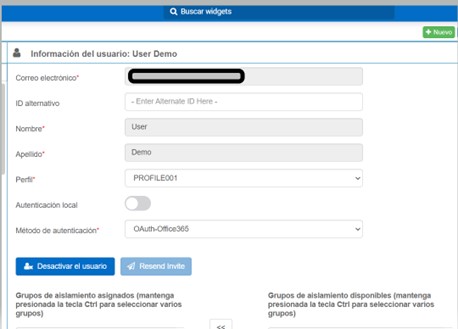
In the ‘Language’ dropdown, select a dialect of Spanish (e.g., Spanish – Chile), then click ‘Save Profile’.
To bring the change into effect, log out and sign back in your Rebus account.
You’ve set your Rebus account’s default language to Spanish.
Bug Fixes#
Super Widgets - Deleted widgets crashing BE
User Profile - Old Password Label is surrounded by some unwanted special characters