Release 27.1 Notes 11 July 2021#
Summary#
In this release, we’ve developed the following improvements:
Improving the look and feel of dashboards and notepads.
The ability to set up an alternate ID that can be used to login to Rebus.
The ability to restrict the systems and facilities users can see on Labor Maintenance screens.
The ability to change a labor user’s user group in one action
Improvements#
Dashboard Made More Intuitive#
The release changes dashboards so that they’re easier for new users to navigate, use, and understand:
Extra space has been added to the widget list search bar so that it accords with the conventions regarding the appearance of search bars on web sites.
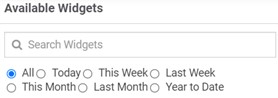
If you have the widget list open and scroll down, the widget list now always repositions itself so that it’s always accessible.
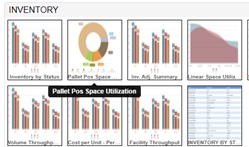
When you hover your pointer over a widget thumbnail, you can see the full tooltip. It’s no longer cut off.
An empty dashboard shows a message that invites you to get started and an ‘Add Widgets’ button.
Notepad matches New Look and Feel#
The appearance of the notepad on the Favorite Widgets screen has been updated so that it accords with the new user interface conventions of the Rebus application.

These changes include:
Clear headings at the top of forms that indicate the form’s purpose. There are three forms: Add Note, Edit Note, Note Views.
A ‘Selected Recipients’ label appears above the list of the note’s recipients.
The Delete button in the Edit Note form has been left-aligned so that it’s far away from the Cancel and Done buttons, which reduces the change of it being accidentally clicked.
In the Note Views form, the note content appears in the body and not in the header.
Time Out for Widget Builder queries#
This release adds a timeout limit of two minutes to database queries executed from the widget builder. If you are using the widget builder and you execute a query that lasts over two minutes, Rebus will shut down the query on the database end and show an error message that asks you to change the parameters of the query. This change helps to maintain fast database performance.
Alternate ID for Rebus Login#
You can now set up an alternate ID that you can use to login to Rebus. A new text field, Alternate ID, has been added to the User Information screen. It holds the user account’s alternate id.

When logging into your user account, you can enter the Alternate ID value into the Email Address field instead of the account’s original email address/username. Then you enter the account’s password to complete the login.
The alternate ID can be also used when logging into Rebus through SP-initiated SAML.
Note
 You cannot use the alternate ID to login to Rebus through Office 365.
An alternate ID must meet the following criteria:
Made up of alphanumeric characters or special characters. It can be in email format although it doesn’t have to be.
Unique in the Rebus system. I.e., not already used as an alternate ID or email address/username for any other Rebus account.
Kiosk Mode applied to all Selected Tabs#
If you select multiple tabs to open in Kiosk mode, all selected tabs will now be visible in Kiosk mode. Previously, you had to make sure that Auto-Rotate was toggled to Yes so that the carousel would cycle through all the pages of all selected tabs.
Archiving Retention Period of Quarantined Transactions Increased to 10 days#
The archiving retention period of quarantined transactions has been extended from three days to 10 days. This gives you the ability to resolve and reprocess quarantined transactions within 10 days instead of three.
Restricted Views on Labor Maintenance Screens#
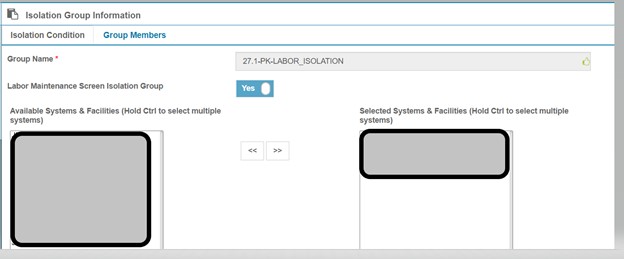
You can now create isolation groups to restrict what a user can see in dropdowns and lists on Labor Maintenance screens. Previously, a user who had access to any Labor Maintenance screen could view through its dropdowns and lists all facilities and systems. Members of Labor Maintenance Screen Isolation groups can see only those systems and facilities that they are authorized to see when they are using Labor Maintenance screens. The following screens are considered ‘Labor Maintenance screens’ for the purpose of this development:
User Preferences
Activity Adjustment Admin
Activity Configuration Admin
Activity Group Configuration Admin
Activity Log in
Labor User Group Admin
Matrix Configuration
Shift Admin
Transaction Error Review
Steps#
Go to Users> Isolation Group Maintenance. You are at the Isolation Group Information Screen.
Click +New.
Enter the group name.
Toggle the Labor Maintenance Screen Isolation Group radio button to yes.
Note
If you have already added an isolation rule to an isolation group, you cannot toggle the Labor Maintenance Screen Isolation Group button, and vice versa.
From the ‘Available Systems and Facilities’ section on the left, select the systems and facilities that should be visible to members of that isolation group and click on ‘>>’ to move them to the ‘Selected Systems & Facilities’ section on the right.
Note
To remove access to certain facilities and systems, select them from the ‘Selected Systems & Facilities’ section on the right and click on ‘<<’ to move them to the ‘Available Systems and Facilities’ section on the left.
Click ‘Save’. The isolation group is created for the specific systems and facilities.
Add users to the group. Select a user from the Available Users list and click ‘<<’ to add them to the Group Users list. To add multiple users at once, hold down the CTRL button, click the users you want to add, and then click ‘<<’.
Result#
The isolation group is saved with a list of systems and facilities and a list of members. Members of this isolation group can view only the selected systems and facilities when using the Labor Maintenance Screens.
Easily Changing a Labor User’s User Group#
You can now change a labor user’s user group in the Labor User Administration screen. Previously, you needed to unassign the labor user from their current user group and re-assign them to a new one. This improvement lets you change the user group in one action.
Steps#
Go to Labor -> Labor User Admin
Select an existing user from the left side.
Click on ‘Assign User to Usergroup’. A form appears.
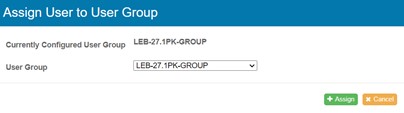
At the top, you see the currently assigned user group. Select the new user group in the bottom dropdown menu.
Click ‘Ok’.