Release 27.0 Notes 23 May 2021#
Summary#
In this release, we’ve developed the following improvements:
A re-designed navigation menu that makes certain procedures faster and easier to accomplish.
A re-designed home screen that lets you add widgets directly to the favorite widgets area without having to open another dashboard.
In the Labor Module, you can now copy an activity type including its steps and time components.
Improvements#
Home Screen Redesigned#
The Rebus home screen has been re-designed to make it easier for you to set up the favorite widgets area. Now you can add widgets directly to the home screen without having to open another dashboard. The home screen has a new screen title: ‘Favorite Widgets’. As on the previous home screen, the Favorite Widgets screen shows widgets on tabs, each of which can have multiple pages.
Adding Widgets and Tabs to the Favorite Widgets Screen
To add widgets to the Favorite Widgets screen, you must also at the same time create a new favorites tab to hold them. A tab can hold up to nine widgets.
Start the widget selection wizard.
The Favorite Widgets Screen is Empty…
The Favorite Widgets Screen has existing tabs…
Click ‘Add Widgets’.
Click ‘New Tab’.
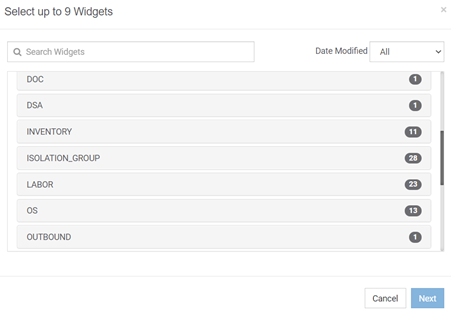
The first form of the widget selection wizard appears.

It shows a list of widget categories represented by grey rectangles. To filter the list by widget name, type the widget name in ‘Search Widgets’ text box. To filter by modified date, select a time range option from the Date Modified drop-down box.
For each widget that you want to add to the new tab, do the following:
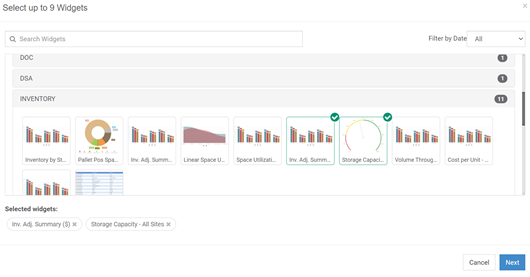
a)Select the widget category of the widget you want to put on the home screen. Thumbnails of the widgets in the selected category appear under the widget category label.
b)Click the widget that you want to add to the new tab.
A green checkmark denotes the selected widget. The name of the selected widget also appears under the ‘Selected widgets’ label.
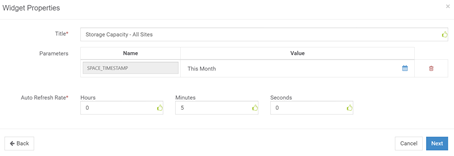
When you are finished selecting widgets, click ‘Next’. A Widget Properties form appears. It is populated with the default title and parameter values of the last selected widget. The wizard will cycle through the Widget Properties form of each of the selected widgets.
For each selected widget, do the following:
a)Set its title and parameter values.
b)Click ‘Next’. The wizard shows the widget properties of the next selected widget.
In the Enter Tab Name field, enter the name of the tab that will hold the selected widgets.
Click ‘Next’. You are at the Favorite Widgets screen, which now has the tab you created with the selected widgets.
Modifying Widgets on Home Screen
To modify a widget on the home screen, hover your pointer over its cogwheel button.
 The button expands to offer three options.
Button |
Click this button to… |
|---|---|
Remove the widget. |
|
Expand the widget so that it fills the home screen’s main display area. |
|
Open the widget properties form and change the widget’s parameter values. |
Other Widget Status Indicators that can be shown in the upper right Corner:
Icon |
What it means… |
|---|---|
Widget is frozen. I.e., its data is not being automatically refreshed. |
|
Widget’s data is being automatically refreshed. |
|
Widget is a member of a drilldown series. |
Moving between Pages
Each page of a tab is represented by a translucent circle at the bottom of the screen. The current page’s circle is blue. To display another page, click on its grey circle.
The current page’s circle is blue. To display another page, click on its grey circle.
Editing Display Options
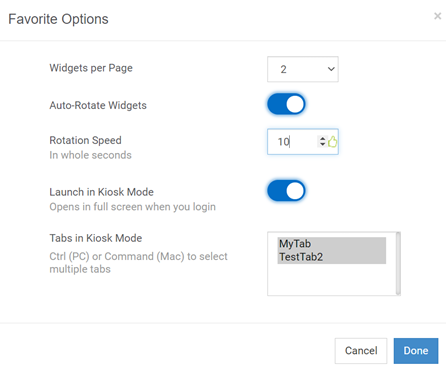
The Favorite Options form lets you decide how widgets are displayed. To open the Favorite Options form, click the cogwheel button  in the upper right. Through this form, you can determine the following:
How many widgets should be displayed on each page.
Whether Rebus should automatically cycle through pages and how long it will remain on each page.
Which tabs should be opened in Kiosk mode (i.e., full screen).
Note
 If you select multiple tabs to open in Kiosk mode, make sure that Auto-Rotate is toggled to Yes so that the carousel cycles through all the pages of all selected tabs. Otherwise only one tab will be shown.

Other Important Changes to Note on the Favorite Widgets Screen
Button/Functionality |
What’s Changed… |
|---|---|
Option moved to top bar of screen. The notepad now stays open even if you click outside it. To close the notepad, click the Notepad button. |
|
Option moved to top bar of screen. |
|
Help Center |
Option moved to dropdown menu accessed by clicking your account ID in the upper right. |
Download App |
Option moved to dropdown menu accessed by clicking your account ID in the upper right. |
Copying Activity Types within a System and Facility#
In the Labor Module, you can now copy an activity type including its steps and time components. This copying facilitates setting up an activity type and allows you to modify auxiliary fields, modify or reuse mappings, or assign the activity type to another activity group.
Constraints
You can only copy activity types within the same system and facility.
You cannot change the mapping type (i.e., enhanced vs simple) of the activity type.
You must change the name of each activity type copied.
Note
 The activity type will belong to the same activity group as the parent activity by default. You can change the activity group once you’ve finished copying the new activity type.
Go to Labor -> Activity Configuration Admin.
Select the System and Facility ID.
Select the activity type you want to copy and click ‘Copy Activity’.
Give the activity type a new name and description. You also have the option to enter a new time measurement.
Click Ok.
The next step depends on whether the copied activity type has a simple or an enhanced mapping.
Simple Mapping |
Enhanced Mapping |
|---|---|
You are done. The modal closes, but the mapping is not copied. You must configure a new mapping for the new activity. |
Another pop-up appears, showing the mapping of the activity. |
Note
 You cannot create duplicate mappings. You must configure a new mapping for all copied activities, otherwise the activity type will be invalid. This applies to both simple and enhanced mappings.
Modifying an Enhanced Mapping
If you are copying an enhanced mapping, a pop-up will appear. You have two options:
Option |
Action |
|---|---|
Modify a mapping |
Select the pencil icon |
Create a new mapping |
Select the + sign. |


