Release 26.0 Notes 21 March 2021#
Summary#
In this release, we’ve added new features and improvements that let you do the following:
Set up Service Provider (SP) initiated SAML authentication in your Rebus environment. With SP-initiated SAML set up, users can be authenticated through an Identity Provider (IdP) like Okta or Azure when they login through the Rebus login page.
Create widgets that are populated by enhanced joins. An enhanced join lets you join multiple data collections (i.e., data sources) on multiple fields that can be found in both sources instead of just one field as with the regular join.
Set a default system and facility ID for all menus in your labour module so that you don’t have to select them every time.
When adding a user to a shift and there’s a scheduling conflict, you can now choose to remove the user from the other shift to resolve the conflict and continue with your current selection.
New Features#
New Rebus Login Sequence#
The release changes the Rebus login screen so that logging in as a regular user is now a two-step process:
In the Email Address field, enter the email address of your Rebus account and then click ‘Next’. The Email address field goes away and the Password field appears.
In the Password field, enter the password of your Rebus account and then click ‘Sign In’. You are at the Home screen of the Rebus application.
Previously, the email and password fields appeared together on the login screen.
Setting Up Service Provider (SP) Initiated SAML#
You can now set up service provider (SP) initiated Security Assertion Markup Language (SAML) authentication in your Rebus environment. With SP-initiated SAML, users can be authenticated through an Identity Provider (IdP) like Okta or Azure when they login to Rebus through the Rebus login page. Through SP-initiated SAML, users access Rebus through their phones or other mobile devices.
Previously, you could only set up IdP-initiated SAML, where users would have to login to the IdP first, and then click on a button to access Rebus. You can have both SP and IdP-initiated SAML authentication working at the same time in your Rebus environment.
In SAML terminology, the service provider is the entity providing the service (e.g., Rebus) and the Identity Provider (IdP) is the entity providing the identities and the ability to authenticate a user.
Setting up your Rebus environment for SP-initiated SAML involves two procedures:
Setting up the SAML tab on the Org Admin screen, and
Setting up the Users who will be accessing via SP-initiated SAML.
Setting Up the Org Admin Screen for SP-initiated SAML
Prerequisite:
Your Rebus environment is already set up for IdP initiated SAML. If it isn’t and you want to enable SAML authentication in your Rebus environment, please contact Rebus Customer Support.
Go to the Administration -> System Administration -> Organization Admin screen and then click on the SAML tab. You are at the SAML tab.
Toggle the ‘Allow SP Authentication’ flag to ‘Yes’. Four fields appear underneath the flag.
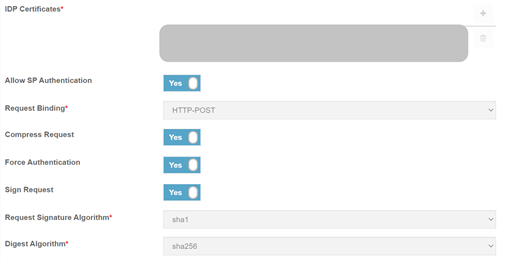
Fill in the SAML tab fields that pertain to setting up SP-initiated SAML:
Field
What you Enter…
Request Binding
Select the mechanism that will be used to transport SAML protocol messages:
HTTP POST enables SAML protocol messages to be transmitted within an HTML form by using base64-encoded content.
HTTP redirect enables SAML protocol messages to be transmitted within URL parameters.
Compress Request
Whether to compress the authentication requests to the IdP.
Force Authentication
Whether users are forced to login again if they close a browser tab or window displaying Rebus and then try to access Rebus again.
Sign Request
Whether authentication requests to the IdP are digitally signed
Request Signature Algorithm
Select the algorithm used to digitally sign authentication requests sent to the IdP.
Digest Algorithm
Select the algorithm used to generate a hash of the authentication request.
Click ‘Save’. Your Rebus environment is now set up for SP-initiated SAML authentication. Now you must set up the users who will be signing into Rebus through SP-initiated SAML.
Setting up Users for SP-initiated SAML
To set up a user for SP-initiated SAML, do the following:
In the Menu, select Administration -> Users Administration -> User Admin. You are at the User Admin screen.
Select the user that you want to set up to access Rebus through SP-initiated SAML. The user’s details appear in the User Information screen.
Toggle the Local Authentication flag to ‘No’. The Authentication Method dropdown box appears.
In Authentication Method, select ‘saml-2.0’.
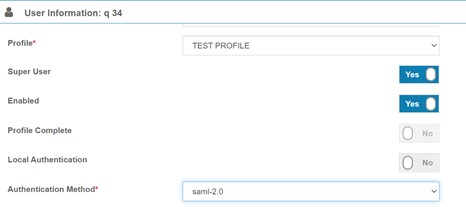
Click ‘Save’. The user is set up to access Rebus through SP-initiated SAML.
Improvements#
Resolving Conflicts when Adding Users to Shifts#
When adding a user to a shift and there’s a conflict (A labor user can’t be assigned to two shifts that are scheduled for the same day of the week.), you can now choose to remove the user from the other shift and continue with your current selection. This lets you solve a conflicting shift validation error in one action.
Previously, if you had tried to add a user and there was a conflict, Rebus would have generated an error, and then would have brought you back to the Shift Admin menu in the Labor Module. With the new improvement, Rebus shows you the list of conflicting users along with the conflicting shifts. You can proceed in two ways:
Option |
Result |
|---|---|
Continue with the selection. |
Conflicting users are deleted from the other shift and added to the new one. |
Do not continue with the selection. |
You are taken back to the add user page to modify the selection. |
Setting a Default System and Facility ID#
You can now set a default system and facility ID for all menus in your labour module so that you don’t have to select them every time.
Note
 If no default choice is selected and there is only one system and one facility in the list, they will be selected by default.
Steps
Go to Labor Administration -> Preferences -> Default Preferences Tab.
Note
On every Labor Module menu screen, there is a manage preferences button that takes you to the default preference tab on the preferences screen.
Select the default system and facility ID. You also have the option to select a default system and leave the facility ID blank.
Result
The default system and facility ID will be automatically chosen on every labor module screen. This includes the following pages: Activity Adjustment Admin, Activity Configuration Admin, Activity group Details, Activity Log In, Labour User Admin, Labor User Group Admin, Existing Shifts, and Transaction Error Review.
Building Widgets Using Enhanced Joins#
You can now create an enhanced join in the Join Collection stage of the non-guided mode of the widget builder. An enhanced join lets you join multiple data collections (i.e., data sources) on multiple fields that can be found in both sources instead of just one field as with the regular join. You can even join several data sources by nesting joins within an enhanced join. For each enhanced join created, you can also configure all non-guided mode widget builder stages, such as adding filters and selecting the display fields.
You can use the enhanced join to connect several data sources so that you can use fields from more than one source in a single widget. Joining on multiple fields lets you join data sources that don’t have a single common field. Instead, you can connect the data sources on fields whose combined values match.
Steps
Note
You cannot create enhanced joins on superwidgets.
Part 1: Preparing the Data
Go to Administration -> Widget Administration -> Widget Builder.
Click +New in the top right corner.
Select Non-Guided Mode.
Fill in the basic information requested and then click Next.
Filter the data and click Next. You are prompted to select the next stage.
Part 2: Join Collection Stage
Click ‘Join Collection’. You are at the Join Collection stage.
Toggle the Enhanced Join toggle flag to ‘Yes’. Two radio buttons, ‘Full Join’ and ‘Left Join’, appear.
In the ‘Select the collection to join’ dropdown, select the data source that you want to join to the widget’s currently selected data source.
Select the type of join you want to make.
Type of Join# Type of Join
Result
Full Join
A table that includes only the matching records from either the first table or the second table.
Left Join
A table that includes all records from the first table (i.e., the left table) and the matching records from the second table.
Click on the green + sign next to ‘Build Query for Enhanced Join’.

You are taken to the first step of the Enhanced Join process, which is the Filters stage of the joined data collection created by the enhanced join. Add conditions to filter the data collection.
Part 3: Setting up the Stages for the Enhanced Join
In the Filters stage, add conditions to filter the data collection.
Note
You must add at least one date condition.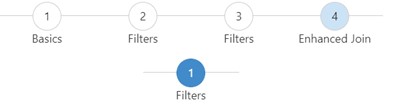
Note
At any point, you can click on Cancel Join to discard the current join and return to the Join Collection stage.Select the next stage of the Enhanced Join process: Filters, Limit, Display Fields, Group, Sort, Join Collection, and Explode Array work the same way as they do in the Widget Builder Stages.
You can add another nested Join Collection stage within an enhanced join to join more than two data sources. A Join Collection stage in an Enhanced Join process lets you create a regular join or another enhanced join. A new type of stage, the Join Condition stage, is specific to building enhanced joins. The enhanced join must have at least one Join Condition stage.
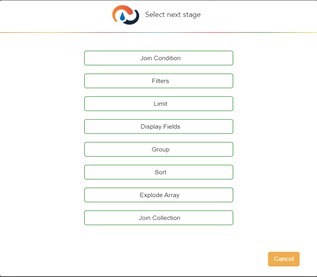
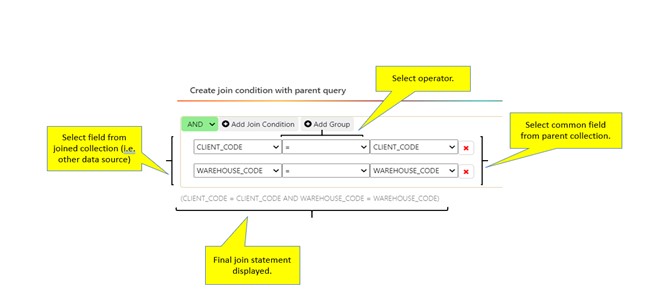
Setting up the Join Condition Stage
The join condition stage lets you join the two data sources by using two or more fields. You can compare the two fields using one of several operators, such as =, =>, <=, etc.
Creating a Join Condition# Feature
Description
Logical Operator
Can choose between AND, OR.
Add Join Condition
Select field, operator, and parent field.
Add Group
To add a group of join conditions nested under a new logical operator.
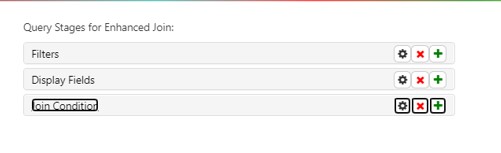
Click on ‘Finish Join’. You are at the Enhanced Join stage. Rebus lists all changes made to that join in the Query Stages for the Enhanced Join section.
Bug Fix#
Labor User Group - Selected Users list is not cleared out if user select another system.
Org Maintenance SAML Page - Tweak Labels and Layout
QA Portal - Filtering by GROUP STATUS doesn’t work.