Release 24.0 Notes 18 September 2020#
Summary#
In this release and various minor releases that have been deployed since release 23.0, we’ve added new features and improvements that let you do the following:
Set up widgets where you can filter data based on shifts.
Add widget builder stages to superwidgets.
Apply isolation groups to data collections created through the custom data entry screen.
Set up Application Programming Interface (API) user accounts through the Organization Admin screen.
New Features#
Filtering Widgets based on Shifts#
You can now set up widgets whose data can be filtered based on shifts in your facilities. Shifts are facility-specific recurring periods of time in which similar tasks are performed. The shift filter lets you see more details about the transactions that took place during the shift.
Step 1: Enabling Shifts#
To use shifts as a filter, you need to enable them for your organization.
Go to Administration > System Administration > Organization Admin > System Details.
On the ‘System Information’ screen, make sure that ‘Translate Date’ is selected.
Select ‘Apply Shift’.
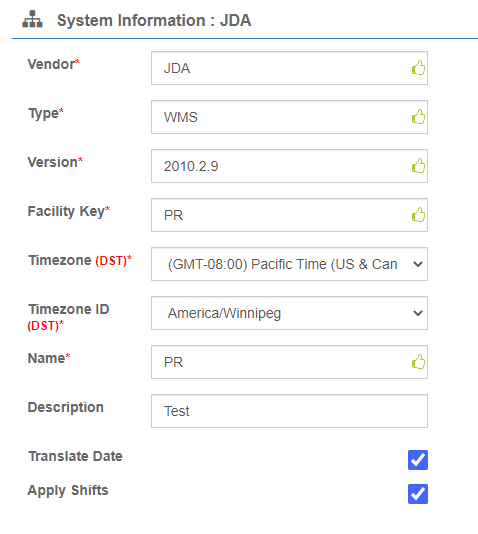
Result: You have enabled the ability to use shifts as a filter. You now need to configure shifts for your facilities.
Step 2: Configuring your Organization’s Shifts#
This procedure goes over how to set up a shift for your organization.
Note
 If your organization uses Rebus’s Labor Module, you can import your labor module’s shifts by clicking on ‘Import Shifts From Labor’ in the upper right corner.
Prerequisite:
Have facilities set up for your system.
Know the details of the shifts that you intend to set up.
Steps:
Go to Administration > System Administration > Organization Admin > Facility Shift.
Click ‘+New shift’.
Fill in the required information in the ‘Shift Information’ page:
Field |
What You Enter… |
|---|---|
Shift Name |
Name of shift. |
Shift ID |
Automatically filled by Rebus. |
Start Time |
Shift’s start time. |
Plus Day |
Must be used for shifts that go past midnight (12:00 AM). If you set this to ‘1’, this shift will be considered part of the previous day even if it runs past midnight. |
Stop Time |
Shift’s end time. |
Days of the Week |
The days of the week during which this shift is scheduled. |
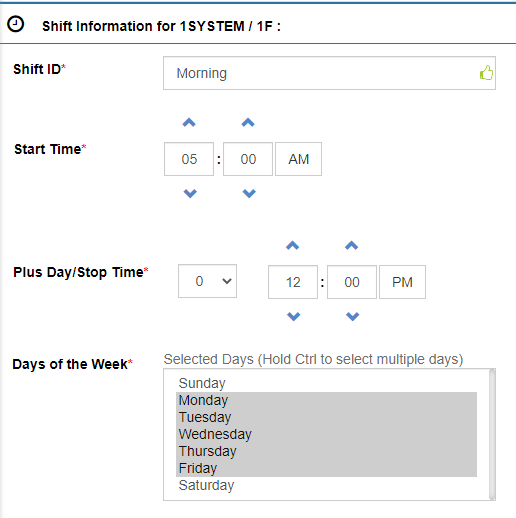
Click ‘Save’.
Result: You have configured a shift for your facility. When you have set up all shifts for the facility, continue with Step 3 – Configure a local date field for your collection
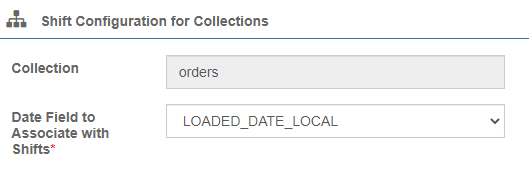
Step 3: Configure a local date for your collection#
To be used with the shift filter, a data collection has to be configured with the local date field that represents the main activity being recorded. This is so that Rebus knows which date should be considered to select the data for a shift when that filter is applied. For example, the ‘Orders’ collection records its main activity in the ‘loaded_date_local’ field. You can associate a local date field with as many collections as you want.
Consider the ‘Morning’ shift configured for facility F1 and the data sample below:
Field |
Value |
|---|---|
Shift Name |
Morning |
Shift ID |
F1-MORNING |
Start Time |
0600 |
Stop Time |
12:59 |
Days of the Week |
Monday to Friday |
Associating the order’s collection with the ‘loaded_date_local’ field and then applying the ‘Morning’ shift as a filter would only display the two first rows, as they are the only one having a loaded_date_local occurring during the morning shift, which takes place between 6 AM and 12:59 AM for the F1 facility.

Steps:
Go to Administration > System Administration > Organization Admin > Shift Details.
In the ‘Configured Collections’ panel, select the collection for which you wish to configure a local date field.
Select which local date field you want to associate to the collection.
Click ‘Save’.
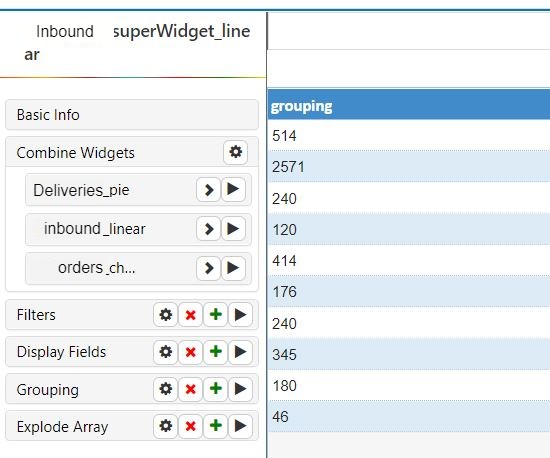
Adding Stages to Superwidgets in Widget builder#
In the Widget Builder screen, you can now add widget builder stages to superwidgets, which lets you process and format superwidget data in the same way you can an ordinary widget’s.
The Widget Builder interface has been changed in the following ways for superwidgets:
In the Combine Widget stage, the labels that denote the component widgets are listed underneath the stage label and indented.
A new button, ‘Add Stage’, lets you add widget builder stages after the Combine Widget stage.
To edit the list of component widgets, click the cogwheel icon of the Combine Widget stage.
When adding a widget builder stage to a superwidget, be aware of the following:
The Combine Widget stage must be the first stage after the Basics stage.
For superwidgets, a Filter stage isn’t required.
In the Filter stage, you can’t add a parameter whose name matches that of a parameter that’s already used in one of the superwidget’s component widgets. If you try to do so, you’ll get a warning message.
You can’t add a Join Collection stage.
Other points about editing superwidgets:
If you change the list of component widgets, all stages after Combine Widget will be automatically removed and will have to be manually re-added.
If you change how a component widget processes data, that change will be reflected in any superwidget of which it is a part.
A superwidget shows in a single chart the combined data of more than one active widget. A superwidget’s data set is a union of the data of its component widgets.
Improvements#
Applying Isolation Groups to Custom Data#
You can now apply isolation groups to data collections created through the custom data entry screen. When viewing widgets on dashboards, members of an isolation group can see only the data that the group’s isolation rule authorizes them to see regardless of how those widgets are otherwise set up to display data. The custom data functionality lets you manually enter data that you want to use in a widget but that does not come from your system.
Setting up API user accounts for Data Extraction#
A tab on the Organization Admin screen, API Users, lets you set up API user accounts through which you can send GET queries to retrieve widget data from the Rebus database. This development is part of the Rebus Application Programming Interface (API) functionality.
Pre-requisites
Access to the Organization Admin screen.
The IP address of the machine that will be sending requests. In most cases, this should be the static IP address of your external (public) network. The website https://www.whatismyip.com/ is a good online tool that can help you find the right IP address.
Go to the Organization Admin screen and click the API Users tab, and then
Click the ‘New User’ button and fill in the needed details. An API user account stores the following authentication-related details:
Field |
What You Enter… |
|---|---|
User ID |
Set up automatically. Identifier of account that is sending API requests. |
Password |
Password for account. Password must meet the following criteria: 1) Minimum length of 12 characters. 2) Contain at least one of each of the following: uppercase and lowercase letters, numbers, and special characters. |
White Listed IP |
The authorized IP address from where the API requests are sent. In most cases, this should be the static IP address of your external (public) network. The website https://www.whatismyip.com/ is a good online tool that can help you find the right IP address. 1) Must be in IPv4 format. 2) Can set up a maximum of three white listed IPs. |
For an application to be authenticated to send API requests, it needs to be configured with the user ID and password of an API user account and its IP address needs to be among the IP addresses whitelisted for that account. You can create up to five API user accounts.
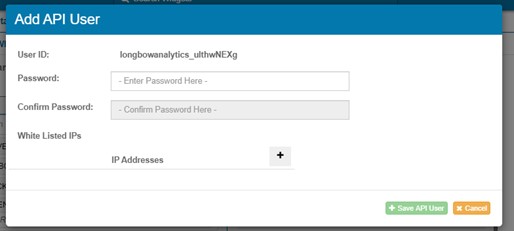
Click ‘Save API User’. The API user account is created.
Assigning Widgets and Setting the GET Query Endpoint URL#
Pre-requisites
Widgets set up that have the data you want to retrieve via API.
After setting up the API user account on the Organization Admin screen, do the following:
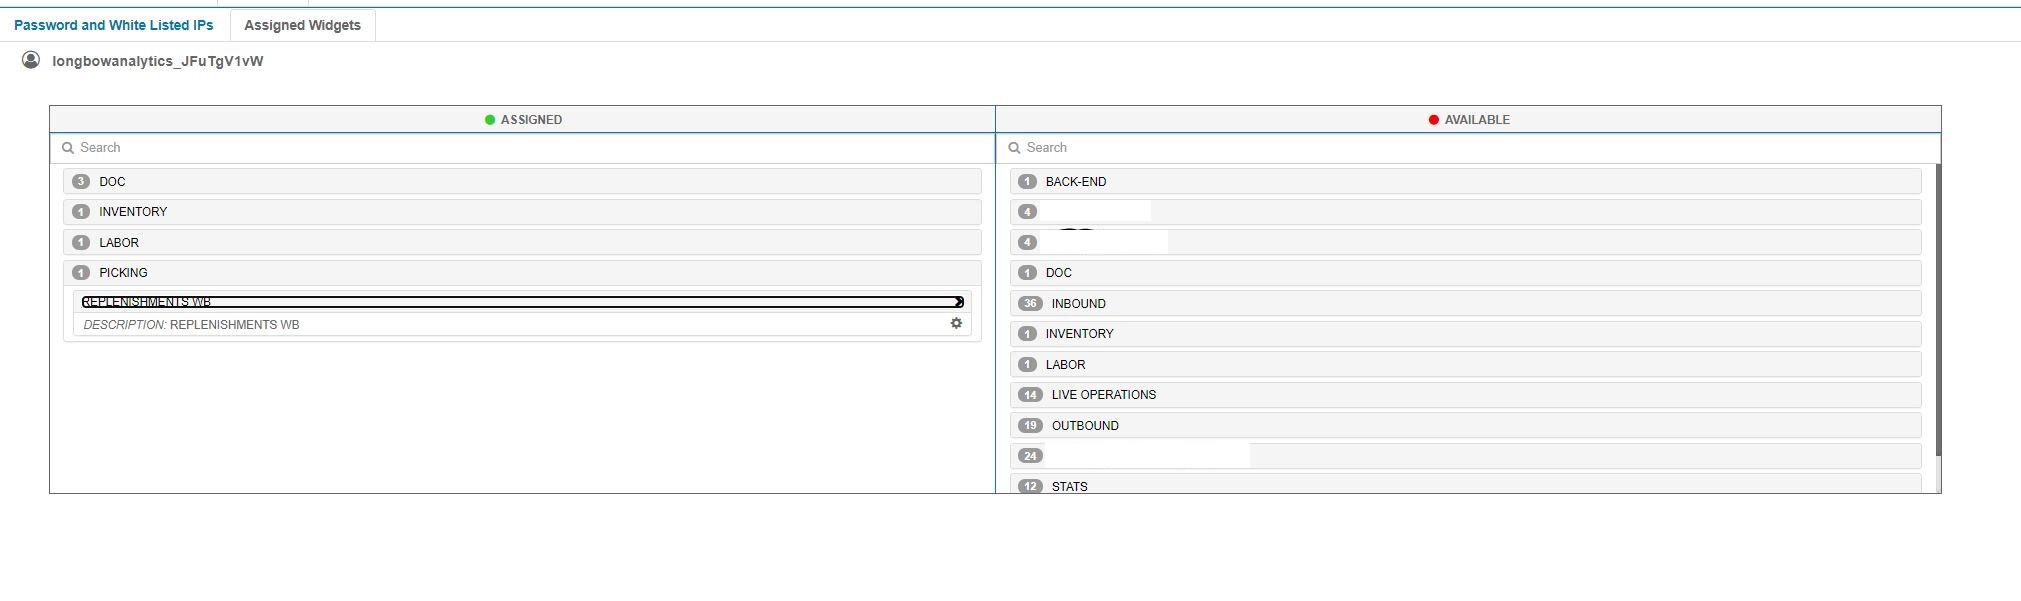
Open the API user account’s Assigned Widgets tab.
Assign to the user account the widget data collections from which this account is authorized to retrieve data. You can move widgets from the Available list to the Assigned list by clicking the ‘<’ button.
To set the endpoint URL of the GET query for an assigned widget, do the following:
1. Click the widget’s name and then click the gearwheel button. The widget’s URL Builder form appears. This form shows all the widget’s parameters and the default values that are used to populate the widget. At the bottom, the URL value shows the query string of the widget’s GET query endpoint URL.
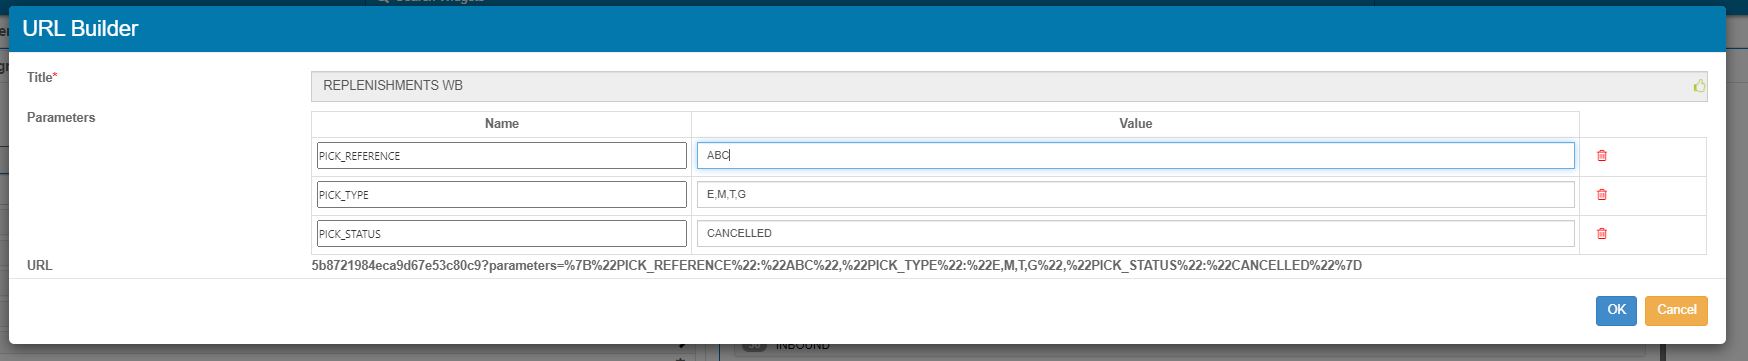
Adjust the parameter values to those you want the GET query to use when you are retrieving this widget’s data via API. The query string is changed to reflect any changes made to the parameter values.
Copy the query string at the bottom of the form and paste it someplace where you can easily get it when you are configuring the application that will be sending GET queries. You will append the query string to another value to build the full GET query endpoint URL for this widget.
Example of query string:
5b8721984eca9d67e53c80c9?parameters=%7B%22PICK_REFERENCE%22:%22ABC%22,%22PICK_TYPE%22:%22E,M,T,G%22,%22PICK_STATUS%22:%22CANCELLED%22%7D
Sending GET Queries for a Widget#
To retrieve data from a widget’s data collection via a GET query, your application (the client) must open a session with the Rebus API server. To open a session, it must do the following:
Have an IP address that is whitelisted for its API user account.
Send to the Rebus API server a POST query with the authentication credentials of its API user account.
Endpoint URL for Authentication |
Body of Post |
|---|---|
{“api_username”:”USERNAME”, “api_password”:”PASSWORD”} |
Example in Postman:
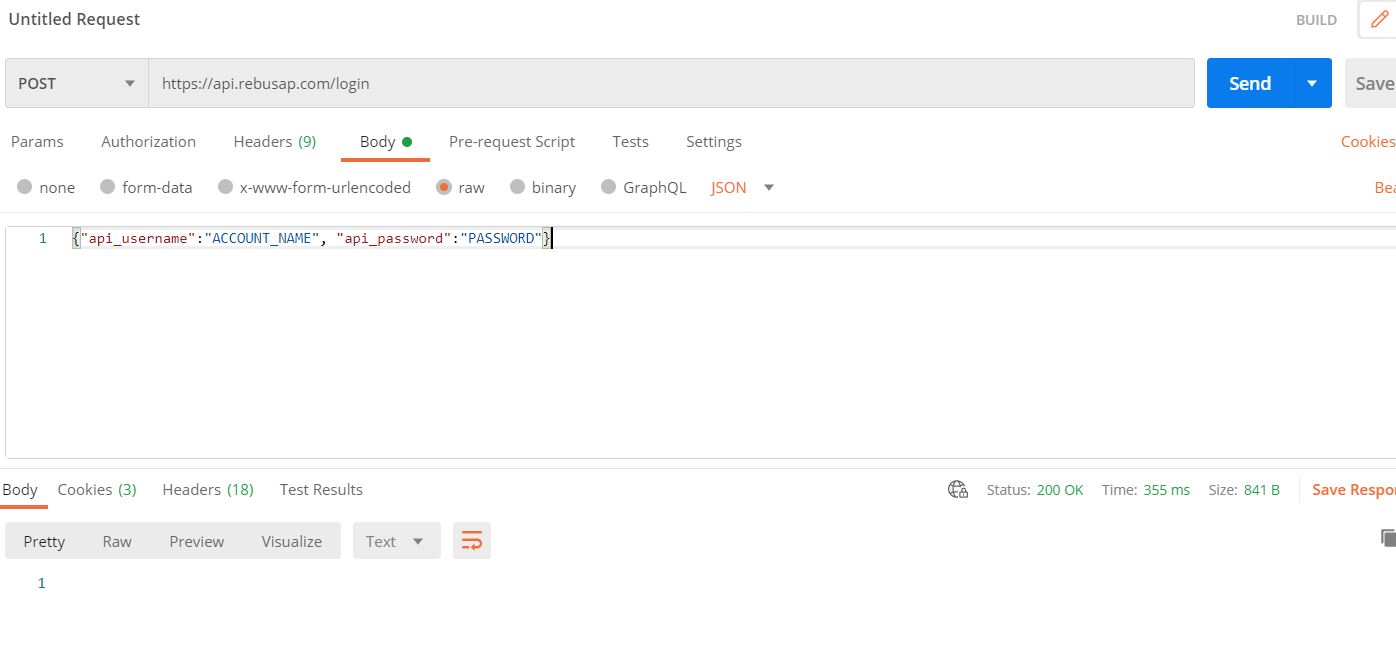
If the client is authenticated, it will receive a 200 OK status message and a session cookie, which lets it send GET queries for a limited time.
GET Queries#
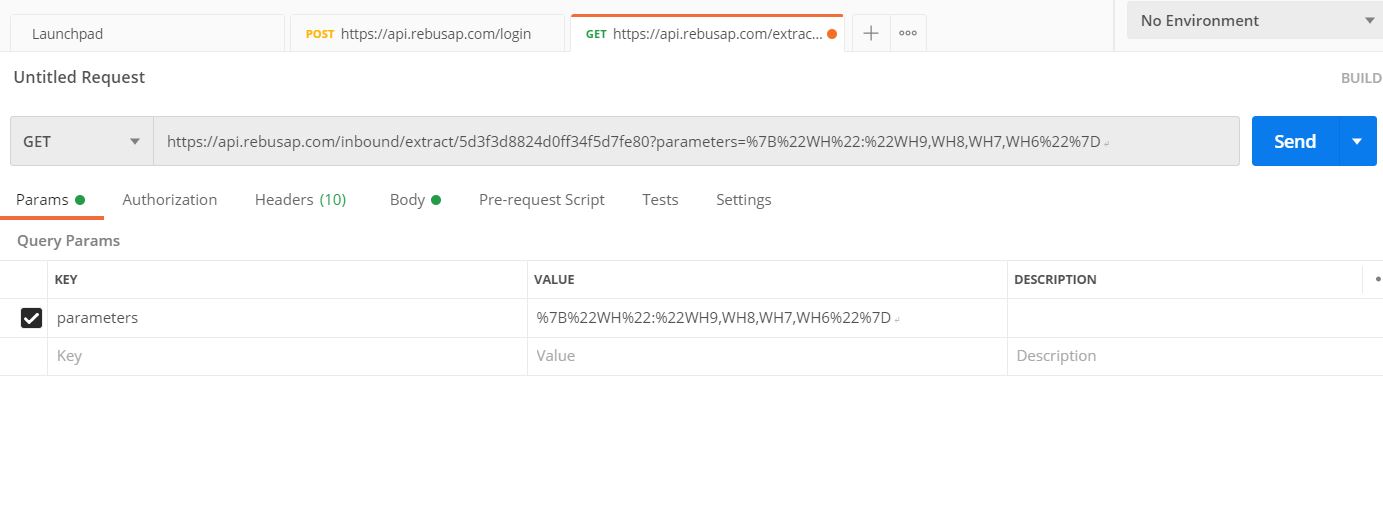
The client can now send GET queries to the Rebus API server. A properly formatted GET query endpoint URL comprises two parts.
Part 1: The host and path name, which is constant:
https://api.rebusap.com/inbound/extract/
and
Part 2: The query string for the widget, which is taken from the API user account record on the Organization Admin screen.
Example:
5b8721984eca9d67e53c80c9?parameters=%7B%22PICK_REFERENCE%22:%22ABC%22,%22PICK_TYPE%22:%22E,M,T,G%22,%22PICK_STATUS%22:%22CANCELLED%22%7D
To build the GET query endpoint URL, the query string is appended to the host and path name:
Example:
https://api.rebusap.com/inbound/extract/5b8721984eca9d67e53c80c9?parameters=%7B%22PICK_REFERENCE%22:%22ABC%22,%22PICK_TYPE%22:%22E,M,T,G%22,%22PICK_STATUS%22:%22CANCELLED%22%7D
Example in Postman:
New Filter in QA Module Product Update History#
You can now use the ‘NOT IN’ filter to select data in the Product Update History screen of the Quality Assurance Module.
Paragraph added to Rebus Privacy Policy#
The Rebus privacy policy has been updated with a paragraph to cover the recently published Rebus User Forum site:
Rebus makes it possible for you to upload and share comments or feedback publicly with other users, such as on the Rebus User Forum site. Any information that you submit through such public features is not confidential, and Longbow may use it for any purpose (including in testimonials or other marketing materials). Any information you post openly in these ways will be available to the public at large and potentially accessible through third-party search engines. Such information can be read, collected and/or used by other users, and it could be used to send you unsolicited messages. Accordingly, please take care when using these features of the Services.
If you have any questions about this change to our privacy policy, please contact your Rebus representative.
Bug Fix#
Widget Builder#
Custom Data Entry Seeded Widgets Have Incorrect Stage Number
Console error clicking previous to limit stage
Widget Function Maintenance - Deleting one Argument Deletes Several
Widgets#
ChartProperty Data Lost on Copied Grid Widget When Changing its Group
Favorite Widgets- Sequence of tab is not correct on dashboard
Cascading Widgets - Deactivating Parent Widget causes errors
Labor Processing#
Processed transactions can get quarantined if activity is deleted
Isolation Groups#
After selecting Number or Boolean field in isolation group then user still able to see restricted data in new widget builder
Activity Adjustments#
When a user makes an adjustment and chooses save, the grid returns to page 1 instead of staying on the current page
Grid has a 1/2-1 inch white space on the screen, to remove this the user must turn on full screen.
Activity Adjustment grid (and Rebus data ) shows in military time
When choosing users from the left side of Activity Adjustments the users are in order by last name, first name (User ID).
Other#
SAML issues