Release 21.0 Notes 20 March 2020#
Summary#
In this release and in various minor releases that have been deployed since release 20.0, we’ve added new features that let you do the following:
Set up dashboard templates that can be shared with your team members.
Build ‘superwidgets’ that let you combine data from multiple widgets without having to use the Join Collection stage.
Manually enter into a widget a data set that doesn’t come from your Warehouse Management System (WMS).
Along with other improvements and bug fixes.
New Features#
Dashboard Publisher#
You can now set up dashboard templates and share them with your team members. A dashboard template is a configured set of widgets. Dashboard templates reduce the setup time for dashboards and helps to ensure that every team member has access to the same sets of widgets.
With a public template, subscribers can edit and share the dashboard as they would one of their own. Public templates are like shared dashboards, but the template is automatically applied to the menu of every user in the profile. With a restricted template, subscribers are restricted from editing or sharing the dashboard and versioning takes place. Every time a new version is published, the dashboard template and its version number are automatically updated for all the subscribers. You can also select ‘Allow Filter Change’ on a restricted template to enable users to change a widget’s parameters.
Features |
Restricted |
Public |
|---|---|---|
Versioning |
Incremented by one each time a new version is published. |
Not maintained |
Adding or deleting widgets |
Allowed only to template’s owner. |
Allowed |
Deleting dashboard |
Not allowed |
Allowed |
Changing Dashboard title |
Allowed only to template’s owner |
Allowed |
Positioning and sizing widget |
Allowed |
Allowed |
Changing widget parameters |
Allowed if the ‘Allow Filter Change’ option is checked |
Allowed |
Changing widget title |
Allowed only to template’s owner |
Allowed |
Exporting/printing widgets |
Allowed |
Allowed |
Drill down and Cascading widgets |
Allowed |
Allowed |
Changing widget refresh timer |
Allowed |
Allowed |
When new users added to template’s profile |
Template applied to user with the most recent published version. |
Template applied to user. |
Setting Up a Dashboard Template#
Prerequisites:
You have access to the ‘Dashboard Publisher Configuration’ screen.
The dashboard you want to use as a template is already set up.
Profile restrictions and isolation groups apply to the dashboard template. Make sure that all the subscribers are part of a profile that is allowed to see the widgets on the template and that no user is part of an isolation group that conflicts with the information displayed in the dashboard template.
Steps
In the Menu header, click on the dropdown arrow and select the Settings button.
Click the Dashboard Publisher icon

The ‘Dashboard Publisher Configuration’ screen appears. Fill in the form:
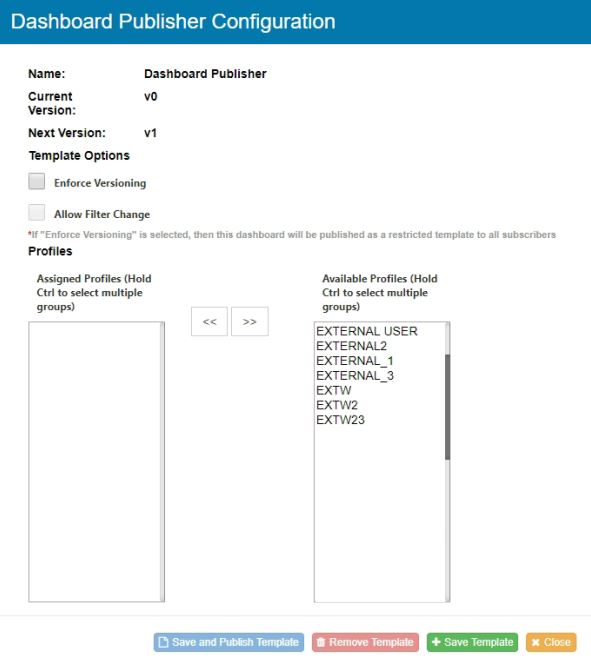
Field Name
Description
Restricted Type
Enforces versioning. Subscribers cannot share, delete or edit the dashboard.
Allow Filter Change
Allows subscribers of a restricted template to change a widget’s parameters.
Profile
Profiles with which the dashboard template will be automatically shared.
Click on ‘Save and Publish Template’ and confirm that you want to share it with all the assigned profiles.
Results
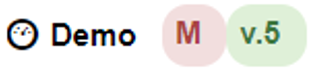
All the users that are part of the profiles you selected can see the dashboard in their menu. As the dashboard owner, you also see a red M next to the dashboard’s title. If the template is restricted, the version number will be visible to all the subscribers. If the template is public, the version number will always be 0 and will only be visible by the owner.
Publishing Dashboard Templates#
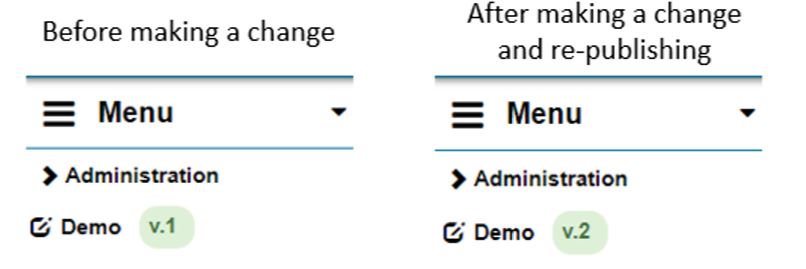
Restricted Dashboard Template | When a restricted template is edited and re-published by the owner, the version number is incremented by 1 and the dashboard’s data is automatically updated for all its subscribers.
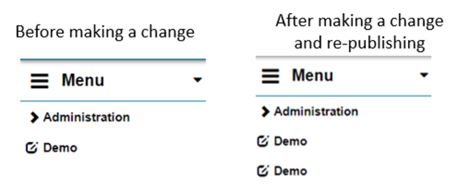
Public Dashboard Template | When a public template is edited and re-published by the owner, a new version of the dashboard is automatically applied to the subscriber’s menu in addition to the previous version.
Deleting/Editing a Dashboard Template#
If you are the owner of a dashboard template, you can edit it or delete it through the ‘Dashboard Publisher Configuration’ screen, or you can change the ownership through the ‘Dashboard Publisher Reassignment’ screen. If you are the owner of a dashboard template, a red M will be visible next to the dashboard’s name in the menu.
Deleting You can delete your template through the Dashboard Publisher Configuration screen or through the Dashboard Publisher Reassignment screen.
Through the Dashboard Publisher Configuration Screen
1. In the Menu header, click on the dropdown arrow and select the Settings button.
2. Click the Dashboard Publisher icon next to the Dashboard you want to delete. The ‘Dashboard Publisher Configuration’ screen appears.
3. Click on ‘Remove Template’ to delete your dashboard template.
If Template is Restricted…
Is Template is Public…
It disappears from the menus of all its subscribers.
It remains accessible to all its former subscribers, but no new version is published.
Editing Steps
In the Menu header, click on the dropdown arrow and select the Settings button.
Click the Dashboard Publisher icon
next to the dashboard you want to edit. The ‘Dashboard Publisher Configuration’ screen appears. The following fields can be edited:
* Enforce Versioning (Restricted Type Indicator)
* Allow Filter Change
* ProfileClick ‘Save and Publish Template’ and confirm that you want to share it with all the assigned profiles.
Changing the Owner#
You can change the owner of a dashboard template if it was published at least once as a restricted template. Ownership cannot be changed on a template that has always been public.
If you change the ownership of a currently public template that was published as a restricted template in the past, the dashboard template will revert to the last restricted template version.
You can see who the owner of a dashboard template is by hovering your mouse over the template’s name in your menu.
Prerequisites:
You have access to the ‘Dashboard Publisher Reassignment’ screen.
The previous owner published the most recent changes made to the dashboard.
The template was published at least once as a restricted template.
Steps:
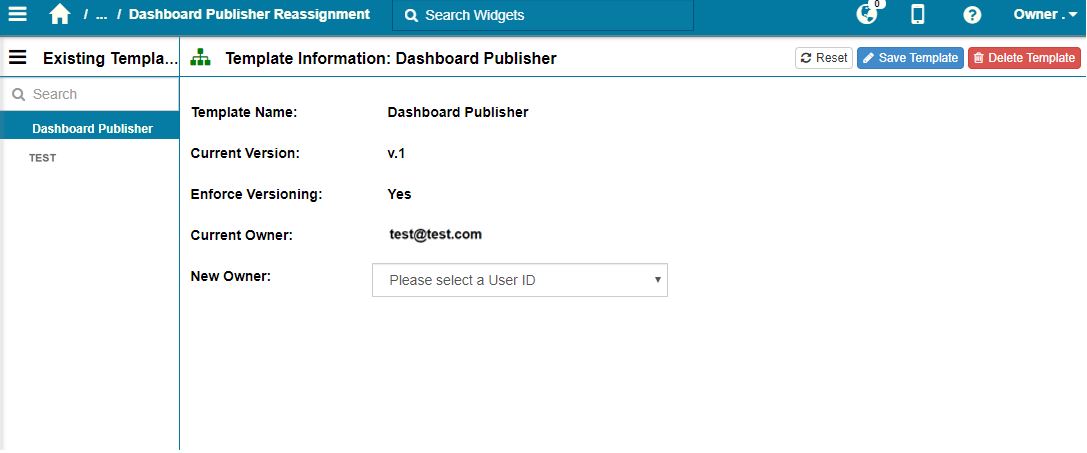
Go to Administration > Widget Administration > Dashboard Publisher Reassignment.
In the ‘Existing Template’ section, select the template that you want to modify.
Through the dropdown menu, Select a new Owner.
Click on ‘Save Template’.
Results
The new owner sees as red M next to the dashboard template’s name. The previous owner no longer sees a red M next to the dashboard template’s name but still is a subscriber. If the previous owner is removed from the dashboard template’s subscribers, they retain a copy of the dashboard but it is no longer updated.
Building Superwidgets - Combining Multiple Widgets#
You can now create ‘superwidgets’ that show in a single chart the combined data of multiple active widgets. A new widget builder stage, ‘Combine Widgets’, lets you create a superwidget and select its component widgets whose combined data will be shown. This functionality lets you easily build a widget that has data from multiple data sets. It’s best used as a last resort when you can’t get a single widget to display the information you want.
Note
A superwidget should not be regarded as a substitute for a Join Collection stage. A superwidget does not let you select its data set based on filter criteria or join a data source to another based on a common field.
How Data is Merged in Superwidgets
A superwidget’s data set is a union of the data of its component widgets. I.e., the data sets of the multiple data sources are simply merged together into a larger data set. There is no check for duplicate records. If two or more component widgets have a column with the same name, there will be a single column with that name in the superwidget data set and the values from that column from all the component widgets will be listed under it.
Note
The filter stages of each component widget don’t combine to become the superwidget’s filter criteria. Therefore if one component widget has a filter to select for all orders in WH1 and another has a filter to select for all orders of customer ‘XYZ’, the combined data set will not show all orders at WH1 that are for XYZ.
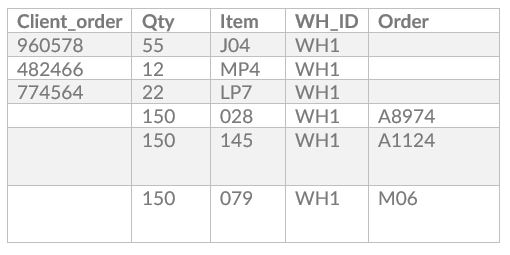
Example: Data from Two Component Widgets

Here, data from two component widgets (Data Source A and Data Source B) is being combined. Three column names, Qty, Item and WH_ID, are shared between the two component widgets.
Merged Data Set for Superwidget
Creating Superwidgets
A new ‘Combine’ toggle button has been added to the Basics stage of the widget builder. If you toggle this to ‘Yes’, the option to select a data collection will be removed and the next required stage will be the Combine Widgets stage. At the Combine Widgets stage, in the Existing Widgets by Groups box, select the active widgets whose combined data will be shown in the superwidget. You can change the order of the component widgets by clicking and dragging the widget name in the Assigned box. After the Combine Widgets stage, you can open the Chart Designer to select the chart type to show the data.
A widget can be added to more than one superwidget.
Features of Superwidgets
You can do the same things with superwidgets that you do with typical widgets: e.g., adding them to dashboards, sharing them with other users, and including them in drilldowns. As with typical widgets, a user needs to be set up to access it through his or her user profile.
Note
Any change made to a widget in the Widget Builder carries through to any superwidget of which it is a component. If a component widget is deactivated, then any superwidget of which it is a component will also be deactivated.
Editing Superwidgets on a Dashboard
In a superwidget’s Properties form, you can change the parameters of each component widget. If two or more component widgets of the superwidget share a parameter; however, that parameter will appear only once.
Editing Superwidgets in the Widget Builder
In the Widget Builder screen, superwidgets are denoted by an orange diamond. Select the superwidget you want to edit and deactivate it. For a superwidget, the Widget Builder screen shows a menu with the top item representing the Basic Info stage and the component widgets listed beneath it.
You can perform the following actions:
Goal
What you do…
Seeing a sample of the data set produced by one component widget.
Click the chevron next to the component widget.
Seeing a sample of the data set produced by a series of component widgets starting at the top and ending at a selected widget.
Click the play button of the component widget.
Changing the component widgets that make up the superwidget.
Click the gearwheel button of the Basic Info stage. The Combine Widgets stage opens and you can change the widgets that make up the superwidget.
Manually Enter Data into Widgets#
The Data Entry functionality lets you manually enter data that you want to use in a widget but that does not come from your WMS. The Data Entry Setup screen lets you create a new collection in your Rebus database and specify the expected data format. The Custom Data Entry screen lets you populate your new collection by adding data manually or in bulk. Once created and populated, your collection is available in the widget builder.
Creating a new collection#
This procedure covers how to create a new collection in your Rebus application and how to add data to populate it.
Step 1 – Create a Form
A form is a template that indicates the structure of the collection you’re creating and the expected format of the data that populates it.
** Prerequisite:**
Have access to the Data Entry Setup screen
Know which fields should be set as unique fields
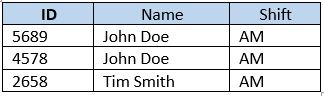
A unique field contains value that allows to identify a record in a table. It cannot contain duplicate values and cannot be edited or deleted once the form is created. The table in the example below shows two employees with the same name working on the same shift. The ‘ID’ unique field differentiates between them.
** Steps:**
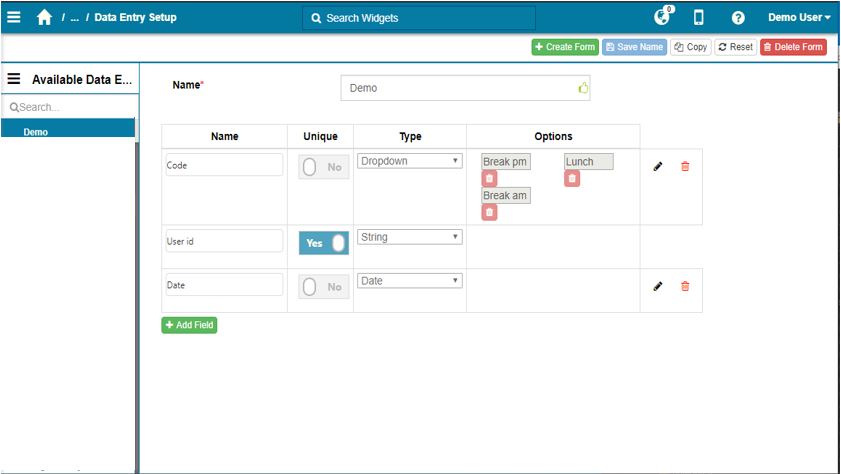
Go to Administration > System Administration > Data Entry Setup.
In the upper right corner, click ‘Create Form’.
Enter a name for your new Collection.
Click ‘Add Field’ and enter a name for your field.
Select a type for the data that will be entered in that field. You can add as many fields as you want.
Available Data Type# Data Type
Definition
Example
String
Represents text, both characters and spaces.
Start
Date
Date and time of the transaction.
Selected through date picker or following UTC format if added in bulk
Number
Represents a number’s full or fractional value.
5, 6.2
Boolean
Either true or false.
True
Dropdown
Creates a drop down with your own value. Click on ‘+Add Option’ to add a dropdown value.
Slide the ‘Unique’ button to ‘yes’ to indicate that you want that field to be a unique field.
Click ‘Save’.
Result
You have created a new collection and configured a form that indicates the expected format of the data.
Step 2 - Assign the New Form to a Profile
The form needs to be assigned to a user’s profile to become accessible.
Prerequisite:
Have access to the Profile Admin screen.
Steps:
Go to Administration > User administration > Profile Admin.
Click the ‘Custom Data Forms’ tab.
In the ‘Existing Profiles’ panel, click on the profile to which you want to assign a form.
In the ‘Unassigned’ section, find the form you want to add and click on the chevron to move it to the ‘Assigned’ section.
Click on the form you just added and select the permission level you want to grant to the profile’s users.
Click on ‘Save’.
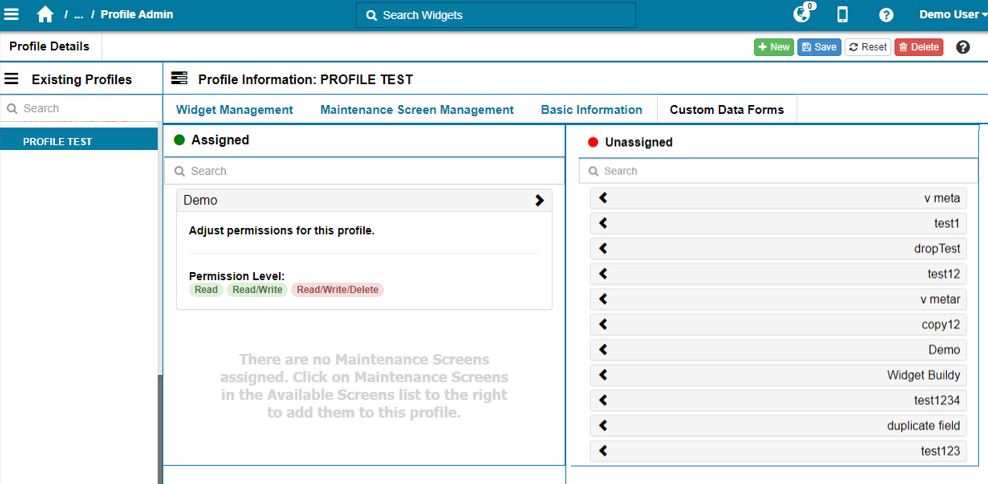
Result
All the users who are part of that profile and who have access to the Data Entry Setup screen or the Custom Data Entry screen can access the form.
Step 3 – Populate the Form
Populate your new collection by entering your own data. You can add data manually or in bulk using a CSV file.
Prerequisites:
Have access to the Custom Data Entry screen.
Optional: Have a CSV file ready.
Add Data Manually#
Steps:
Go to Administration > System Administration > Custom Data Entry.
In the ‘Available Data Entry Forms’ panel, select the form for which you want to add data.
Click ‘New Entry’ and populate the fields according to the previously configured data type.
Click ‘Save’.
Your data has been added to the collection. To see it, refresh your collection by clicking on ‘Search’ in the Filters panel.
Add Bulk Data#
Populate your new collection by entering your own data. You can add data manually or in bulk using a CSV file.
Headers must match the field names of your form.
All unique fields must have data. Non-unique fields can be left blank.
Date fields must follow the UTC format.

Prerequisites:
Have access to the Custom Data Entry screen. Optional: Have a CSV file ready for upload.
Steps:
Go to Administration > System Administration > Custom Data Entry.
In the ‘Available Data Entry Forms’ panel, select the form for which you want to add data.
To Add Data Manually
To Upload from a CSV
Click ‘New Entry’ and populate the fields according to the previously configured data type.
Click ‘Import From CSV’
Click ‘Save’
Select a CSV file from your computer and click ‘open’
Your data has been added to the collection. To see it, refresh your collection by clicking on ‘Search’ in the Filters panel.
Result
You have created a new collection, specified its structure and populated it. You can now access your new collection in the Widget Builder.
Filtering your Custom Data
You can filter your custom data using the column values of your form to select only the rows that you need.
** To filter your data: **
Go to Administration > System Administration > Custom Data Entry.
Select the form that you want in the ‘Available Data Entry Forms’ panel.
The ‘Available Data Entry Forms’ panel becomes the ‘Filters’ panel. To go back to the list of forms, click on ‘Back’.

In the ‘Filters’ panel, click ‘Search’ to refresh your collection and see the data available.
In the ‘Filters’ panel, click ‘+Add Filter’ and select the column that you want to use. You can use multiple filters at once, but each column can only be used once.
Click ‘Search’.
Result
Rebus only displays rows that have data for the configured filters.
Editing a Data Entry Form
You can add, modify or delete a field in a Data Entry form if that field was not set up as a unique field.
Steps:
Go to Administration > System Administration > Data Entry Setup.
From the ‘Available Data Entry Form’, select the form that you want to modify.
Make your desired changes to the form:
Type of Change
What You Do…
Modify the collection’s name
Edit the name in the ‘Name’ field at the top of the page.
Add a field
Click ‘+Add Field’, add a name and a data type and indicate if the field is unique or not.
Modify a field
Click
 next to the field you want to modify and make the desired changes. Click on
  to save the changes or on
  to cancel your changes.
Delete a field
Click
 in the field that you want to delete.
Add a dropdown option
In a field that has a ‘dropdown’ data type, click
. Click ‘+Add Option’ and add a name for the new value. Click on to save your changes.Modify a dropdown option
In a field that has a ‘dropdown’ data type, click
. Click on the option that you want to modify and add a new value. Click on to save your changes.Delete a dropdown option
In a field that has a ‘dropdown’ data type, click
. Click under the value that you want to delete and click on to save your changes.Delete the form
In the upper right corner, click ‘Delete Form’.
Editing Custom Data
You can add, modify or delete the data in a data entry form.
Go to Administration > System Administration > Custom Data Entry.
From the ‘Available Data Entry Form’, select the form that you want to modify.
In the ‘Filters’ panel, click ‘Search’ to visualize all of your data. You can also apply a filter to select only the data that you want.
Make your desired changes to the data:
Type of Change
What You Do…
Add an entry manually
Click ‘+New Entry’ and enter data in the required fields. Click ‘Save’.
Add bulk entries
In the upper right corner click ‘import CSV’. Select a ‘CSV’ file from your computer and click ‘Open’.
Edit an entry
Select the entry that you want to edit and click ‘Edit Entry’. Make the desired changes and click ‘Save’.
Delete an entry
Select the entry that you want to edit and click ‘Delete Entry’.
Improved Look and Feel for Rebus Mobile App#
We have changed the look and feel of the Rebus mobile application The redesigned screens allow you to access your password settings, personal profile, and dashboards.
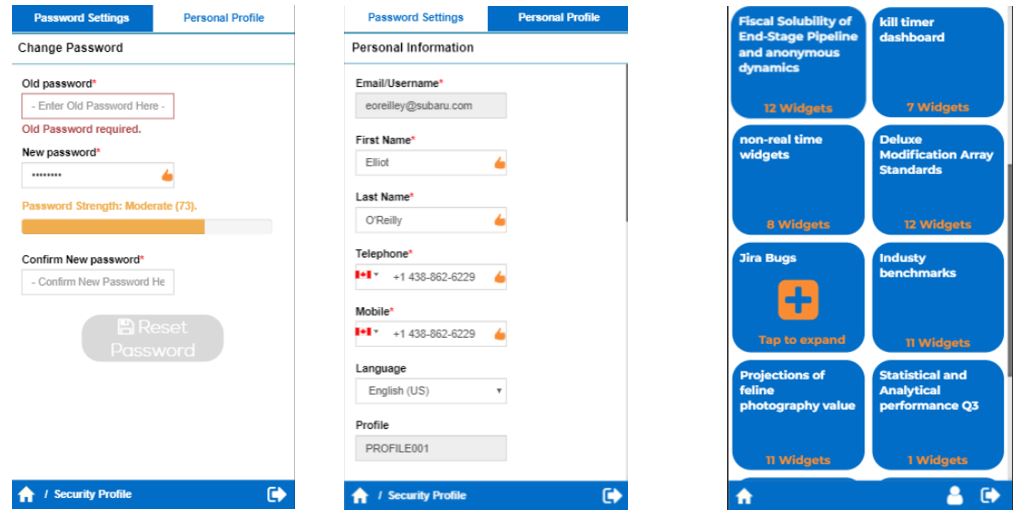
The parameter picker now lets you change your widgets’ configurations from your device. Click on the wheel icon to access and modify the parameters or click on the ADD ICON icon to modify the date parameter.
Improvements - Widget Builder#
Restrict the Amount of Data shown by a Widget#
You can now restrict the number of rows from the data set that’s used to populate a widget. A new Widget Builder stage, Limit, lets you specify the number of rows to select. A Limit stage takes the data set that’s been passed on from the previous stage, selects the specified number of rows from the top of the data set, and passes only these to the next stage. You can use a Sort stage to sort the data set into a preferred sort order before passing it to a Limit stage.
You can set up a Limit stage to restrict the number of rows of data you want users to access through a widget at any one time.
Note
Adding a Join Collection stage after a Limit stage undoes the Limit stage and creates a new data set that’s populated by the results from the joined tables as if the Limit stage had never been set up.
Selecting any Widget Builder stage#
The widget builder screen has been changed so that you can now edit any widget builder stage of any inactive widget. Previously, you could only edit a widget’s Filter stage and its final stage.
Note
If you change a widget stage (e.g., adding or removing a field), make the same change to all subsequent stages. Otherwise, the widget may not work as expected.
Using Null in Condition Functions#
In the widget builder, you can now set up a condition function that can return null. Previously a condition function’s two possible return expressions had to share the same data type (e.g., string or date). This makes it easier to set up certain types of widgets.
A condition function evaluates a boolean expression to return one of the two specified return expressions. condition(test,test_true,test_false).