Release 51.0 Notes 19 April 2026#
Summary#
In this release, we’ve developed the following new feature and improvements:
You can now use Rebus’s Intra-Day AI Agent, a new feature in Rebus AI that helps you manage outbound warehouse work more effectively throughout the day, directly from your dashboard.
In the AI Panel, you can now view your chat history, use chat suggestions for queries, and submit feedback on responses directly in the chat.
You can now filter by “Last X Hours” and “Next X Hours” on Dashboards, Favorites and in Widget Builder.
You can now reset your published dashboard layouts without requiring additional publisher roles or permissions.
The Travel Distance screen is now part of the Labor Hub and is available under the Setup tab as Travel.
AI Panel - New Feature#
AI Agent Helps with Outbound Orders#
You can now use Rebus’s Intra-Day AI Agent, a new feature in Rebus AI that helps you manage outbound warehouse work more effectively throughout the day, directly from your dashboard.
This tool helps you:
See which orders are ahead of or behind schedule,
Identify the most urgent orders, and
Get suggestions on moving associates to where they’re needed most.
Instead of manually reviewing orders, deadlines, and staff availability, the Intra-Day AI Agent analyzes your dashboard data for you and provides clear, simple recommendations.
How Does it Work?#
You can get to the Intra-Day tab from the Rebus AI panel. From here, you can configure your own Intra-Day Policies, which tell the agent how to analyze a dashboard’s data.
You can ask questions pertaining to 3 main subjects:
“Which orders are behind schedule?”#
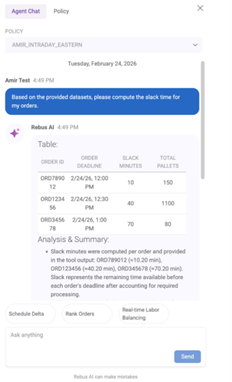
The system calculates how much “slack time” each order has, meaning whether it’s ahead of schedule or falling behind. You’ll see results like: “Order 200 is 50 minutes behind schedule and needs attention.”
“What are my most critical orders right now?”#
The system can automatically prioritize orders based on slack time and optional weighting that you can configure. You’ll see results like: “Order 200 is the most critical due to negative slack and an approaching cutoff.”
“Should I move anyone to a different order?”#
If an order is falling behind, the assistant can suggest moving an available associate to help. You’ll see results like: “Move John Smith to Order 200 since it is most critical and John Smith is available.”
The assistant will review your data and respond with an clear explanation and recommendation, and a table showing the details behind the recommendation.
Policies#
A policy is a configuration that defines how the Intra-day Agent analyzes warehouse operations. Policies are associated to your account and to the dashboard where they are created.
The Agent relies on two types of widgets: The Outbound Widget and the Active Associates Widget, which provide data on warehouse order progress and warehouse workers’ current assignments respectively. These widgets only need to be set as Active in Widget Builder and do not need to be present on your dashboard.
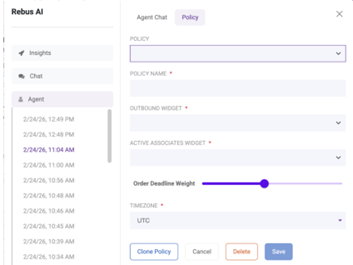
Within the policy, you can also define Order Deadline Weight, which tells the Intra-day Agent how important the order deadline should be when evaluating which orders need attention first. It works on a scale from 1-10, with 10 representing the highest level of importance.
Getting Started#
Create at least 2 widgets (Outbound and Active Associates) and add them to your dashboard. Only these two widgets are supported for the Intra-Day AI Agent, and they must contain the required fields listed below.
Required Fields for Outbound Widget#
ORDER_ID – Identifier for the order
ORDER_DEADLINE – Cut-off time for completion
PALLET_TMU – Time standard per pallet
PALLETS_PICKED – Number of pallets already picked
TOTAL_PALLETS – Total pallets required
CASE_TMU – Time standard per case
CASES_PICKED – Cases already picked
TOTAL_CASES – Total cases required
Required Fields for Active Associates Widget#
ASSOCIATE_ID – Identifier for an Associate
SHIFT_START – Start date of the associate’s work
SHIFT_END – End date of the associate’s work
CURRENT_ACTIVITY – Current activity of the associate
LAST_SWITCH_TIME – The time when the associate started working on the current order
AVAILABILITY – A flag indicating whether the associate is available
ASSIGNED_ORDER_ID – Current order identifier which the associate is working on
LAST_ACTIVITY_TIME – Last time the associate logged an activity
Click the Rebus AI button in the bottom-right corner while on your dashboard. Navigate to the Agent tab.
Go to Policy and select Create New Policy. A policy is a configuration that defines how the Intraday Agent analyzes warehouse operations, and it relies on the data from your Outbound and Active Associates widgets. Fill out the form and select your pre-configured widgets. Save the policy.
Navigate to the Agent Chat, select the policy you want to use, and run a prompt. You can choose between a custom prompt or one of our preset options. You prompt must relate to one of the following subjects:
Order scheduling
Ranking order urgency
Moving around associates
5. The AI Agent will produce a data table that includes data relevant to your prompt, as well as an explanation of that data. You can create multiple policies, clone existing policies, and continue conversations from previous sessions.
AI Panel Improvements#
Viewing Chat History and Giving Feedback#
Rebus AI has three updates that make it easier to use and send your feedback to the AI service. You can now view your chat history, use chat suggestions for queries, and submit feedback on responses directly in the chat.
Chat History#
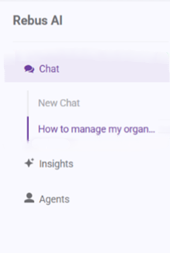
You can now view a history of your past Chatbot conversations. Previously submitted queries are stored and displayed in a historical list under the Chat tab. Clicking a history item will automatically resend that question to the chatbot.
Chat Suggestions#
The chat interface now includes predefined suggestions in the empty state. A new “Suggestions” section provides quick start prompts like:
How do I manage my organization details?
Give me best practices for widget building.
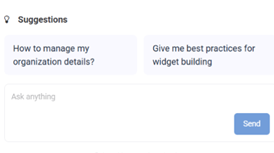
Selecting a suggestion automatically sends it as a query.
User Feedback#
You can now submit feedback directly to the AI service. Feedback is captured and used to improve responses over time. To submit feedback, either mark a thumbs up or thumbs down on the Rebus AI response in your chat.
Dashboard and Widget Improvements#
Filtering Widget Data Based on Near Past or Near Future Time Ranges#
You can now filter by “Last X Hours” and “Next X Hours” on Dashboards, Favorites and in Widget Builder.
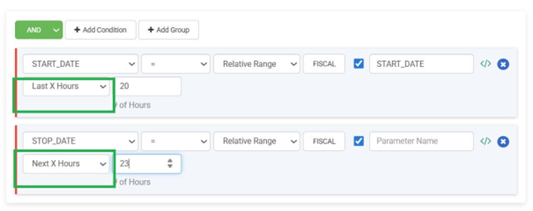
The new filters let you choose a moving time window based on the current time instead of picking exact timestamps. When you select something like “Last 2 hours” or “Next 1 hour,” the system automatically calculates the start and end times relative to the moment you’re viewing the data. As time passes, that window updates on its own, so you’re always looking at the most recent or upcoming period without having to adjust anything. Previously, no relative hour-based filtering existed in these areas.
Resetting Dashboard Layouts in Dashboard Publisher#
All users can now reset their published dashboard layouts without requiring additional publisher roles or permissions. You can reset your dashboard layout to its last published state by clicking the Reset Layout button at the top of your dashboard. This will undo all unsaved changes. Previously, you could not use the Reset Layout function on shared dashboards unless you had been assigned the Dashboard Publisher role.
Labor Module - Improvements#
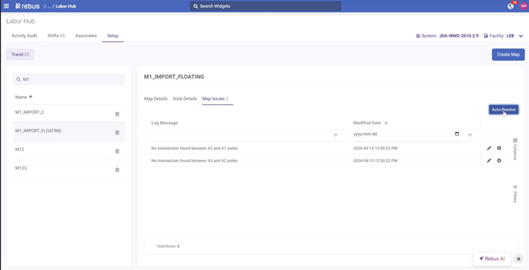
Travel Distance Screen Now Part of Labor Hub#
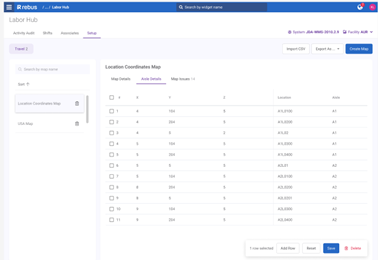
The Travel Distance screen is now part of the Labor Hub and is available under the Setup tab as Travel. The new screen has the same functionalities as the old Travel Distance Configuration screen, including Map Details, Aisle Details, and Map Issues tabs.
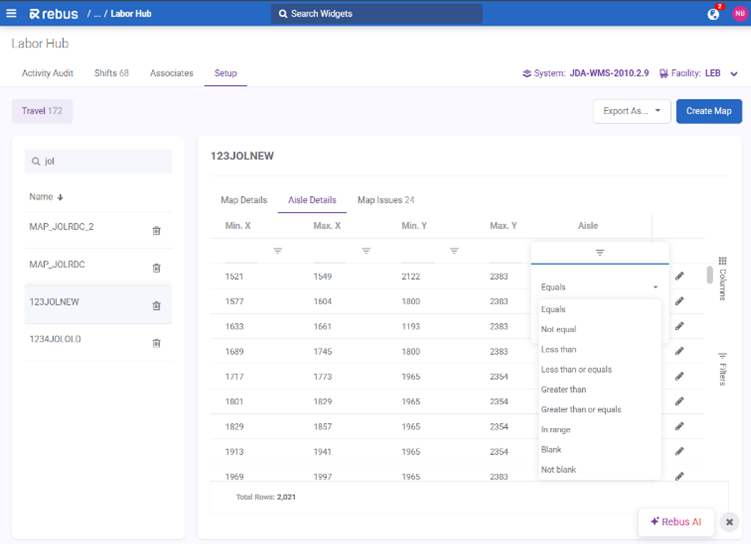
You can search and sort your existing maps on the lefthand side of the screen. Options to import/export to CSV is available at the top of each tab. You can filter by column on each screen.
Map Details Tab#
When you click Create New Map, a central interface opens where you can add entries manually. You can also upload entries in bulk via a CSV file from the top right of the Travel screen.
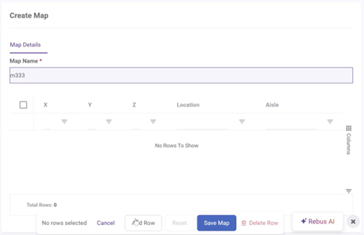
You can access the edit mode for updating map aisle details via a floating toolbar at the bottom right side of the screen, which includes options to add rows, delete rows, save, cancel, and reset.

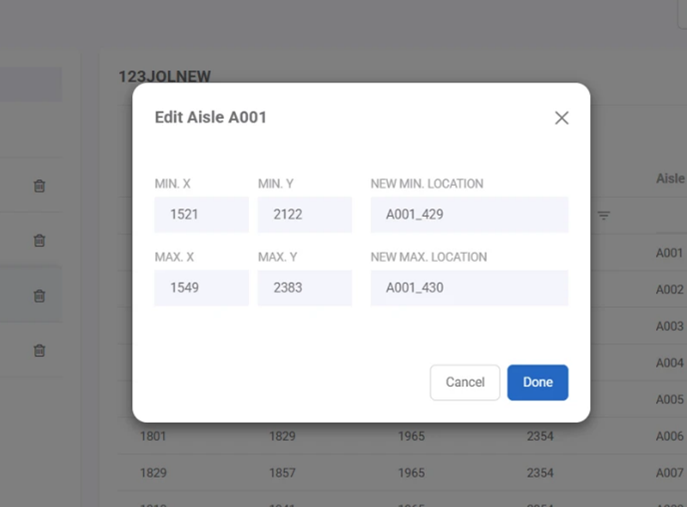
Aisle Details Tab#
In the Aisle Details tab, you can see the Min/Max of both the X and Y coordinates of each aisle.
When you edit Aisle details using the icon on the right of each aisle, the Min and Max values in the popup text box are prefilled. Previously, they were displayed as labels at the top in the old screen.
Map Issues Tab#
If a map has issues that need to be resolved, you will see a number next to the Map Issues tab title. You can automatically resolve map issues using the Auto-Resolve button on the right hand side of the screen. The feature works the same as on the old screen by creating a new aisle that connects the source and destination aisles.
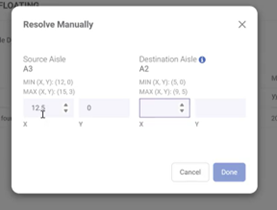
You can also resolve issues manually. Click in the edit icon and fill in the aisle details in the popup.
Bug Fixes#
Labor Hub - Associates - Importing existing associates resets data and removes scheduled shifts when Shift is set to “Not Available”.
Labor Hub - Associates are not sorted correctly by Associate ID in card views under Shifts, Groups, and Teams.
Shifts: Associates with Alternate shifts cannot be changed to another shift.
Shifts: Sunday is not auto-populated in the days of week input.
Work Day toggle causes infinite loading on superwidgets.
Activity Audit > Errors - Unable to add associate if ID already exists in tenant’s other system.