Labor Admin - Adjustments#
Adjusting Activities#
If you need to make changes to the activities of a user or multiple users for things like:
Sick days and vacation,
Impromptu meetings,
User forgetting to log sign-on and sign-off activities,
User being interrupted and having to go tend to something else like helping a co-worker or dealing with a safety issue,
User performing an activity that wasn’t recorded, but should have been,
User working through his or her break,
You can make an activity adjustment in the Labor Hub’s Activity Audit History tab.
Adjustments are usually made to past activities. If the Allow Adjustment Future Dates flag has been toggled to ‘Yes’ on the Organization Admin screen, Rebus will process future-dated activity adjustments. Rebus considers an activity adjustment to be future-dated if its stop time is after the current time minus thirty minutes.
Note
 To avoid creating conflicts in a user’s schedule, don’t enter future-dated activity adjustment for activities that the affected user is currently doing.
There are 7 adjusting techniques that you can use:
Technique |
Description |
Example |
Link to More Info |
|---|---|---|---|
Create a New Activity |
Inserts a new activity into an empty time slot. |
A user forgot to sign off and a sign off activity needs to be inserted. |
|
Create a Mass Adjustment |
Inserts a new sign-on activity, sign-off activity, and a non-essential activity into an existing activity for a group of users. |
There was an impromptu staff meeting and an activity needs to be inserted into the schedules of all the attendees. |
Inserting Activity Adjustments into Existing Activities (Mass Adjustment) |
Insert various activities for one or many labor associates |
Inserts direct and indirect activities into an empty time slot or an existing activity for a group of users. |
Indirect activities logged on paper by a group of labor associates must be inserted for that group. |
|
Edit the quantity of an activity |
You need to adjust the quantity of items (e.g., pallets, cases, lines) associated with the activity. |
A labor associate mistakenly entered incorrect quantities. |
a_activity_edit_qty |
Edit an Activity |
You need to adjust an activity’s time. |
Due to user error, an activity has mistakenly been recorded as going on all night and must be adjusted or you need to create an empty time slot into which you can insert a new activity. |
|
Add a maximum duration between activities |
Prevents the employee’s first activity of the day to attach itself to the previous day’s last activity due to a forgotten sign-off. |
Provided in Adding a Maximum Duration |
|
User Logs an Activity |
A labor associate needs to start recording an essential or non-essential activity for himself or herself. |
The user doesn’t have an RF machine to log activities and needs to have an activity logged directly in Rebus (e.g., sign-on or sign-off) tracked. |
|
Change an activity’s activity type |
Corrects activities created through the Activity Log In screen and the Activity Adjustment Admin screen with the wrong activity type. The total goal time will be updated based on the correct activity. |
A ‘pallet picking’ activity has been logged as the incorrect activity, rather than the ‘case picking’ activity. As a result, labor associates are given time to pick pallets rather than cases. |
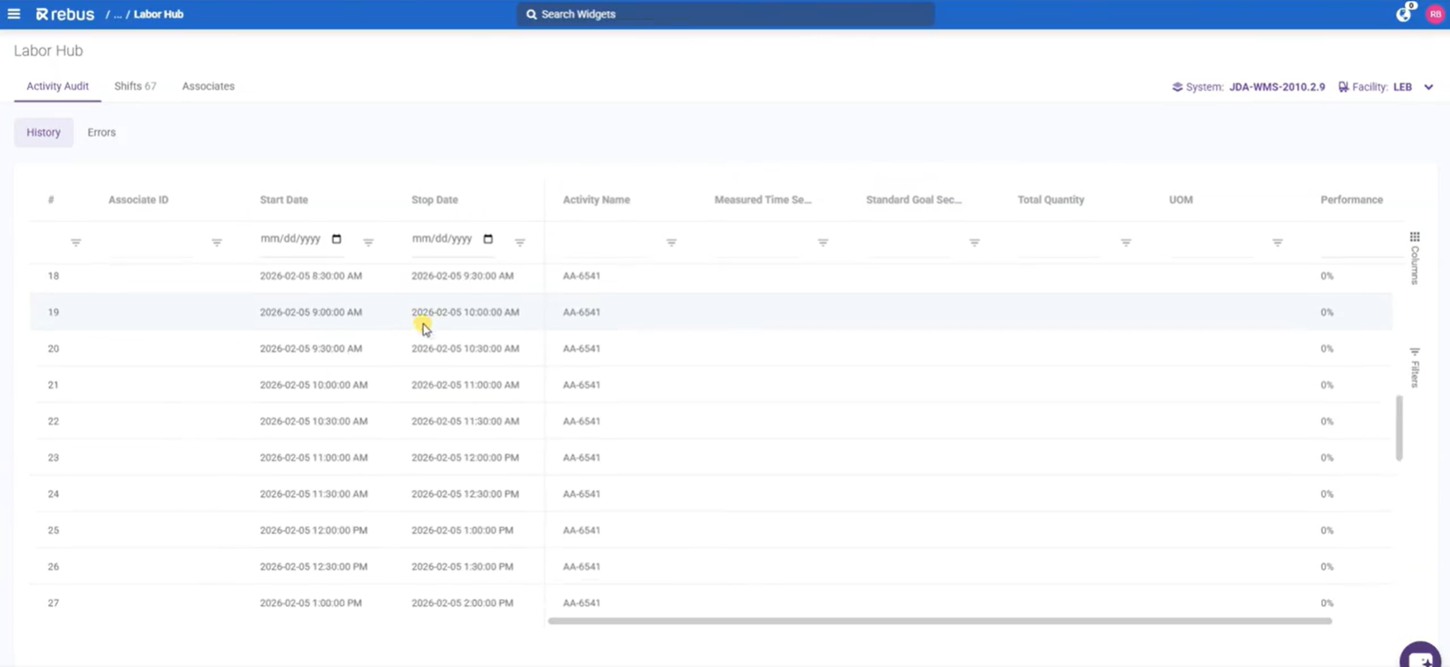
Searching Activities#
The default grid on the History screen displays 10 columns by default. You can show or hide columns with the Column sidebar.
Related activities are grouped by Associate ID.
There are column filters added directly to the grid for fast filtering, and you can filter by Shift, Associate, and Supervisor using the dropdowns on the top left of the screen.
You can search by grouping at the top right of the screen. When you type into the search bar, the data in the grid filters in real-time.
Editing Activities#
Inline editing lets you edit fields directly in the table on the History screen of the Labor Hub.
Note
Rebus does not consider break thresholds when adjusting the start and end times of an adjusted activity.
To edit an Activity:
Go to Admin Tools -> Labor -> Labor Hub -> Activity Audit -> History and search for the activity whose time you want to edit.
Click the checkbox at the far left of the row you want to edit. The row highlights and the status bar at the bottom of the screen confirms “1 event selected.”
The grid has several columns, and you may have to scroll horizontally to find the field you need. For example, scroll right to reach Activity Name, Quantity, Adjusted Time, or Adjustment Note. Use the Columns button on the far right of the grid to show or hide columns and reduce scrolling.
Make your desired adjustments:
Field |
What You Enter… |
|---|---|
Activity Name, if necessary |
Click the Activity Name cell of the selected row. A dropdown appears. Select the correct activity type from the list. |
Start Date or Stop Date |
Click inside the Start Date or Stop Date cell. A date/time picker opens showing a calendar on the left and an analog clock dial on the right. Click the desired date on the calendar, then adjust the hour and minute fields below the clock using the up/down arrows or by typing directly. Select AM or PM, then click OK to confirm. An error icon appears if the value is invalid (e.g., start after stop). Click Today at the bottom-left of the date picker to jump to today’s date quickly. |
Adjusted Time (Paid / Unpaid) |
Click the Adjusted Time (Paid) or Adjusted Time (Unpaid) cell. Type a value or use the up/down arrows. Negative values reduce time; positive values add time. The unit is minutes. |
Adjustment Note |
Click the Adjustment Note cell. A dropdown appears. Select the appropriate reason code for the time adjustment. |
Save or discard your changes. When you finish editing, use the action bar at the bottom of the screen. Click Save to commit all changes to the selected row, or Reset to discard and revert to the original values. You can also click Delete from this bar to remove the activity record entirely.
Note
Only one row can be inline edited at a time. If you need to update the same fields across many associates simultaneously, use the Mass Adjustment feature instead.
Creating New Activities#
This procedure goes over how to create an activity and insert it into an empty time slot in a user’s schedule. This can be done for either non-essential or essential activities.
Pre-requisite#
Before creating an activity, know the following:
The labor associates whose schedules you’ll be adding the activity to.
When you plan to insert the activity on the schedules of the affected labor associates. An activity should be inserted into a time slot that’s empty on each affected labor associate’s schedule. This reduces the chances of getting any errors due to overlapping activities.
Points for Adding Sign-On and Sign-Off activities#
If you’re inserting both a Sign-On and its Sign-Off for a user who forgot to log them, insert today’s Sign-On before you insert yesterday’s Sign-Off. This allows the system to correctly adjust the activities.
If you’re inserting a Sign-On, run a search for the last activity logged by the user on the working day before the day into which you’ll be inserting the Sign-On. Select that activity and then create the adjustment.
If you’re inserting a Sign-Off, run a search for the last activity logged by the user on the working day into which you’ll be inserting the adjustment. Select that activity and then create the adjustment.
Steps#
Go to Admin Tools -> Labor -> Labor Hub -> Activity Audit -> History. Select your system and facility.
Click ‘+New’ to access the New Event popout tab.
Enter the details of the new activity:
Field |
What You Enter… |
|---|---|
Associate Group |
The User Group the user whose schedule needs to be adjustment. As a result, the list of ‘User IDs’ is filtered according to the selected User Group. |
Shift |
The shift the user is assigned to in the Shift Admin screen. As a result, the list of ‘User IDs’ is filtered according to the selected Assigned Shift. |
Associates |
From the list of this facility’s labor associates, select the user(s) IDs whose schedules will have this activity adjustment inserted into their schedules. The users are listed in alphabetical order. |
Activity Name |
Activity type of the inserted activity. |
The Steps table opens for input.
Populate the fields of Step 1 and Step 2 (if applicable). If you selected a two-step activity type (e.g., Sign-On, Sign-Off), then two steps will appear.
Field |
What You Enter… |
|---|---|
Start Date and Stop Date |
Set the duration of the activity through the Start and Stop time fields of the activity’s step. Rebus populates default values: Step 1’s start time is populated with the stop time of the selected activity and Step 1’s stop time is one second later. If a Step 2 was created, its start time will be the same as Step 1’s stop time. Make sure that Step 2’s stop time is later than its start time. |
Quantity |
The quantity of items (e.g., pallets, lines) associated with this step. This is a required field. For non-essential activities or Sign-Ons and Sign-Offs, leave the ‘1’ automatically entered. |
Adjusted (Paid) and Adjusted (Unpaid) |
The number of seconds in this step that you want to count as paid or unpaid. The ‘-/+’ checkbox is selected by default to automatically convert entered numbers to negative ones. To enter positive numbers, clear the ‘-/+’ checkbox. These fields are not available for sign-on activities. |
Adjustment Note |
Note about why this activity was inserted; it’s mandatory only if ‘Adjusted (Paid)’ or ‘Adjusted (Unpaid)’ are populated with a number other than 0. |
Click ‘Save’. A confirmation message lets you know whether the activity was successfully inserted into the schedules of all selected users at the specified date and time.
Inserting Activity Adjustments into Existing Activities (Mass Adjustment)#
Note
Rebus does not consider break thresholds when adjusting the start and end times of an adjusted activity.
You can insert emergency or unexpected activities into an ongoing activity and have start and end times updated automatically. This lets you make adjustments that account for unexpected interruptions (e.g., fire alarms, impromptu meetings) to ongoing activities.
You can also do this for a sign-on and a sign-off activity.
Adding this kind of adjustment is a lot like adding a new activity adjustment.
Pre-requisite#
Before creating a mass activity adjustment, know the following:
Into which activity on which day you want to add a new activity.
The labor associates whose schedules you’ll be adding the activity to.
Note
When you create a mass adjustment in an activity on the Activity Adjustment screen, any resulting time gap is filled by adjusting subsequent transactions automatically.
Steps#
Go to Admin Tools -> Labor -> Labor Hub -> Activity Audit -> History. Select your system and facility.
Click ‘+New’ to access the New Event popout tab.
Enter the details of the new activity:
Field |
What You Enter… |
|---|---|
Associate Group |
The User Group the user whose schedule needs to be adjustment. As a result, the list of ‘User IDs’ is filtered according to the selected User Group. |
Shift |
The shift the user is assigned to in the Shift Admin screen. As a result, the list of ‘User IDs’ is filtered according to the selected Assigned Shift. |
Associates |
From the list of this facility’s labor associates, select the user(s) IDs whose schedules will have this activity adjustment inserted into their schedules. The users are listed in alphabetical order. |
Activity Name |
Activity type of the inserted activity. |
Click ‘Save’. A confirmation message lets you know whether the activity was successfully inserted into the schedules of all selected users at the specified date and time.
If you re-populate the Activity Adjustment screen with the same set of activities, you will see that the original activity has been split into two separate activities and the added activity is sandwiched between them.
Importing Activities Through the History Screen#
Through the History Tab on the Activity Audit screen, you can insert various activities for one or many labor associates with a single CSV file import.
Constraints#
You can import activities of only one system and facility at a time.
The CSV file import only inserts activities: it does not update them.
Steps#
Create a CSV file that contains the indirect activities’ information. See the table below for a description of each column name.
Note
The downloadable CSV example file contains all AUX field columns (i.e., from AUX1 to AUX25). You can remove the AUX columns that you won’t use in this import.
Note
The default date format in csv type files cannot be processed by Rebus labor module. You must use the YYYY-MM-DD HH:MM:SS format.
Column Name |
Required |
Description |
Accepted Value Format |
|---|---|---|---|
userid |
Yes |
The Labor Associate ID entered in Rebus. |
Any characters or spaces. |
activity |
Yes |
The Activity Name entered in the corresponding Activity Type’s configuration screen. |
Any characters or spaces. |
stepsequence |
Yes |
The activity’s step number. Enter 0 to indicate its first step, and 1 to indicate its second step. |
0 = first step 1 = second step |
step |
Yes |
The Step Name entered in the Step Details tab of the corresponding Activity Type. |
Any character and/or spaces. |
quantity |
Yes |
The quantity processed during the activity. |
Greater than or equal to 1. Note: If the activity is non-essential, enter 1. |
uom |
Yes if the activity is essential (i.e., essentialFlg = 1). No if the activity is non-essential (i.e., essentialFlg = 0 |
The unit of measurement (e.g., CASE, EACH, LINE, PALLET). For SIGN-ON and SIGN-OFF activities, enter ‘SIGN-ON’ and ‘SIGN-OFF’ respectively. |
Any characters or spaces. |
activityDate |
Yes |
Date and time of the activity. Must be in UTC. |
YYYY-MM-DD HH:MM:SS |
essentialFlag |
Yes |
Whether the activity is essential. |
0 = non-essential. 1 = essential |
grouping |
No |
For an essential activity: the transaction ID number assigned to the WMS transaction that’s associated with the activity you want to insert. For a non-essential activity: it’s recommended to leave it blank. Note: If ‘grouping’ is left blank, Rebus will populate a value for you, with the prefix ‘TRAN-CSV’. |
Any characters or spaces. |
activityGroup |
No |
The Activity Group Name selected in the corresponding Activity Type’s configuration screen. |
Any characters or spaces. |
sourceLocation |
No |
The location from which the labor associate travelled to complete the activity. Enter the location’s identifiable attribute value. |
Any characters or spaces. |
destinationLocation |
No |
The location to which the labor associate travelled to complete the activity. Enter the location’s identifiable attribute value. |
Any characters or spaces. |
AUX fields (AUX1 to AUX25) |
No |
AUX field’s value. |
Any characters or spaces. |
From the Rebus menu, go to Admin Tools -> Labor -> Labor Hub -> Activity Audit -> History.
Select the System and Facility ID.
Click ‘Import CSV’.
Upload the CSV file that contains the activities’ information.
Result#
After a moment, you will be able to see these activities in the Activity Adjustment Admin screen.
Adding a Maximum Duration#
A maximum duration is the amount of time between both stop times of a previous transaction and its subsequent one. If this duration is exceeded and the sign-off activity is missing, the start time of the first activity of the day is recorded the same as its stop time.
To set up the desired value for the maximum duration, please contact the Rebus Support team.
Here’s an example of how Rebus processes the maximum duration:
Sequence |
Rebus Processing Notes |
|---|---|
1 |
The PUT AWAY activity’s stop time is: 03/21/2022 at 5 PM |
2 |
An employeee forgets to sign-off. |
3 |
The next day’s first activity is PICKING and its stop time is:
Maximum duration = 12 hours |
4 |
The PICKING activity’s start time is recorded the same as its stop time: 03/22/2022 at 8 AM |
Note
Once the missing sign-on and sign-off activities are inserted, you can adjust the activity’s start time if needed. For more information, see Editing Activities.
Logging Activities#
This procedure goes over how a single labor associate can log an activity for himself or herself through the Activity Log In screen.
Prerequisites#
To allow labor associatess to log essential activities into the Associate Portal, ensure that the ‘Kiosk’ toggle is turned on in the respective Activity Type. For more information, see step 3 of Setup Procedure 6 of 7: Setting up Activity Types for Imported Transactions.
Note
Labor associates can log an essential activity if it has one-step.
Steps#
Go to Admin Tools -> Associate Portal.
In the bottom right corner of the screen, enter the system and facility details:
Field |
What You Enter… |
|---|---|
System |
Originating system. |
Facility ID |
The ID of the facility of the labor associate. |
Under ‘Associate ID’, enter either the Labor Associate ID or the Alternate User ID.
Under the Shift toggle, select Start. You are signed on to your shift.
At the end of your shift, enter your Associate ID.
Select an activity from the Activity Dropdown. Click the Stop button, and enter the quantity of the activity completed. Non-essential, Essential with Kiosk Toggle On and Unmeasured activities don’t have an Enter Quantity field.
In the Additional Details section, enter or edit AUX field values.
Click next, then click confirm. Your activity will show as logged successfully.
Changing Activity Type of Activity Adjustment#
You can correct activities created through the Activity Log In screen and the Activity Adjustment Admin screen with the wrong activity type. The total goal time will be updated based on the correct activity.
Note
An activity cannot be changed to a Sign-On or Sign-Off activity.
Data Updates#
This section goes over background information about what and how data is updated in the Activity Adjustment Admin screen after changing an activity. When an activity is changed to another activity type, the following data is updated or recalculated:
Activity ID
Activity Name
Description
Step
UOM
Fatigue Seconds
Standard Goal Seconds
Standard Seconds
The table below shows the result of changing a one-step activity to a two-step activity and vice-versa:
Type of Change |
Result |
|---|---|
One-step activity changed to a two-step activity |
A second activity record will be added with the same grouping as the initial activity, and a quantity of 0. |
Two-step activity changed to a one-step activity |
One activity record from the same grouping is deleted. |
Steps#
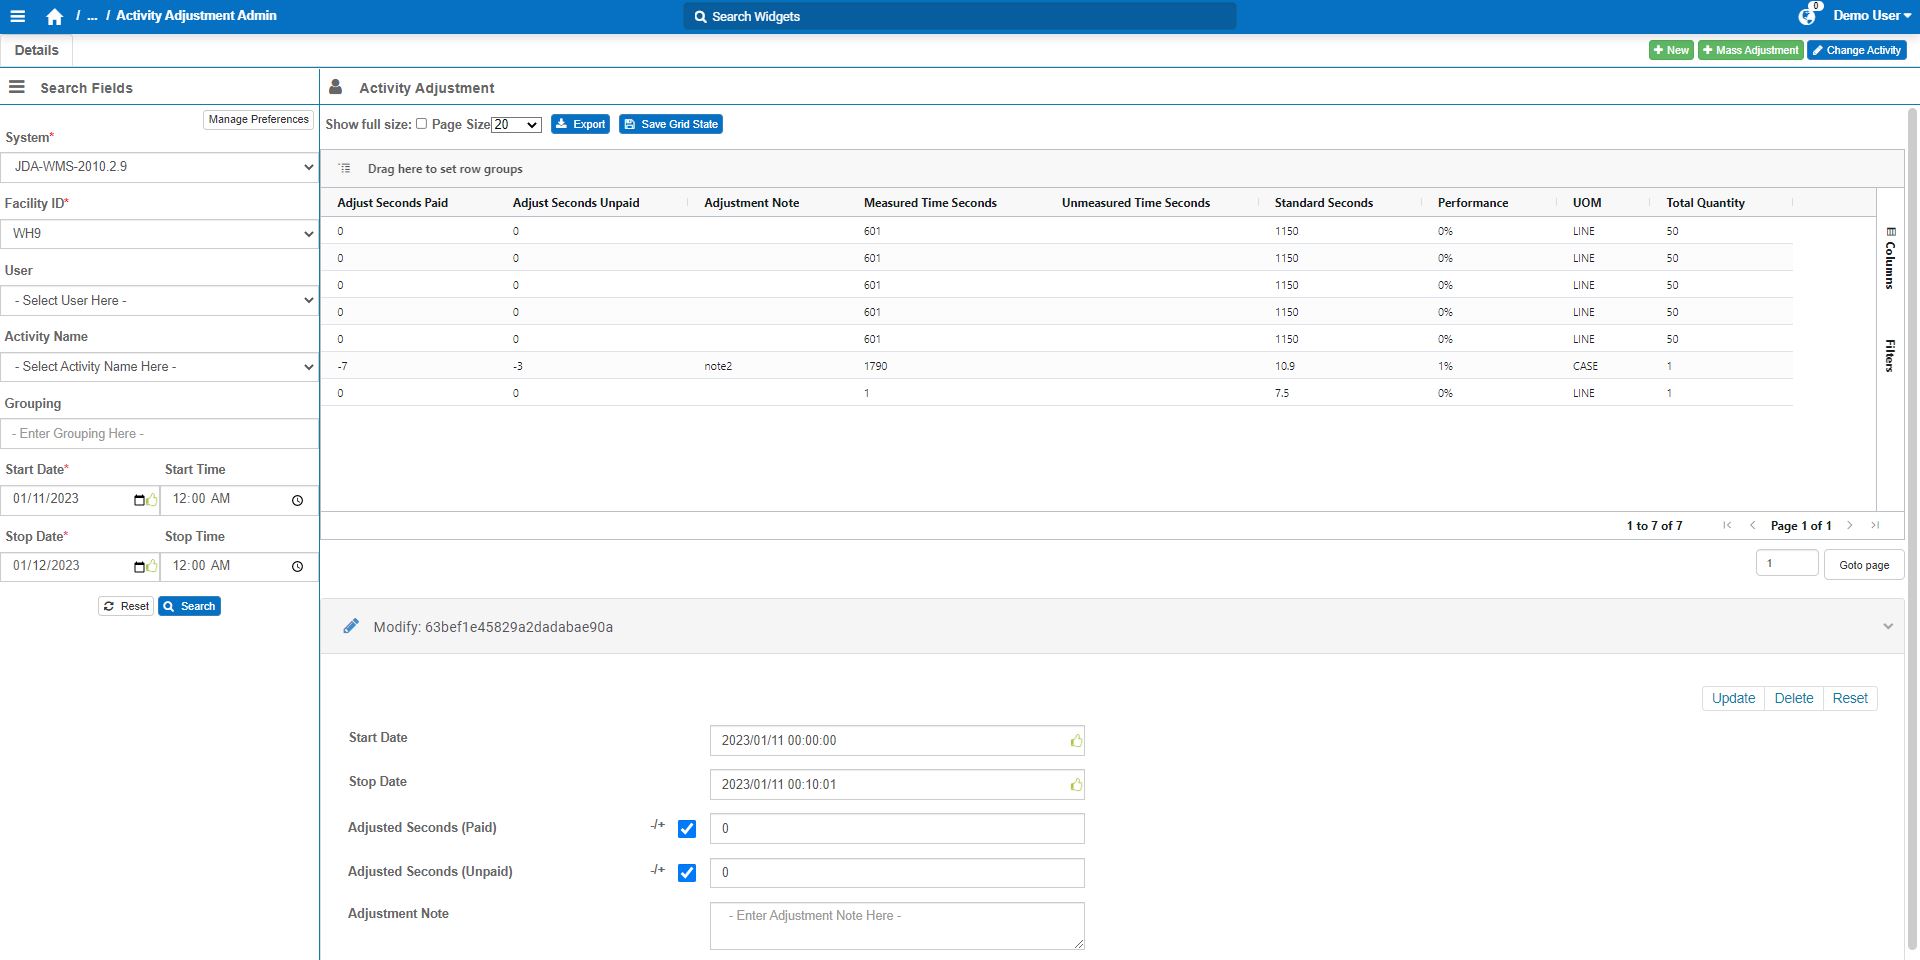
From the Rebus menu, go to Admin Tools > Labor > Activity Adjustment Admin.
Run a search for the activity type whose activity records you want to change the activity.
Do one of the following:
Select an activity and click ‘Change Activity’. The Change Activity form appears and displays only the selected activity grouped by Grouping.
Click ‘Change Activity’. The Change Activity form appears with the complete list of activities grouped by Grouping.
Select the activity record(s) whose activity you want to change.
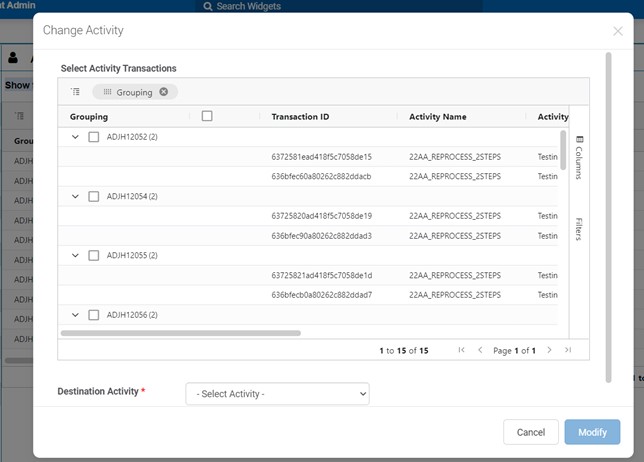
Next to ‘Destination Activity’, select the correct activity that you want to change the records to.
Click ‘Done’.
Result#
The selected activity records now have the new and correct activity recorded with the respective updated data.