Release 50.0 Notes 08 February 2026#
Summary#
In this release, we’ve developed the following new features and improvements:
You can now add a customizable adjustment period for new associates in Rebus using Labor Learning Curve. With this adjustment in place, performance is measured against custom expectations instead of your regular standard.
The Hire Date field is now required for all labor associate records.
The Transaction Error Review screen is now called the Activity Audit screen and is located as a tab in the Labor Hub. This makes it easier to access and features multiple updates that make the screen more convenient to navigate.
Shift editing is now easier and Alternate Shift rules are now automatically enforced to preserve consistency.
You can now scan QR codes generated for the Employee Portal mobile app with RF devices.
On the API Ingestion page, you can now deactivate an API Ingestion flow and turn it back on later directly from Rebus.
You can now set up API users that have IP addresses in the IPv4 format.
You can now define “Today” and “Yesterday” using a custom 24-hour window instead of the standard midnight-to-midnight range.
Labor Module - New Feature#
Adjusting Goals for New Associates#
You can now add a customizable adjustment period for new associates in Rebus using Labor Learning Curve. With this adjustment in place, performance is measured against custom expectations instead of your regular standard. This means:
Fairer performance evaluation for new hires during training,
Improved reporting accuracy by reflecting training periods in Labor metrics,
Clear learning curve visibility for supervisors, and
Automatic application of adjusted expectations with no manual intervention needed.
You can access the Labor Learning Curve tab on the Activity Configuration Screen after selecting an activity. Rules are configured per activity.

Learning Curve timelines are calculated based on number of days from Hire Date. Users can configure 1 to 3 phases per Activity. Each phase applies an adjustment (+X% of goal value) to expectations. Phases are standardized and named:
Phase 1
Phase 2
Phase 3
If the standard goal for an activity is 50 goal seconds per activity, a new hire in Phase 1 might have an adjusted expectation of +20% of the goal value, meaning they are measured against 60 goal seconds per activity instead of the full standard. As the associate progresses into Phase 2 and Phase 3, expectations automatically increase until they align with the regular goal.
Labor Module Improvements#
Hire Date a required field on Labor Hub screen#
The Hire Date field is now required for all labor associates. Previously, you could leave this field blank. This is now required when you:
Create a new Associate,
Import Associates via CSV,
Create an Associate through Associate Portal / Activity Login,
Modify an existing labor user if their Hire Date was previously blank.
Existing labor associates who currently have no Hire Date are not automatically updated. Instead, if you edit an associate and his or her Hire Date field is empty, the system will prompt you to enter a Hire Date before you can save changes.
Easier to Review Errors in New Screen#
The Transaction Error Review screen is now called the Activity Audit screen and is located as a tab in the Labor Hub. This makes it easier to access and features multiple updates that make the screen more convenient to navigate.
In the new update, you can now:
View Quarantined and Incomplete transactions together in a single grid.
Resolve both Quarantined and Incomplete transactions using a single Resolve button.
Filter transactions by Activity Group or Associate.

Search transactions by Error Message or Grouping.

Use the new Days to Archive column to see how long errors will remain on screen before being automatically purged.
Reset the grid back to the default layout using the Reset Grid button.
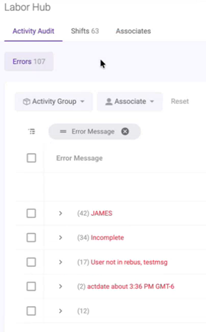
The new screen can be found in the Labor Hub, under the Activity Audit tab. The Errors grid also displays a total count of unresolved errors in the title.

The grid combines both Quarantine and Incomplete records into one view. The default grid includes the same columns as the previous page, plus a new checkbox selection column and a new Days to Archive.
Days to Archive#
The Days to Archive column shows how many days remain before the error is purged from the grid. The countdown is based on the activity timestamp in UTC:
Errors countdown begins at 10 days
Incompletes countdown begins at 5 days
Grouping#
You can now group errors directly within the grid to make large lists easier to review:
Group Errors by Error Message to quickly see all transactions with the same issue together,
Group by Activity Group or Associate to organize errors by people involved,
Select the checkbox next to the grouped items to select multiple items at once.
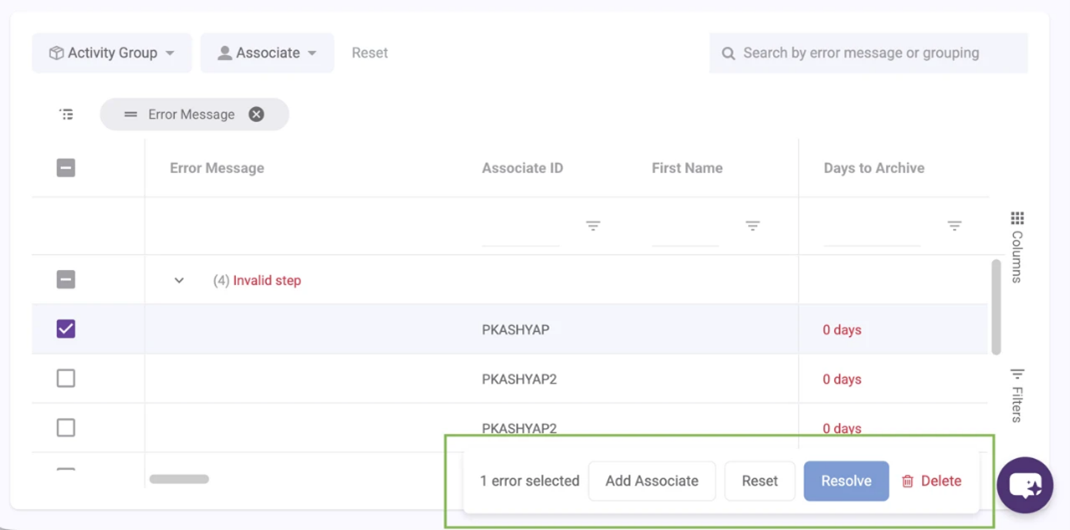
Action Bar#
The Action Bar at the bottom of the screen lets you add an associate and reset, resolve, or delete transactions once you select an error.
Resolving Errors#
Select one or more errors from the grid.
Click Resolve in the floating action bar.
The selected errors are submitted for resolution immediately (no confirmation dialog).
The grid refreshes and resolved errors no longer appear.
A success message appears: “1 error resolved” or “X errors resolved.”
In cases where only some errors can be resolved the system shows an error dialog for the failed errors.
Deleting Errors#
Select one or more errors from the grid.
Click Delete in the floating action bar.
Confirm the delete action in the dialog.
Deleted errors are removed from the grid.
Resetting the Grid Layout#
Click Reset in the floating action bar.
The grid immediately returns to the default layout.
Reset clears these grid customizations:
Sorting
Filters
Column order
Column visibility
Column widths
Column pinning
Row grouping
User Interface Improvements to Shifts Screen#
There are three updates to the Shifts Screen in the Labor Hub. These changes make Shift editing easier and keep Alternate Shift rules consistent.
The Shift panel now stays open after saving. In Labor Hub > Shifts, when you create or edit a regular shift, the Shift panel now stays open after you click Save. This means you can make additional changes after you save without re-opening the panel. This does not apply to the Alternate Shifts panel.
Associates who do not have a Primary shift can no longer be added to an Alternate Shift in Labor Hub > Shifts. When you open the Associates tagbox, associates without a Primary Shift do not appear in the list. This change only affects new edits going forward and does not affect any current setups.
In Labor Hub > Associates, when you add an Alternate Shift for an associate, you can no longer pick a Shift the associate already belongs to. In Shift Plan tab > Add Alternate, the Shift dropdown does not include regular/standard Shifts the associate is already assigned to. This change only affects new edits going forward and does not affect any current setups.
Employee Portal Mobile App Improvements#
Add Barcode Scanning for User ID and Activity Selection in Employee Portal Mobile App#
Associates can now select activities in the Employee Portal mobile app by scanning a barcode or QR code. This update makes starting activities faster and easier for associates using Android RF devices on the floor. Instead of scrolling through long activity lists or navigating dropdowns, they can now select activities instantly using a scanner. You can now:
Generate both a QR code and a barcode for each activity,
Print activity barcodes or QR codes for paper-based or workstation use,
Select an activity by scanning a barcode or QR code instead of scrolling through the activity list, and
Automatically populate and set the selected activity after scanning with no manual searching required.
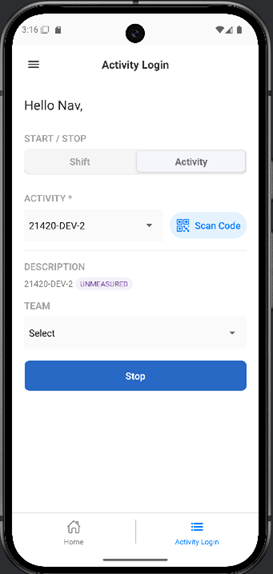
A new Scan Code button has been added to the Activity tab in the Employee Portal mobile app. Clicking the Scan Code button opens the device camera or scanner.
When an associate scans an activity barcode or QR code, the system automatically selects and populates the corresponding activity in the Activity dropdown. To set up codes for activities, navigate to the Activity Details tab on the Activity Configuration screen. A new Generate QR/Barcode button is available under Activity Codes for App once an activity has been created. This button is not visible when creating a new activity.
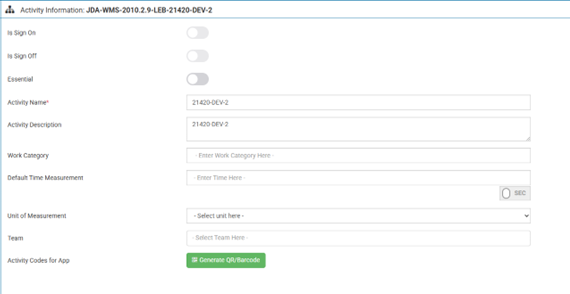
Click Generate QR/Barcode to create both a QR code and a barcode tied to the selected activity. A Print option is included so activity codes can be posted in work areas or printed for easy access.
Configuring Automatic Logging Off of Employee Portal Mobile App#
You can now configure a custom auto-logoff timer for the Employee Portal mobile app. Previously, the Employee Portal mobile app automatically logged out users after 15 minutes. This change lets you have more control over auto-logoff intervals so it better matches your operational needs.
On the Organization Admin screen under Organization Details, you can enter a value in hours between 0 and 8 (including decimals) to determine the auto-logoff time.
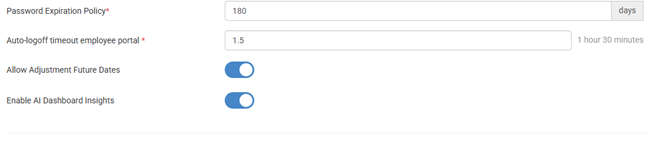
The system default is set at 0.25 hours, or 15 minutes. Set this amount to 0 to deactivate auto-logoff.
QR codes can be scanned by RF devices#
You can now scan QR codes generated for the Associate Portal mobile app with RF devices. This makes it easier to use barcodes in your facility. Previously, you could only scan QR codes with a mobile device camera.
You can generate a Facility QR that encodes Facility and System info so associates can scan it instead of typing those fields during first sign-in. Each associate can also have a personal QR that encodes their login details. Scanning auto-fills credentials.
To set up a barcode for a facility:
Go to System > Organization Admin > Facility Details.
Click on the Facility you want to create a QR code for.
Select the Mobile QR/Barcode button to set up the code.
Save and/or print this for easy scanning.
To set up a barcode for a user:
Go to Labor > Labor Hub > Associates.
Select an existing associate you want to create a code for by clicking the pencil button and inputting the pin number at the bottom.
Click the 3 dots and select ‘Mobile QR/Barcode’ to save the User’s QR code.
API Improvements#
Turn API ingestion on or off#
On the API Ingestion page, you can now deactivate an executed API Ingestion flow and restart it later directly from Rebus. This gives you more control and makes it easier to stop ingestion when there is an issue with a flow’s execution.
Previously, a running ingestion flow could sometimes get stuck. When this happened, it also prevented you from deactivating the flow from Rebus. With this update, you can reliably stop and restart services, even when a flow gets stuck.
When you click Deactivate on a flow that’s currently running, you may see a pop up letting you know that the flow is still processing, and some data may already have been added before it fully stops.
You’ll be able to confirm and proceed if you still want to deactivate it.
Organization Admin Improvements#
IPv4 ranges allowed for API Users#
On the Organization Admin screen under API Users, you can now save IP addresses starting with 100.x.x.x, with some exceptions. Previously, you could not save IP addresses in the 100.x.x.x range.
Note
 You still cannot save addresses that are in the 100.64.0.0 to 100.127.255.255 range. This is because this range is reserved for internal ISP network use and is not valid on the public internet.
This change improves flexibility in configuring API user IP restrictions while maintaining safeguards against invalid network ranges.
Custom Time Ranges for Working Day#
You can now define “Today” and “Yesterday” using a custom 24-hour window instead of the standard midnight-to-midnight range. This change lets you define your operational day start time and apply it across dashboards through global filters.
Many operation schedules don’t align with a calendar day. Now your dashboards can reflect how your operation actually runs (for example, if you have a 4:00 AM shift change).
A new field has been added in Organization Admin > Facility Details > Work Day Start Time.
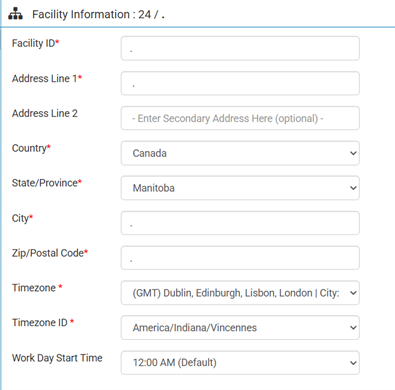
When you set a time, you define the starting hour of a 24-hour work period. If you set the start time to 2:00 AM:
Today = 2:00 AM today to 2:00 AM tomorrow
Yesterday = 2:00 AM yesterday to 2:00 AM today
A new toggle has also been added in the Dashboards Global Filters Panel under Date Filters.
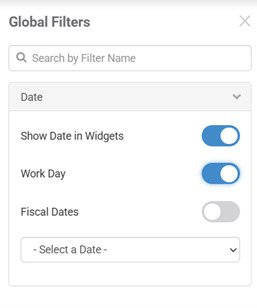
The toggle applies your facility’s configured work day start time to all date filters on the dashboard. It works with all date filter types:
Relative (Today, Yesterday, etc.)
Relative Range
Fixed date ranges
Note
Work Day and Fiscal Dates are mutually exclusive and only one can be active at a time in Global Filters. Work Day is not available in Widget Builder or individual widget date settings. It can only be enabled at the dashboard global filter level. Widgets themselves do not have independent Workday start-time behavior.
Note
If multiple facilities share the same name, the system may apply the Workday configuration from the first matching facility record it finds. To avoid conflicts, ensure facilities have unique names or consistent Workday settings across duplicates.
Bug Fixes#
Labor Activity Reprocess - Events not reprocessing based on Total Quantity multiplied by Default Time Measurement
Favorites: Grid widget scroll returns user to previous page in Favorites tab with multiple pages